Some astronomers are control freaks. It’s not enough to buy a telescope, they want to craft every part of the experience with their own hands. If you’re ready, and willing to get your hands dirty (and covered in glass dust), you can join thousands of amateur telescope makers and build your own telescope from scratch.
Why pick up a low quality, wobbly telescope from the department store when you can craft your own – just like Galileo, and all the great astronomers from history. For a minor investment, you can build a worthy telescope out of spare parts and high quality kits. Continue reading “Astronomy Cast Ep. 327: Telescope Making, Part 1: Toys and Kits”
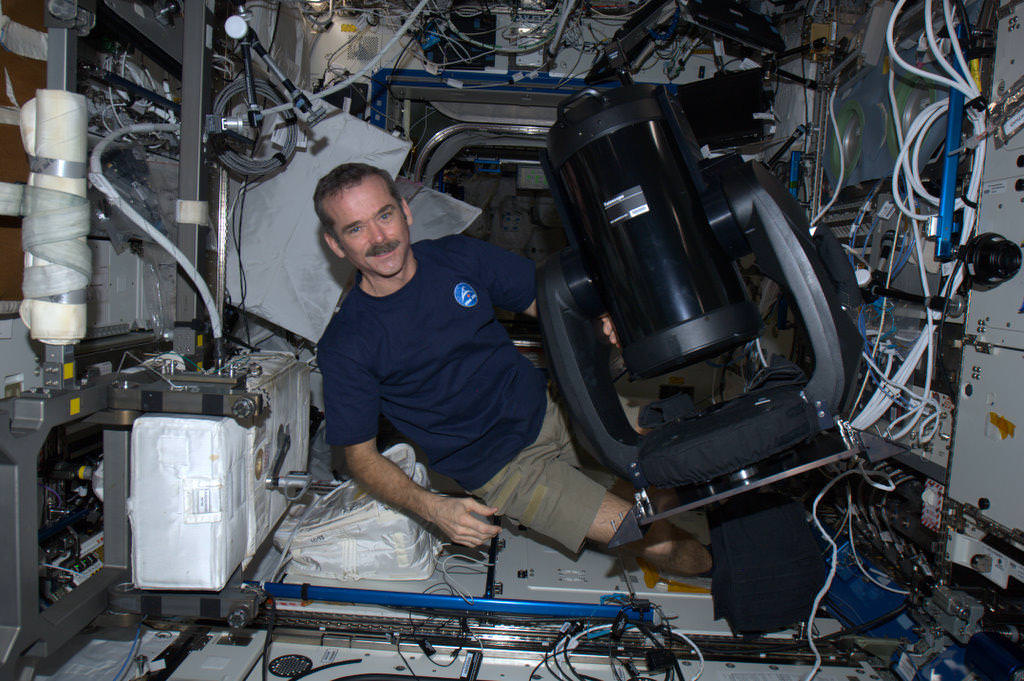
Canadian astronaut Chris Hadfield with the new ISERV (International Space Station SERVIR Environmental Research and Visualization System), a modified Celestron telescope for Earth observation. Credit: NASA/CSA
Astronauts on the International Space Station today are installing a new modified Celestron telescope. This won’t be used to observe the stars, but instead look back to Earth to acquire imagery of specific areas of the world for disaster analysis and environmental studies. Called ISERV (International Space Station SERVIR Environmental Research and Visualization System), it is a new remote-controlled imaging system.
“Essentially, it will be pointed out of one of the windows of the Space Station, and used for Earth imaging,” Andrea Tabor, social media coordinator for Celestron told Universe Today, “especially for natural disasters and to help countries that may not have their own Earth-observing satellites to help assess damage and assist with evacuations.”
ISERV will be installed in the Window Observational Research Facility (WORF) in the station’s Destiny laboratory.
The Celestron CPC 925, is a 9.25″ diffraction limited Schmidt-Cassegrain telescope and off-the-shelf sells for $2,500 including the mount, (just the 9.25 inch optical tube sells for $1,479). It was modified at the Marshall Space Flight Center.
“They used the fork mount that comes with it,” Tabor said, “but they just removed the tripod and replaced it with a specialized mount to anchor and stabilize it on the ISS.”
Because it is pointed out of a window and because the ISS is moving so fast, it would be difficult to align it with the sky and do any celestial imaging, Tabor said.
ISERV is the first of what is hoped to be a series of space station Earth-observing instruments, each to feature progressively more capable sensors to help scientists gain operational experience and expertise, as well as help design better systems in the future. Scientists envision that future sensors could be mounted on the exterior of the station for a clearer, wider view of Earth.
It arrived on the ISS in July of 2012 on board the Japanese HTV-3.
“It’s been up there sitting in a box, so today was unboxing and assembly day,” Tabor said. She added that they hope to post some of the first images from the telescope on their Twitter and Facebook pages.
The telescope will normally be operated by remote-controlled from Earth and so the astronauts won’t likely be working with it directly except for assessing its operation or troubleshooting any problems.
“Images captured from ISERV on the ISS could provide valuable information back here on Earth,” said Dan Irwin, SERVIR program director at Marshall. “We hope it will provide new data and information from space related to natural disasters, environmental crises and the increased effects of climate variability on human populations.”
First of all, I’d like to say thank you for all the feedback on the first entry from the Amateur Telescope Maker’s Journal and say “Hello! Kia ora! Namaste! Greetings and Salutations!” to all the amateur, professional and armchair astronomers who wrote from the USA, Guatemala, New Zealand, Finland, India and elsewhere. What a kick it’s been to hear from everyone, and I like to think that astronomy and watching the stars is a shared language between people from around the world.
If I have succeeded in whetting your appetite for such things and you are still interested in, or even thinking about trying to build your own telescope, you might want to read on.
Two tips to remember: “Any job worth doing is worth doing right!” No excuses! and “The longest journey begins with the first step!” Here we go!
My first step was collecting as many fasteners as I could gather. I like to repair and build things and have found that fasteners always come in handy for this or that project. Eventually the fasteners I collected became crucial in the building of my telescope! If you do decide to, or are thinking about building your own telescope, you might do some serious fastener scavenging first, or if you can afford it, go out and buy a complete set of precision stainless steel nuts and bolts. I can’t over emphasize how important this step is. Believe me, you will need them.
My favorite scavenger hunt was the result of looking in a trash bin (dumpster diving anyone?) next to a computer test equipment manufacturing company where I worked the 1980’s. During inventory the ‘powers that be’, found it actually cheaper to throw away – if you can believe it — the used and/or unsorted fasteners left over from one project or another. This was cheaper than re-sorting and re-stocking I was asked by one of the techs, if I’d be interested in collecting some of them. Of course I was! Some of those ‘slightly used’ fasteners still live in mayonnaise, peanut butter and pickle jars in my garage!
A word about scavenging, in fact, a caution: Remember to be extremely careful when handling old electronic components. For example: TV or stereo capacitors when not fully discharged present a serious shock hazard! Also, collecting components from any leaky or cracked open transformers or other components should be suspect and left alone. Got contamination? Burnt components or signs of burning are also a not good prospect. Leave it alone! Old machinery and tools found at swap meets, garage sales and recycle centers are the best resource.
Many of us amateur astronomers are on a very limited budget. We have to do the best we can to find, adapt or modify that which allows us to follow our astronomy bliss. I am not above scavenging and getting my hands dirty to do the deed!
The main mirror in a Newtonian telescope is obviously the most important single component? That is to say, aside from the eyepieces, the secondary and main mirror mount! I’ve always wanted a larger scope and was hugely excited when I heard about a 12 ½-inch mirror for sale through a friend. Buying that mirror made the rest of my project possible and the other pieces fall into place. Here, I’d like to applaud the synchronicity and blind luck!
Originally I opted to build the easiest and quickest to build mount for this telescope. That would be a ‘Dobson’ style or alt-azimuth style turntable mount. A 14 inch diameter ‘sono’ tube (a concrete pier mold) came with the mirror I bought. I experimented with this tube for a while as part of the OTA (Optical Train Assembly) but found it too heavy and clumsy to handle easily. So instead, I decided to build some sort of N/S E/W polar aligned mount. A yoke mount? A German Equatorial? or a fork mount? I had to think on that for awhile.
After buying the mirror, I found myself at a ‘point of no return’. Now was the time to consider the final design and move forward! At first, I was tempted to build a simple Dobson style mount. (John Dobson is a hero of mine!) The heavy duty ‘sono tube’ concrete pier form was originally intended as the main body of the scope. Man-O-Man, was that thing ever heavy! And kind of ugly too. The more I thought about it the more I realized it would be too heavy and probably too hard to transport. That’s when I decided to try something a little bit lighter… and maybe a little different.
I received several requests for more construction details which follow, after this progress report…
I painted the counter balance arm and counter weights with acrylic paint(s). For transporting the telescope the OTA is removed and the lead weights and steel counter balance bar removed. Handling uncoated lead or galvanized steel pipe regularly is known to be a source of heavy metal contamination. Use precautionary measures including gloves and or masks when handling or working these materials!
The most recent addition to my home-built telescope is the bright orange tennis ball at the end of the counter balance bar. I traced the end of the pipe onto the tennis ball with a pencil, then cut out the circle with an exacto knife. (CAREFULLY!) After trimming, it fit snugly in place. Next up: I will find a small battery powered red LED and mount it on the end of the tennis ball. The batteries will ‘live’ inside the removable ball. I made the plywood box to hold counter balance weights, tools, supplies and battery(s). It is also a handy ‘step up’ to the eyepiece, for shorter viewers. The top of the box I covered with a new car floor mat I found lying on the side of the road… Is that road kill?
Now, how about some more construction details:
The plant saucer I used to cover the main mirror housing has a dual function.
The circularly embossed rings in the top help align the focuser and secondary!
Now, let’s talk about some inexpensive eyepieces. Have you ever made your own? Why not?
I collected optical components from old cameras, dark room projectors, binoculars and video cameras I found along the way. Some of the optics had quite reasonable focal lengths and diameters, which made them easier to modify and turn into useful eyepieces! Inexpensive and readily available materials can be used with quite satisfactory results… that is if you aren’t a perfectionist.
Above, I show how I used old 35 mm film canisters to make eyepieces. Use an Exacto knife to cut out the bottom of plastic film containers. These containers come in several colors. I prefer the black one’s but transparent work well too! The canisters have a 1 1/4 inch outside diameter and will fit into the 1 1/4 inch eyepiece holder later.
In these views I am shown attaching a modified film canister to a ‘recycled’ 24mm video camera lens.
I wrapped the end of the film canister with black tape to make up for the difference in diameters. The modified canister then fit snugly into the end of the lens body. This handmade eyepiece has a VERY wide field yet performs fairly well! There is no color shift in the crisp, wide angle view… Yes! I like!
I did the same thing with one of the eyepieces from the Chinese binoculars I had. The 20 mm eyepiece has great eye relief! In this case, the modified film canister is super glued into place. Note: BE VERY CAREFUL when applying super glue near any optical surface! The fumes released during curing can severely damage any lens! Not that this has ever happened to me…. no……
Construction details: Continued
The leveling screws use drilled out faucet handles. I found that needed to rub some graphite onto the threads to stop them from squeaking loudly. The lag bolts pass thru clear holes in the 2 X 4’s. There are threaded inserts installed on the bottoms of the four hole locations. The faucet handles are locked in place with cap screws and nuts. The wheel axle is a solid steel rod, 3/8 inches diameter and has holes drilled thru either end for cotter pins, washers and keepers. The gap between the wheel and the modified aluminum router table is maintained with a cut piece of clear, thick walled nylon tubing.
The main mirror adjustment or collimating screws are accessed through these holes in the base of the main mirror mount.
Eventually, I will mount a cooling fan here.
Here’s how I made the secondary spider legs…
I used 2 inch long 1/4-20 bolts and cut off the heads. Then I cut a slot 1/2 way down the bolt shafts with a hand held hacksaw. I cut thin stainless steel packing straps to fit – rounded the ends – then drilled a thru hole for #00 lock nuts and screws to fasten the assembly. On the far side, there’s a SS washer and thumbscrew.
The secondary mirror housing mount was made from a 1 inch long section of 1 inch square stainless steel tubing. The stainless steel packing straps were then inserted and bent 45 degrees to fit.
How’s that for details? Of course, some ideas are not mine. I copied good ideas from elsewhere, created my own and am passing them forward to you. Does that work for you? I hope you’ve found some of this stuff useful or at least interesting? Please write and let me know? I’d appreciate it and promise to reply. I’m just a ‘lonely’ astronomer and would love to hear from you!
By the way… got any old telescope parts laying around? I’m always looking for more!
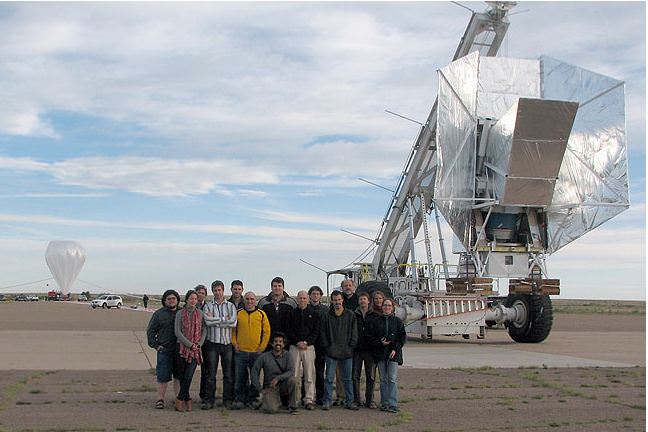
University of Minnesota faculty and students pose in front of a telescope that, for a nerve-wracking couple of days, went missing aboard a truck while it was being delivered to the NASA-run Columbia Scientific Balloon Facility in Palestine, Texas. The picture was taken in 2009 at Fort Sumner, New Mexico. (Courtesy Shaul Hanany, University of Minnesota)
[/caption]
Astronomers and students from the University of Minnesota hoping to search for radiation left over from the Big Bang instead spent the past few days looking for their telescope – a 6,000 lb (2729 kg) behemoth of a science experiment. Just how does a telescope that big go missing? You could ask the truck driver who was supposed to deliver it to a NASA facility in Palestine, Texas, but he’s not talking and police in Texas won’t press charges against him. But the good news is that the missing telescope has been found – sitting at a truck wash — after a frantic cross-country search.
The telescope is a high-tech irreplaceable piece of equipment that is 22 ft high 15 ft wide (6.5 X 4.5 meters). It is designed to detect radiation from the Big Bang and it took fifteen people 8 years to build. The telescope will be shipped to Antarctica, where it will be attached to a giant balloon in December and sent 110,000 feet (33,500 meters) into the atmosphere.
Last Friday, a Minnesota trucking company sent off one of their trucks with telescope inside. But by Monday there was no word from the trucker and the scientists started to panic when the truck didn’t show up at the NASA facility. Calls to the trucker went unanswered. The owner of the trucking company sent his son to Dallas to search for the truck and the driver. Their only clue was a credit card charge at a Dallas truck stop.
The son found the driver, asleep in the cab of the truck, but the trailer, with the precious cargo inside, was nowhere to be seen.
The driver said he left the trailer at a hotel parking lot, but when the searchers arrived, it wasn’t there. More searching, and the trucker clammed up and wouldn’t provide any more clues or reasons for why he didn’t deliver his cargo.
Finally another employee of the trucking company found the trailer sitting at a truck wash in Dallas.
“If they would not have found that particular trailer at that time, maybe half a day or a day later someone would have stolen it and taken it for metal or just for scrap,” said physics professor Shaul Hanany, the project’s lead researcher.
NASA unpacked the crate Thursday morning and said the telescope was unharmed and is in great shape.
The owner of the trucking company said sometimes they do have trouble with drivers, but he has never had anything like this happen, especially with such a unique instrument. He wondered, why couldn’t the driver be hauling a load of potato chips instead of something that will solve the mysteries of the Universe?
The driver has been fired, and the telescope will head to Antarctica as planned.
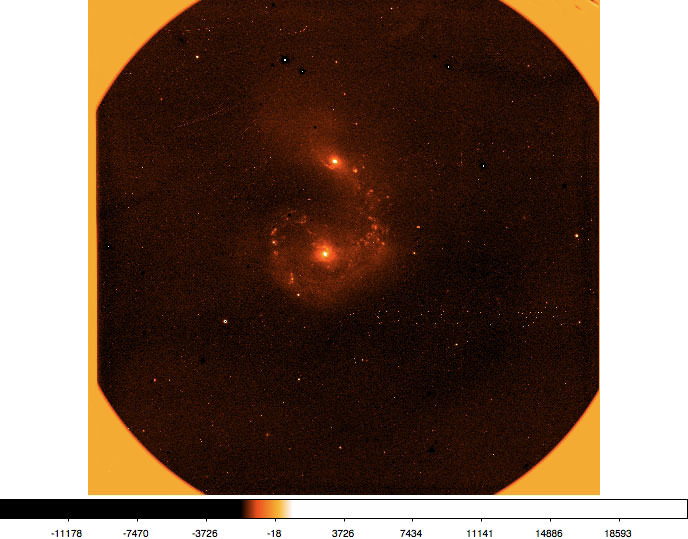
The MOSFIRE instrument's "first light" image of The Antennae galaxies, acquired on April 4 2012.
[/caption]
Last week, on April 4, 2012, the W.M. Keck Observatory’s brand-new MOSFIRE instrument opened its infrared-sensing eyes to the Universe for the first time, capturing the image above of a pair of interacting galaxies known as The Antennae. Once fully commissioned and scientific observations begin, MOSFIRE will greatly enhance the imaging abilities of “the world’s most productive ground-based observatory.”
Installed into the Keck I observatory, MOSFIRE — which stands for Multi-Object Spectrometer For Infra-Red Exploration — is able to gather light in infrared wavelengths. This realm of electromagnetic radiation lies just beyond red on the visible spectrum (the “rainbow” of light that our eyes are sensitive to) and is created by anything that emits heat. By “seeing” in infrared, MOSFIRE can peer through clouds of otherwise opaque dust and gas to observe what lies beyond — such as the enormous black hole that resides at the center of our galaxy.
MOSFIRE can also resolve some of the most distant objects in the Universe, in effect looking back in time toward the period “only” a half-billion years after the Big Bang. Because light from that far back has been so strongly shifted into the infrared due to the accelerated expansion of the Universe (a process called redshift) only instruments like MOSFIRE can detect it.
The instrument itself must be kept at a chilly -243ºF (-153ºC) in order to not contaminate observations with its own heat.
Astronomers also plan to use MOSFIRE to search for brown dwarfs — relatively cool objects that never really gained enough mass to ignite fusion in their cores. Difficult to image even in infrared, it’s suspected that our own galaxy is teeming with them.
The impressive new instrument has the ability to survey up to 46 objects at once and then do a quick-change to new targets in just minutes, as opposed to the one to two days it can typically take other telescopes!
Unprocessed image of M82 taken with MOSFIRE on April 5, 2012. (W. M. Keck Observatory)
Images taken on the nights of April 4 and 5 are just the beginning of what promises to be a new heat-seeking era for the Mauna Kea-based observatory!
“The MOSFIRE project team members at Keck Observatory, Caltech, UCLA, and UC Santa Cruz are to be congratulated, as are the observatory operations staff who worked hard to get MOSFIRE integrated into the Keck I telescope and infrastructure,” says Bob Goodrich, Keck Observatory Observing Support Manager. “A lot of people have put in long hours getting ready for this momentous First Light.”
The two Keck 10-meter domes atop Mauna Kea. (Rick Peterson/WMKO)
Read more on the Keck press release here.
The W. M. Keck Observatory operates two 10-meter optical/infrared telescopes on the summit of Mauna Kea on the Big Island of Hawaii. The spectrometer was made possible through funding provided by the National Science Foundation and astronomy benefactors Gordon and Betty Moore.
Greetings, fellow SkyWatchers! Our week begins with the dance of the planets and a gathering of asteroids. Keep watching as Mars makes its closest approach of the year – while Venus and Jupiter continue to get nearer. Celebrate the Full Worm Moon, interesting stars and beautful galaxies and clusters! Dust off those binoculars and telescopes and meet me in the backyard, because… Here’s what’s up!
Monday, March 5 – Today is the birthday of Gerardus Mercator, famed mapmaker, who started his life in 1512. Mercator’s time was a rough one for astronomy, but despite a prison sentence and the threat of torture and death for his “beliefs,” he went on to design a celestial globe in the year 1551.
Need a little celestial action of your own? Then be outside at twilight with a clear horizon to catch Mercury! joining the show with Venus and Jupiter. The swift inner planet will make a brief appearance on the western skyline just after the Sun dips below the horizon. To add to the fun, the planet Uranus is situated about 5 degrees to its southwest and asteroid Vesta is about 5 degrees south/southwest. More? Then know that asteroid Ceres is also here – just around 20 degrees to Mercury’s southeast. While the asteroids and Uranus really aren’t observable, it’s still fun to know they’re “hanging around” in the same small space!
Tonight we’ll ignore the Moon and use both Sirius and Beta Monocerotis as our guides to have a look at one fantastic galactic cluster for any optical aid – M50 (Right Ascension: 7 : 03.2 – Declination: -08 : 20). Hop about a fistwidth east-southeast of Beta, or northeast of Sirius…and be prepared!
Perhaps discovered as early as 1711 by G. D. Cassini, it was relocated by Messier in 1772 and confirmed by J. E. Bode in 1774. Containing perhaps as many as 200 members, this colorful old cluster resides almost 3000 light-years away. The light of the stars you are looking at tonight left this cluster at a time when iron was first being smelted and used in tools. The Mayan culture was just beginning to develop, while the Hebrews and Phoenicians were creating an alphabet. Do you wonder if it looked the same then as it does now? In binoculars you will see an almost heart-shaped collection of stars, while telescopes will begin to resolve out color and many fainter members – with a very notable red one in its midst. Enjoy this worthy cluster and make a note that you’ve captured another Messier object!
Now, point your telescope towards Mars! This universal date marks the closest approach of Mars and Earth (0.6737 AU = 100.78 million km). While it’s a far cry from being the much celebrated “size of the Moon”, Mars currently has an apparent diameter of 13.89″. This will make for some mighty fine observing, so be sure to check for a lot a great surface details!
Tuesday, March 6 – If you get a chance to see sunshine today, then celebrate the birthday of Joseph Fraunhofer, who was born in 1787. As a German scientist, Fraunhofer was truly a “trailblazer” in terms of modern astronomy. His field? Spectroscopy! After having served his apprenticeship as a lens and mirror maker, Fraunhofer went on to develop scientific instruments, specializing in applied optics. While designing the achromatic objective lens for the telescope, he was watching the spectrum of solar light passing through a thin slit and saw the dark lines which make up the “rainbow bar code.” Fraunhofer knew that some of these lines could be used as a wavelength standard so he began measuring. The most prominent of the lines he labeled with letters that are still in use. His skill in optics, mathematics and physics led Fraunhofer to design and build the very first diffraction grating which was capable of measuring the wavelengths of specific colors and dark lines in the solar spectrum. Did his telescope designs succeed? Of course! His work with the achromatic objective lens is the design still used in modern telescopes!
In 1986, the first of eight consecutive days of flybys began as VEGA 1 and Giotto became the very first spacecraft to reach Halley’s Comet. Tonight let’s just fly by the Moon and have a look at Theta Aurigae. 2.7 magnitude Theta is a four star system ranging in magnitudes from 2.7 to 10.7. The brightest companion – Theta B – is magnitude 7.2 and is separated from the primary by slightly more than 3 arc seconds. Remember that this is what is known as a “disparate double” and look for the two fainter members well away from the primary.
Wednesday, March 7 – Today the only child of William Herschel (the discoverer of Uranus) was born in 1792 – John Herschel. He became the first astronomer to thoroughly survey the southern hemisphere’s sky, and he was discoverer of photographic fixer. Also born on this day, but in 1837, was Henry Draper – the man who made the first photograph of a stellar spectrum.
Tonight the great Grimaldi, found in the central region of the Moon near the terminator is the best lunar feature for binoculars. If you would like to see how well you have mastered your telescopic skills, then let’s start there. About one Grimaldi length south, you’ll see a narrow black ellipse with a bright rim. This is Rocca. Go the same distance again (and a bit east) to spot a small, shallow crater with a dark floor. This is Cruger, and its lava-filled interior is very similar to another study – Billy. Now look between them. Can you see a couple of tiny dark markings? Believe it or not, this is called Mare Aestatis. It’s not even large enough to be considered a medium-sized crater, but is a mare!
Take the time tonight to have a look at Delta Monocerotis with binoculars. Although it is not a difficult double star, it is faint enough to require some optical aid. If you are using a telescope, hop to Epsilon. It’s a lovely yellow and blue system that’s perfect for small apertures.
Thursday, March 8 – On this day in 1977, the NASA airborne occultation observatory made a unique discovery – Uranus had rings!
Tonight we’ll play ring around the Full Moon. In many cultures, it is known as the “Worm Moon.” As ground temperatures begin to warm and produce a thaw in the northern hemisphere, earthworms return and encourage the return of robins. For the Indians of the far north, this was also considered the “Crow Moon.” The return of the black bird signaled the end of winter. Sometimes it has been called the “Crust Moon” because warmer temperatures melt existing snow during the day, leaving it to freeze at night. Perhaps you may have also heard it referred to as the “Sap Moon.” This marks the time of tapping maple trees to make syrup. To early American settlers, it was called the “Lenten Moon” and was considered to be the last full Moon of winter. For those of us in northern climes, let’s hope so!
Friday, March 9 – Today is the anniversary of the Sputnik 9 launch in 1966 which carried a dog named Chernushka (Blackie). Also today we recognize the birth of David Fabricius. Born in 1564, Fabricus was the discoverer of the first variable star – Mira. Tonight let’s visit with an unusual variable star as we look at Beta Canis Majoris – better known as Murzim.
Located about three fingerwidths west-southwest of Sirius, Beta is a member of a group of stars known as quasi-Cepheids – stars which have very short term and small brightness changes. First noted in 1928, Beta changes no more than .03 in magnitude, and its spectral lines will widen in cycles longer than those of its pulsations.
When you’ve had a look at Beta, hop another fingerwidth west-southwest for open cluster NGC 2204 (Right Ascension: 6 : 15.7 – Declination: -18 : 39). Chances are, this small collection of stars was discovered by Caroline Herschel in 1783, but it was added to William’s list. This challenging object is a tough call for even large binoculars and small telescopes, since only around a handful of its dim members can be resolved. To the larger scope, a small round concentration can be seen, making this Herschel study one of the more challenging. While it might not seem like it’s worth the trouble, this is one of the oldest of galactic clusters residing in the halo and has been a study for “blue straggler” stars.
Saturday, March 10 – Since this is a weekend night and we’ve a short time before Moonrise, why not break out the big telescope and do a little galaxy hopping in the region south of Beta Canis Majoris?
Our first mark will be NGC 2207 – a 12.3 magnitude pair of interacting galaxies. Located some 114 million light-years away, this pair is locked in a gravitational tug of war. The larger of the pair is NGC 2207 (Right Ascension: 6 : 16.4 – Declination: -21 : 22), and it is estimated the encounter began with the Milky Way-sized IC 2163 about 40 million years ago. Like the M81 and M82 pair, NGC 2207 will cannibalize the smaller galaxy – yet the true space between the stars is so far apart that actual collisions may never occur. While our eyes may never see as grandly as a photograph, a mid-sized telescope will make out the signature of two galactic cores with intertwining material. Enjoy this great pair!
Now shift further southeast for NGC 2223 (Right Ascension: 6 : 24.6 – Declination: -22 : 50). Slightly fainter and smaller than the previous pair, this round, low surface brightness galaxy shows a slightly brighter nucleus area and a small star caught on its southern edge. While it seems a bit more boring, it did have a supernova event as recently as 1993!
Sunday, March 11 – Tonight let’s return to Canis Major with binoculars and have a look at Omicron 1, the western-most star in the central Omicron pair. While this bright, colorful gathering of stars is not a true cluster, it is certainly an interesting group.
For larger binoculars and telescopes, hop on to Tau northeast of Delta and the open cluster NGC 2362 (Right Ascension: 7: 18.8 – Declination: -24 : 5). At a distance of about 4600 light-years, this rich little cluster contains about 40 members and is one of the youngest of all known star clusters. Many of the stars you can resolve have not even reached main sequence yet! Still gathering themselves together, it is estimated this stellar collection is less than a million years old. Its central star, Tau, is believed to be a true cluster member and one of the most luminous stars known. Put as much magnification on this one as skies will allow – it’s a beauty!
Until next week? Dreams really do come true when you keep on reaching for the stars!
If you enjoy this weekly observing column, then you’d love the fully illustrated The Night Sky Companion 2012. It’s available in both Kindle and soft cover formats!
The Faulkes Telescope. Credit: Faulkes Telescope/LCOGT
[/caption]
Using and getting the most out of robotic astronomy
Whilst nothing in the field of amateur astronomy beats the feeling of being outside looking up at the stars, the inclement weather many of us have to face at various times of year, combined with the task of setting up and then packing away equipment on a nightly basis, can be a drag. Those of us fortunate enough to have observatories don’t face that latter issue, but still face the weather and usually the limits of our own equipment and skies.
Another option to consider is using a robotic telescope. From the comfort of your home you can make incredible observations, take outstanding astrophotos, and even make key contributions to science!
The main elements which make robotic telescopes appealing to many amateur astronomers are based around 3 factors. The first is that usually, the equipment being offered is generally vastly superior to that which the amateur has in their home observatory. Many of the robotic commercial telescope systems, have large format mono CCD cameras, connected to high precision computer controlled mounts, with superb optics on top, typically these setups start in the $20-$30,000 price bracket and can run up in to the millions of dollars.
A look at the Faulkes Telescope South inside. Credit: Faulkes Telescope/LCOGT
Combined with usually well defined and fluid workflow processes which guide even a novice user through the use of the scope and then acquisition of images, automatically handling such things as dark and flat fields, makes it a much easier learning curve for many as well, with many of the scopes specifically geared for early grade school students.
Screenshot of the Faulkes Telescope realtime interface. Credit: Faulkes Telescope/LCOGT
The second factor is geographic location. Many of the robotic sites are located in places where average rainfall is a lot lower than say somewhere like the UK or North Eastern United States for example, with places like New Mexico and Chile in particular offering almost completely clear dry skies year round. Robotic scopes tend to see more sky than most amateur setups, and as they are being controlled over the Internet, you yourself don’t even have to get cold outside in the depths of winter. The beauty of the geographic location aspect is that in some cases, you can do your astronomy during the daytime, as the scopes may be on the other side of the world.
iTelescope systems are located all over the globe. Credit: iTelescope project
The third is ease of use, as it’s nothing more than a reasonably decent laptop, and solid broadband connection that’s required. The only thing you need worry about is your internet connection dropping, not your equipment failing to work. With scopes like the Faulkes or Liverpool Telescopes, ones I use a lot, they can be controlled from something as modest as a netbook or even an Android/iPad/iPhone, easily. The issues with CPU horsepower usually comes down to the image processing after you have taken your pictures.
Software applications like the brilliant Maxim DL by Diffraction Limited which is commonly used for image post processing in amateur and even professional astronomy, handles the FITS file data which robotic scopes will deliver. This is commonly the format images are saved in with professional observatories, and the same applies with many home amateur setups and robotic telescopes. This software requires a reasonably fast PC to work efficiently, as does the other stalwart of the imaging community, Adobe Photoshop. There are some superb and free applications which can be used instead of these two bastions of the imaging fraternity, like the excellent Deep Sky stacker, and IRIS, along with the interestingly named “GIMP” which is variant on the Photoshop theme, but free to use.
Some people may say just handling image data or a telescope over the internet detracts from real astronomy, but it’s how professional astronomers work day in day out, usually just doing data reduction from telescopes located on the other side of the world. Professionals can wait years to get telescope time, and even then rather than actually being a part of the imaging process, will submit imaging runs to observatories, and wait for the data to roll in. (If anyone wants to argue this fact…just say “Try doing eyepiece astronomy with the Hubble”)
The process of using and imaging with a robotic telescope still requires a level of skill and dedication to guarantee a good night of observing, be it for pretty pictures or real science or both.
Location Location Location
The location for a robotic telescope is critical as if you want to image some of the wonders of the Southern Hemisphere, which those of us in the UK or North America will never see from home, then you’ll need to pick a suitably located scope. Time of day is also important for access, unless the scope system allows an offline queue management approach, whereby you schedule it to do your observations for you and just wait for the results. Some telescopes utilise a real time interface, where you literally control the scope live from your computer, typically through a web browser interface. So depending on where in the world it is, you may be in work, or it may be at a very unhealthy hour in the night before you can access your telescope, it’s worth considering this when you decide which robotic system you wish to be a part of.
Telescopes like the twin Faulkes 2-metre scopes, which are based on the Hawaiian island of Maui, atop a mountain, and Siding Spring, Australia, next to the world famous Anglo Australian Observatory, operate during usual school hours in the UK, which means night time in the locations where the scopes live. This is perfect for children in western Europe who wish to use research grade professional technology from the classroom, though the Faulkes scopes are also used by schools and researchers in Hawaii.
The type of scope/camera you choose to use, will ultimately also determine what it is you image. Some robotic scopes are configured with wide field large format CCD’s connected to fast, low focal ratio telescopes. These are perfect for creating large sky vistas encompassing nebulae and larger galaxies like Messier 31 in Andromeda. For imaging competitions like the Astronomy Photographer of the Year competition, these wide field scopes are perfect for the beautiful skyscapes they can create.
Scopes like the Faulkes Telescope North, even though it has a huge 2m (almost the same size as the one on the Hubble Space Telescope) mirror, is configured for smaller fields of view, literally only around 10 arcminutes, which will nicely fit in objects like Messier 51, the Whirpool Galaxy, but would take many separate images to image something like the full Moon (If Faulkes North were set up for that, which it’s not). It’s advantage is aperture size and immense CCD sensitivity. Typically our team using them is able to image a magnitude +23 moving object (comet or asteroid) in under a minute using a red filter too!
A field of view with a scope like the twin Faulkes scopes, which are owned and operated byLCOGT is perfect for smaller deep sky objects and my own interests which are comets and asteroids.Many other research projects such as exoplanets and the study of variable stars are conducted using these telescopes.Many schools start out imaging nebulae, smaller galaxies and globular clusters, with our aim at the Faulkes Telescope Project office, to quickly get students moving on to more science based work, whilst keeping it fun. For imagers, mosaic approaches are possible to create larger fields, but this obviously will take up more imaging and telescope slew time.
Each robotic system has its own set of learning curves, and each can suffer from technical or weather related difficulties, like any complex piece of machinery or electronic system. Knowing a bit about the imaging process to begin with, sitting in on other’s observing sessions on things like Slooh, all helps. Also make sure you know your target field of view/size on the sky (usually in either right ascension and declination) or some systems have a “guided tour mode” with named objects, and make sure you can be ready to move the scope to it as quickly as possible, to get imaging. With the commercial robotic scopes, time really is money.
Global Rent-A-Scope interface
Magazines like Astronomy Now in the UK, as well as Astronomy and Sky and Telescope in the United States and Australia are excellent resources for finding out more, as they regularly feature robotic imaging and scopes in their articles. Online forums like cloudynights.com and stargazerslounge.com also have thousands of active members, many of whom regularly use robotic scopes and can give advice on imaging and use, and there are dedicated groups for robotic astronomy like the Online Astronomical Society. Search engines will also give useful information on what is available as well.
To get access to them, most of the robotic scopes require a simple sign up process, and then the user can either have limited free access, which is usually an introductory offer, or just start to pay for time. The scopes come in various sizes and quality of camera, the better they are, usually the more you pay. For education and school users as well as astronomical societies, The Faulkes Telescope (for schools) and the Bradford Robotic scope both offer free access, as does the NASA funded Micro Observatory project. Commercial ones like iTelescope, Slooh and Lightbuckets provide a range of telescopes and imaging options, with a wide variety of price models from casual to research grade instrumentation and facilities.
So what about my own use of Robotic Telescopes?
Personally I use mainly the Faulkes North and South scopes, as well as the Liverpool La Palma Telescope. I have worked with the Faulkes Telescope Project team now for a few years, and it’s a real honour to have such access to research grade intrumentation. Our team also use the iTelescope network when objects are difficult to obtain using the Faulkes or Liverpool scopes, though with smaller apertures, we’re more limited in our target choice when it comes to very faint asteroid or comet type objects.
After having been invited to meetings in an advisory capacity for Faulkes, late in 2011 I was appointed pro am program manager, co-ordinating projects with amateurs and other research groups. With regards to public outreach I have presented my work at conferences and public outreach events for Faulkes and we’re about to embark on a new and exciting project with the European Space Agency whom I work for also as a science writer.
My use of Faulkes and the Liverpool scopes is primarily for comet recovery, measurement (dust/coma photometry and embarking on spectroscopy) and detection work, those icy solar system interlopers being my key interest. In this area, I co-discovered Comet C2007/Q3 splitting in 2010, and worked closely with the amateur observing program managed by NASA for comet 103P, where my images were featured in National Geographic, The Times, BBC Television and also used by NASA at their press conference for the 103P pre-encounter event at JPL.
The 2m mirrors have huge light grasp, and can reach very faint magnitudes in very little time. When attempting to find new comets or recover orbits on existing ones, being able to image a moving target at magnitude 23 in under 30s is a real boon. I am also fortunate to work alongside two exceptional people in Italy, Giovanni Sostero and Ernesto Guido, and we maintain a blog of our work, and I am a part of the CARA research group working on comet coma and dust measurements, with our work in professional research papers such as the Astrophysical Journal Letters and Icarus.
The Imaging Process
When taking the image itself, the process starts really before you have access to the scope. Knowing the field of view, what it is you want to achieve is critical, as is knowing the capabilities of the scope and camera in question, and importantly, whether or not the object you want to image is visible from the location/time you’ll be using it.
First thing I would do if starting out again is look through the archives of the telescope, which are usually freely available, and see what others have imaged, how they have imaged in terms of filters, exposure times etc, and then match that against your own targets.
Ideally, given that in many cases, time will be costly, make sure that if you’re aiming for a faint deep sky object with tenuous nebulosity, you don’t pick a night with a bright Moon in the sky, even with narrowband filters, this can hamper the final image quality, and that your choice of scope/camera will in fact image what you want it to. Remember that others may also want to use the same telescopes, so plan ahead and book early. When the Moon is bright, many of the commercial robotic scope vendors offer discounted rates, which is great if you’re imaging something like globular clusters maybe, which aren’t as affected by the moonlight (as say a nebula would be)
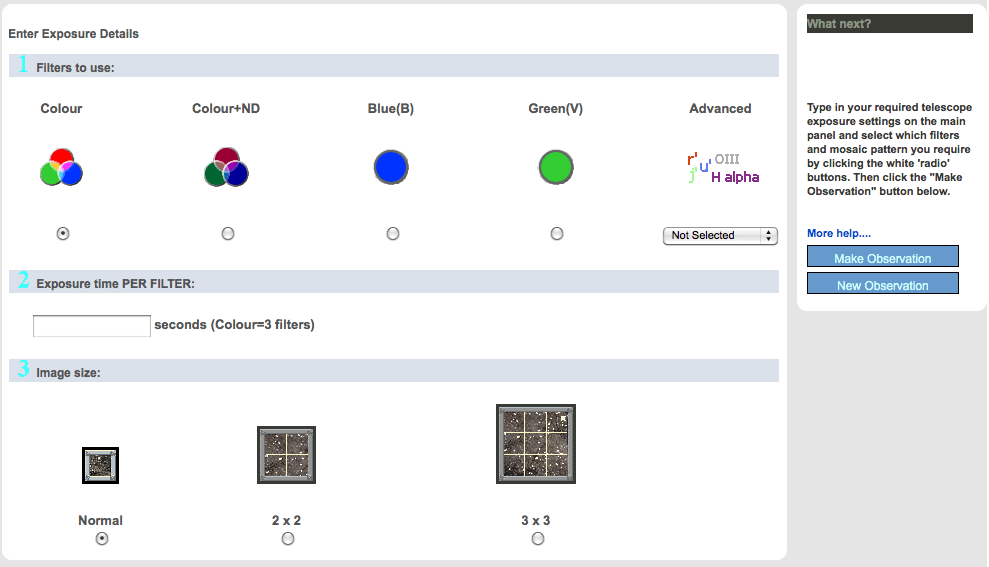
Forward planning is usually essential, knowing that your object is visible and not too close to any horizon limits which the scope may impose, ideally picking objects as high up as possible, or rising to give you plenty of imaging time. Once that’s all done, then following the scope’s imaging process depends on which one you choose, but with something like Faulkes, it’s as simple as selecting the target/FOV, slewing the scope, setting the filter, and then exposure time and then waiting for the image to come in.
The number of shots taken depends on the time you have. Usually when imaging a comet using Faulkes I will try to take between 10 and 15 images to detect the motion, and give me enough good signal for the scientific data reduction which follows. Always remember though, that you’re usually working with vastly superior equipment than you have at home, and the time it takes to image an object using your home setup will be a lot less with a 2m telescope. A good example is that a full colour high resolution image of something like the Eagle Nebula can be obtained in a matter of minutes on Faulkes, in narrowband, something which would usually take hours on a typical backyard telescope.
For imaging a non moving target, the more shots in full colour or with your chosen filter (Hydrogen Alpha being a commonly used one with Faulkes for nebula) you can get the better. When imaging in colour, the three filters on the telescope itself are grouped into an RGB set, so you don’t need to set up each colour band. I’d usually add a luminance layer with H-Alpha if it’s an emission nebula, or maybe a few more red images if it’s not for luminance. Once the imaging run is complete, the data is usually placed on a server for you to collect, and then after downloading the FITS files, combine the images using Maxim (or other suitable software) and then on in to something like Photoshop to make the final colour image. The more images you take, the better the quality of the signal against the background noise, and hence a smoother and more polished final shot.
Between shots the only thing that will usually change will be filters, unless tracking a moving target, and possibly the exposure time, as some filters take less time to get the requisite amount of light. For example with a H-Alpha/OIII/SII image, you typically image for a lot longer with SII as the emission with many objects is weaker in this band, whereas many deep sky nebula emit strongly in the H-Alpha.
The Image Itself
NGC 6302 taken by Thomas Mills High School with the Faulkes Telescope
As with any imaging of deep sky objects, don’t be afraid to throw away poor quality sub frames (the shorter exposures which go to make up the final long exposure when stacked). These could be affected by cloud, satellite trails or any number of factors, such as the autoguider on the telescope not working correctly. Keep the good shots, and use those to get as good a RAW stacked data frame as you can. Then it’s all down to post processing tools in products like Maxim/Photoshop/Gimp, where you’d adjust the colours, levels, curves and possibly use plug ins to sharpen up the focus, or reduce noise. If it’s pure science your interested in, you’ll probably skip most of those steps and just want good, calibrated image data (dark and flat field subtracted as well as bias)
The processing side is very important when taking shots for aesthetic value, it seems obvious, but many people can overdo it with image processing, lessening the impact and/or value of the original data. Usually most amateur imagers spend more time on processing than actual imaging, but this does vary, it can be from hours to literally days doing tweaks. Typically when processing an image taken robotically, the dark and flat field calibration are done. First thing I do is access the datasets as FITS files, and bring those in to Maxim DL. Here I will combine and adjust the histogram on the image, possible running multiple iterations of a de-convolution algorithm if the start points are not as tight (maybe due to seeing issues that night).
Once the images are tightened up and then stretched, I will save them out as FITS files, and using the free FITS Liberator application bring them in to Photoshop. Here, additional noise reduction and contrast/level and curve adjustments will be made on each channel, running a set of actions known as Noels actions (a suite of superb actions by Noel Carboni, one of the worlds foremost imaging experts) can also enhance the final individual red green and blue channels (and the combined colour one).
Then, I will composite the images using layers into a colour final shot, adjusting this for colour balance and contrast. Possibly running a focus enhancement plug in and further noise reduction. Then publish them via flickr/facebook/twitter and/or submit to magazines/journals or scientific research papers depending on the final aim/goals.
Serendipity can be a wonderful thing
I got in to this quite by accident myself…. In March 2010, I had seen a posting on a newsgroup that Comet C/2007 Q3, a magnitude 12-14 object at the time, was passing near to a galaxy, and would make an interesting wide field side by side shot. That weekend, using my own observatory, I imaged the comet over several nights, and noticed a distinct change in the tail and brightness of the comet over two nights in particular.
Comet C/2007 Q3. Credit: Nick Howes
A member of the BAA (British Astronomical Association), seeing my images, then asked if I would submit them for publication. I decided however to investigate this brightening a bit further, and as I had access to the Faulkes that week, decided to point the 2m scope at this comet, to see if anything unusual was taking place. The first images came in, and I immediately, after loading them in to Maxim DL and adjusting the histogram, noticed that a small fuzzy blob appeared to be tracking the comet’s movement just behind it. I measured the separation as only a few arc-seconds, and after staring at it for a few minutes, decided that it may have fragmented.
I contacted Faulkes Telescope control, who put me in touch with the BAA comet section director, who kindly logged this observation the same day. I then contacted Astronomy Now magazine, who leapt on the story and images and immediately went to press with it on their website. The following days the media furore was quite literally incredible.
Interviews with national newspapers, BBC Radio, Coverage on the BBC’s Sky at Night television show, Discovery Channel, Radio Hawaii, Ethiopia were just a few of the news/media outlets that picked up the story.. the news went global that an amateur had made a major astronomical discovery from his desk using a robotic scope. This then led on to me working with members of the AOP project with the NASA/University of Maryland EPOXI mission team on imaging and obtaining light curve data for comet 103P late in 2010, again which led to articles and images in National Geographic, The Times and even my images used by NASA in their press briefings, alongside images from the Hubble Space Telescope. Subscription requests to Faulkes Telescope Project as a result of my discoveries went up by hundreds of % from all over the world.
In summary
Robotic telescopes can be fun, they can lead to amazing things, this past year, a work experience student I was mentor for with the Faulkes Telescope Project, imaged several fields we’d assigned to her, where our team then found dozens of new and un-catalogued asteroids, and she also managed to image a comet fragmenting. Taking pretty pictures is fun, but the buzz for me comes with the real scientific research I am now engaged in, and it’s a pathway I aim to stay on probably for the rest of my astronomical lifetime. For students and people who don’t have the ability to either own a telescope due to financial or possibly location constraints, it’s a fantastic way to do real astronomy, using real equipment, and I hope, in reading this, you’re encouraged to give these fantastic robotic telescopes a try.
A composite image of the Whirlpool Galaxy (also known as M51). The green image is from the Hubble Space Telescope and shows the optical wavelength. The submillimetre light detected by SCUBA-2 is shown in red (850 microns) and blue (450 microns). The Whirlpool Galaxy lies at an estimated distance of 31 million light years from Earth in the constellation Canes Venatici Credit: JAC / UBC / Nasa
[/caption]
The stars and faint galaxies you see when you look up at the night sky are all emitting light within the visible light spectrum — the portion of the electromagnetic spectrum we can see with our unaided eyes or through optical telescopes. But our galaxy, and many others, contain huge amounts of cold dust that absorbs visible light. This accounts for the dark regions.
A new camera recently unveiled at the James Clerk Maxwell Telescope (JCMT) in Hawaii promises to figuratively shed light on this dark part of the universe. The SCUBA-2 submillimetre camera (SCUBA in this case is an acronym for Submillimetre Common-User Bolometer Array) can detect light at lower energy levels, allowing astronomers to gather data on these dark areas and ultimately learn more about our universe and its formation.
Light is measurable; its intensity or brightness is measured by photons while colour is measured by the energy of the photons. Red photons have the least energy and violet photons have the most energy. This can also be thought of in terms of wavelengths. Light at longer wavelengths have less energy and light at shorter wavelengths have more energy. This continues beyond the visible light spectrum. As electromagnetic waves get shorter, we get ultraviolet light, x-rays, and gamma rays. As wavelengths get longer, we get infrared light, submillimetre light, and finally radio waves.
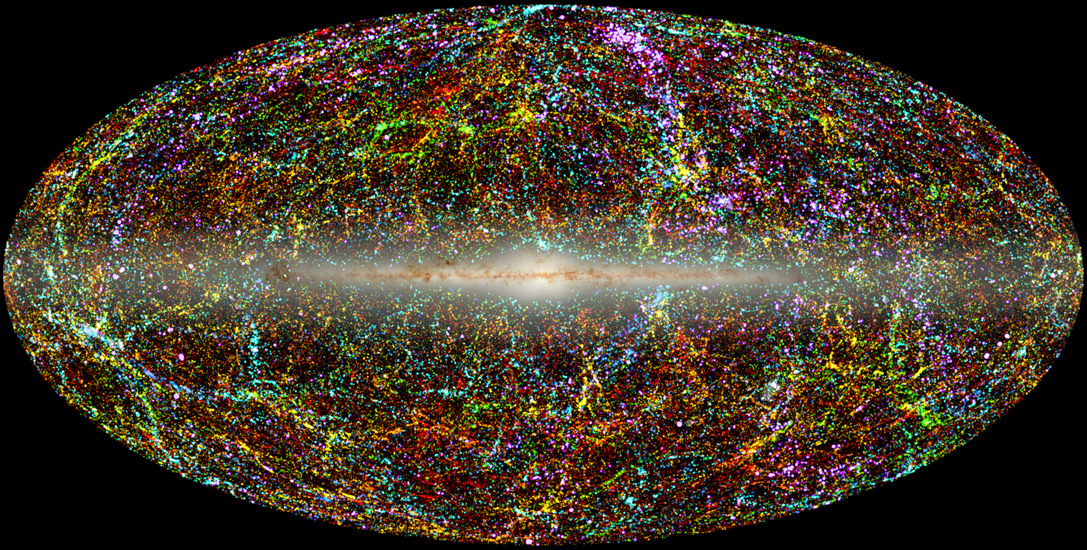
Panoramic view of the entire near-infrared sky reveals the distribution of galaxies beyond the Milky Way. Image credit: Thomas Jarrett, IPAC/Caltech.
On the longer end of the electromagnetic spectrum, infrared and radio telescopes have been around for decades helping astronomers understand more about the universe. But this is only part of the picture. The cold dust that absorbs the visible light to create the dark regions seen through optical telescopes is actually absorbing the light’s energy and reemitting it at longer wavelengths in the submillimetre region.
The first submillimetre camera, SCUBA, was designed and constructed at the Royal Observatory in Edinburgh in collaboration with the University of London. In 1997, it was up and running at the JCMT. Observations of submillimetre wavelengths are typically harder to gather — it takes a long time to image a small portion of the sky in this region. Nevertheless, submillimetre observations have already revealed a previously unknown population of distant, dusty galaxies as well as images of cold debris discs around nearby stars. This latter finding could be an indication of the presence of planetary systems.
A team of astronomers has recently developed the camera SCUBA-2 that can probe the submillimetre region with increased speed and much greater detail. But it’s a touchy instrument. Director of the JCMT Professor Gary Davis explains that for SCUBA-2 to detect extremely low energy radiation in the submillimetre region, “the instrument itself needs to be [extremely cold]. The detectors… have to be cooled to only 0.1 degree above absolute zero [–273.05°C], making the interior of SCUBA-2 colder than anything in the Universe that we know of!”
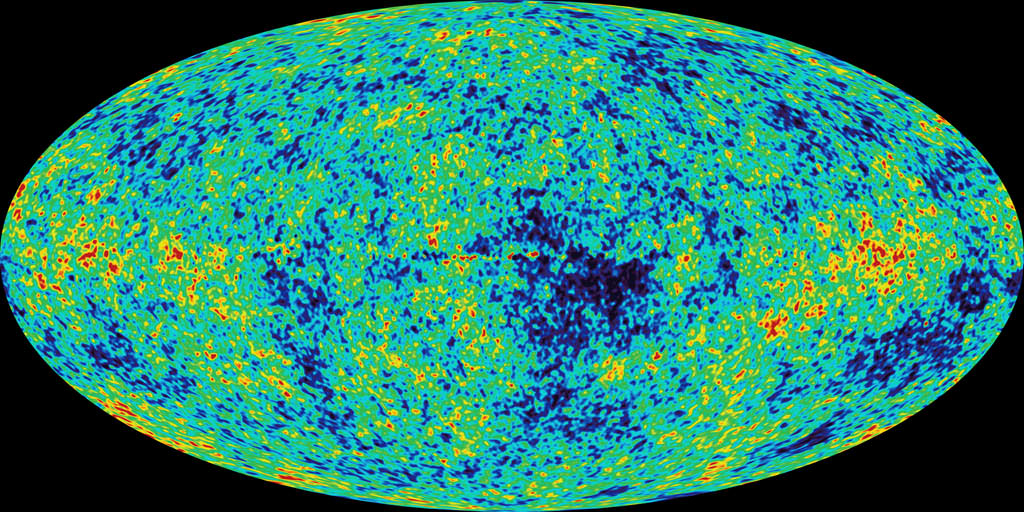
The infant Universe as imaged in the radio wavelength spectrum. Image Credit: NASA/WMAP Science Team.
The camera is a huge step in observational astronomy. Director of the United Kingdom Astronomy Teaching Centre Professor Ian Robson likened the technological leap between early sub-millimetre cameras and SCUBA-2 to the difference between wind-on film cameras and modern digital technology. “It is thanks to the ingenuity and abilities of our scientists and engineers that this immense leap in progress has been achieved,” he said.
Dr Antonio Chrysostomou, Associate Director of the JCMT, explains that SCUBA-2’s first task will be to carry out a series of surveys throughout the sky, mapping sites of star formation within our Galaxy, as well as planet formation around nearby stars. It will also survey our galactic neighbours and look into deep space to sample the youngest galaxies in the Universe. This latter task will be critical in helping astronomers understand how galaxies have evolved since the Big Bang.
The SCUBA-2 camera is housed on the 15 metre (about 50 foot) diameter JCMT situated close to the summit of Mauna Kea, Hawaii, at an altitude of 4092 metres (about 13,425 feet). It is typically used to study our Solar System, interstellar dust and gas, and distant galaxies.
Source: Revolutionary New Camera Reveals Dark Side of the Universe
The James Clerk Maxwell Telescope. Image credit: www.jach.hawaii.edu
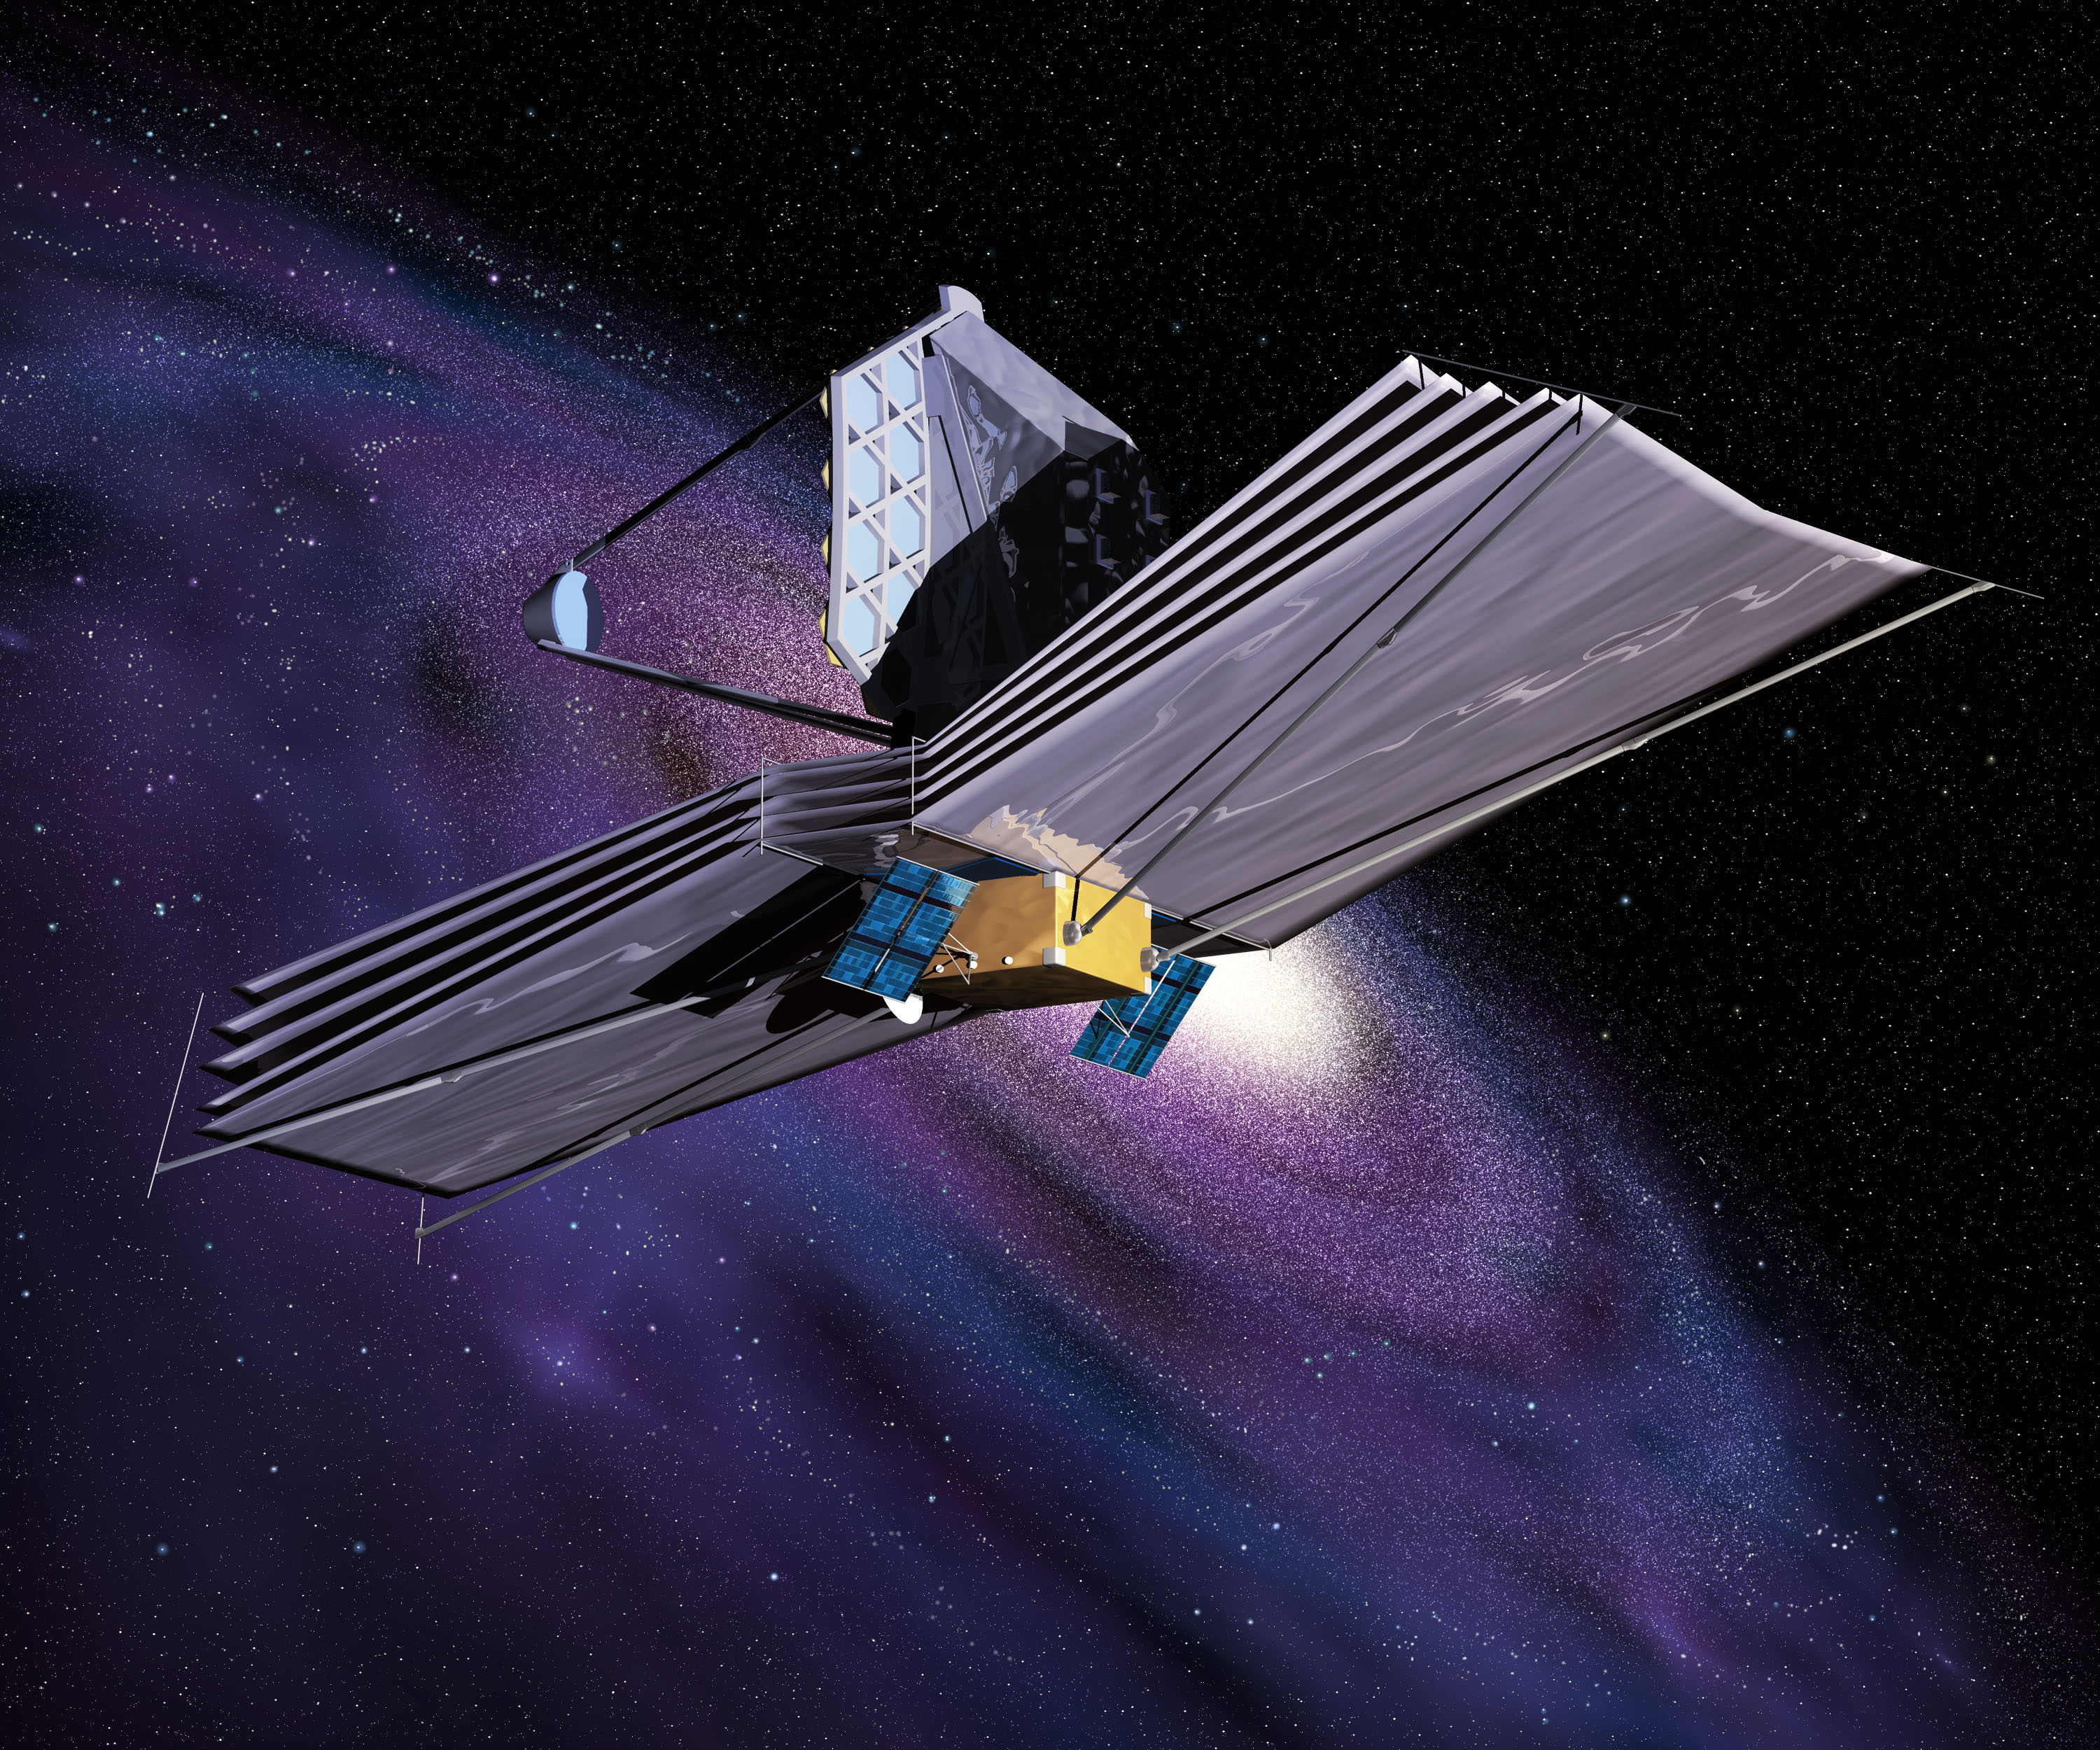
An Artist's Conception of the James Webb Space Telescope. Credit: ESA.
[/caption]
On November 14, President Obama signed an Appropriations bill that solidified NASA’s budget for fiscal year 2012. The space agency will get $17.8 billion. That’s $648 million less than last year’s funding and $924 million below what the President had asked for. But it’s still better than the $16.8 billion proposed earlier this year by the House of Representatives.
To most people, $17.8 billion is a huge amount of money. And it absolutely is, but not when you’re NASA and have multiple programs and missions to fund. So where does it all go?
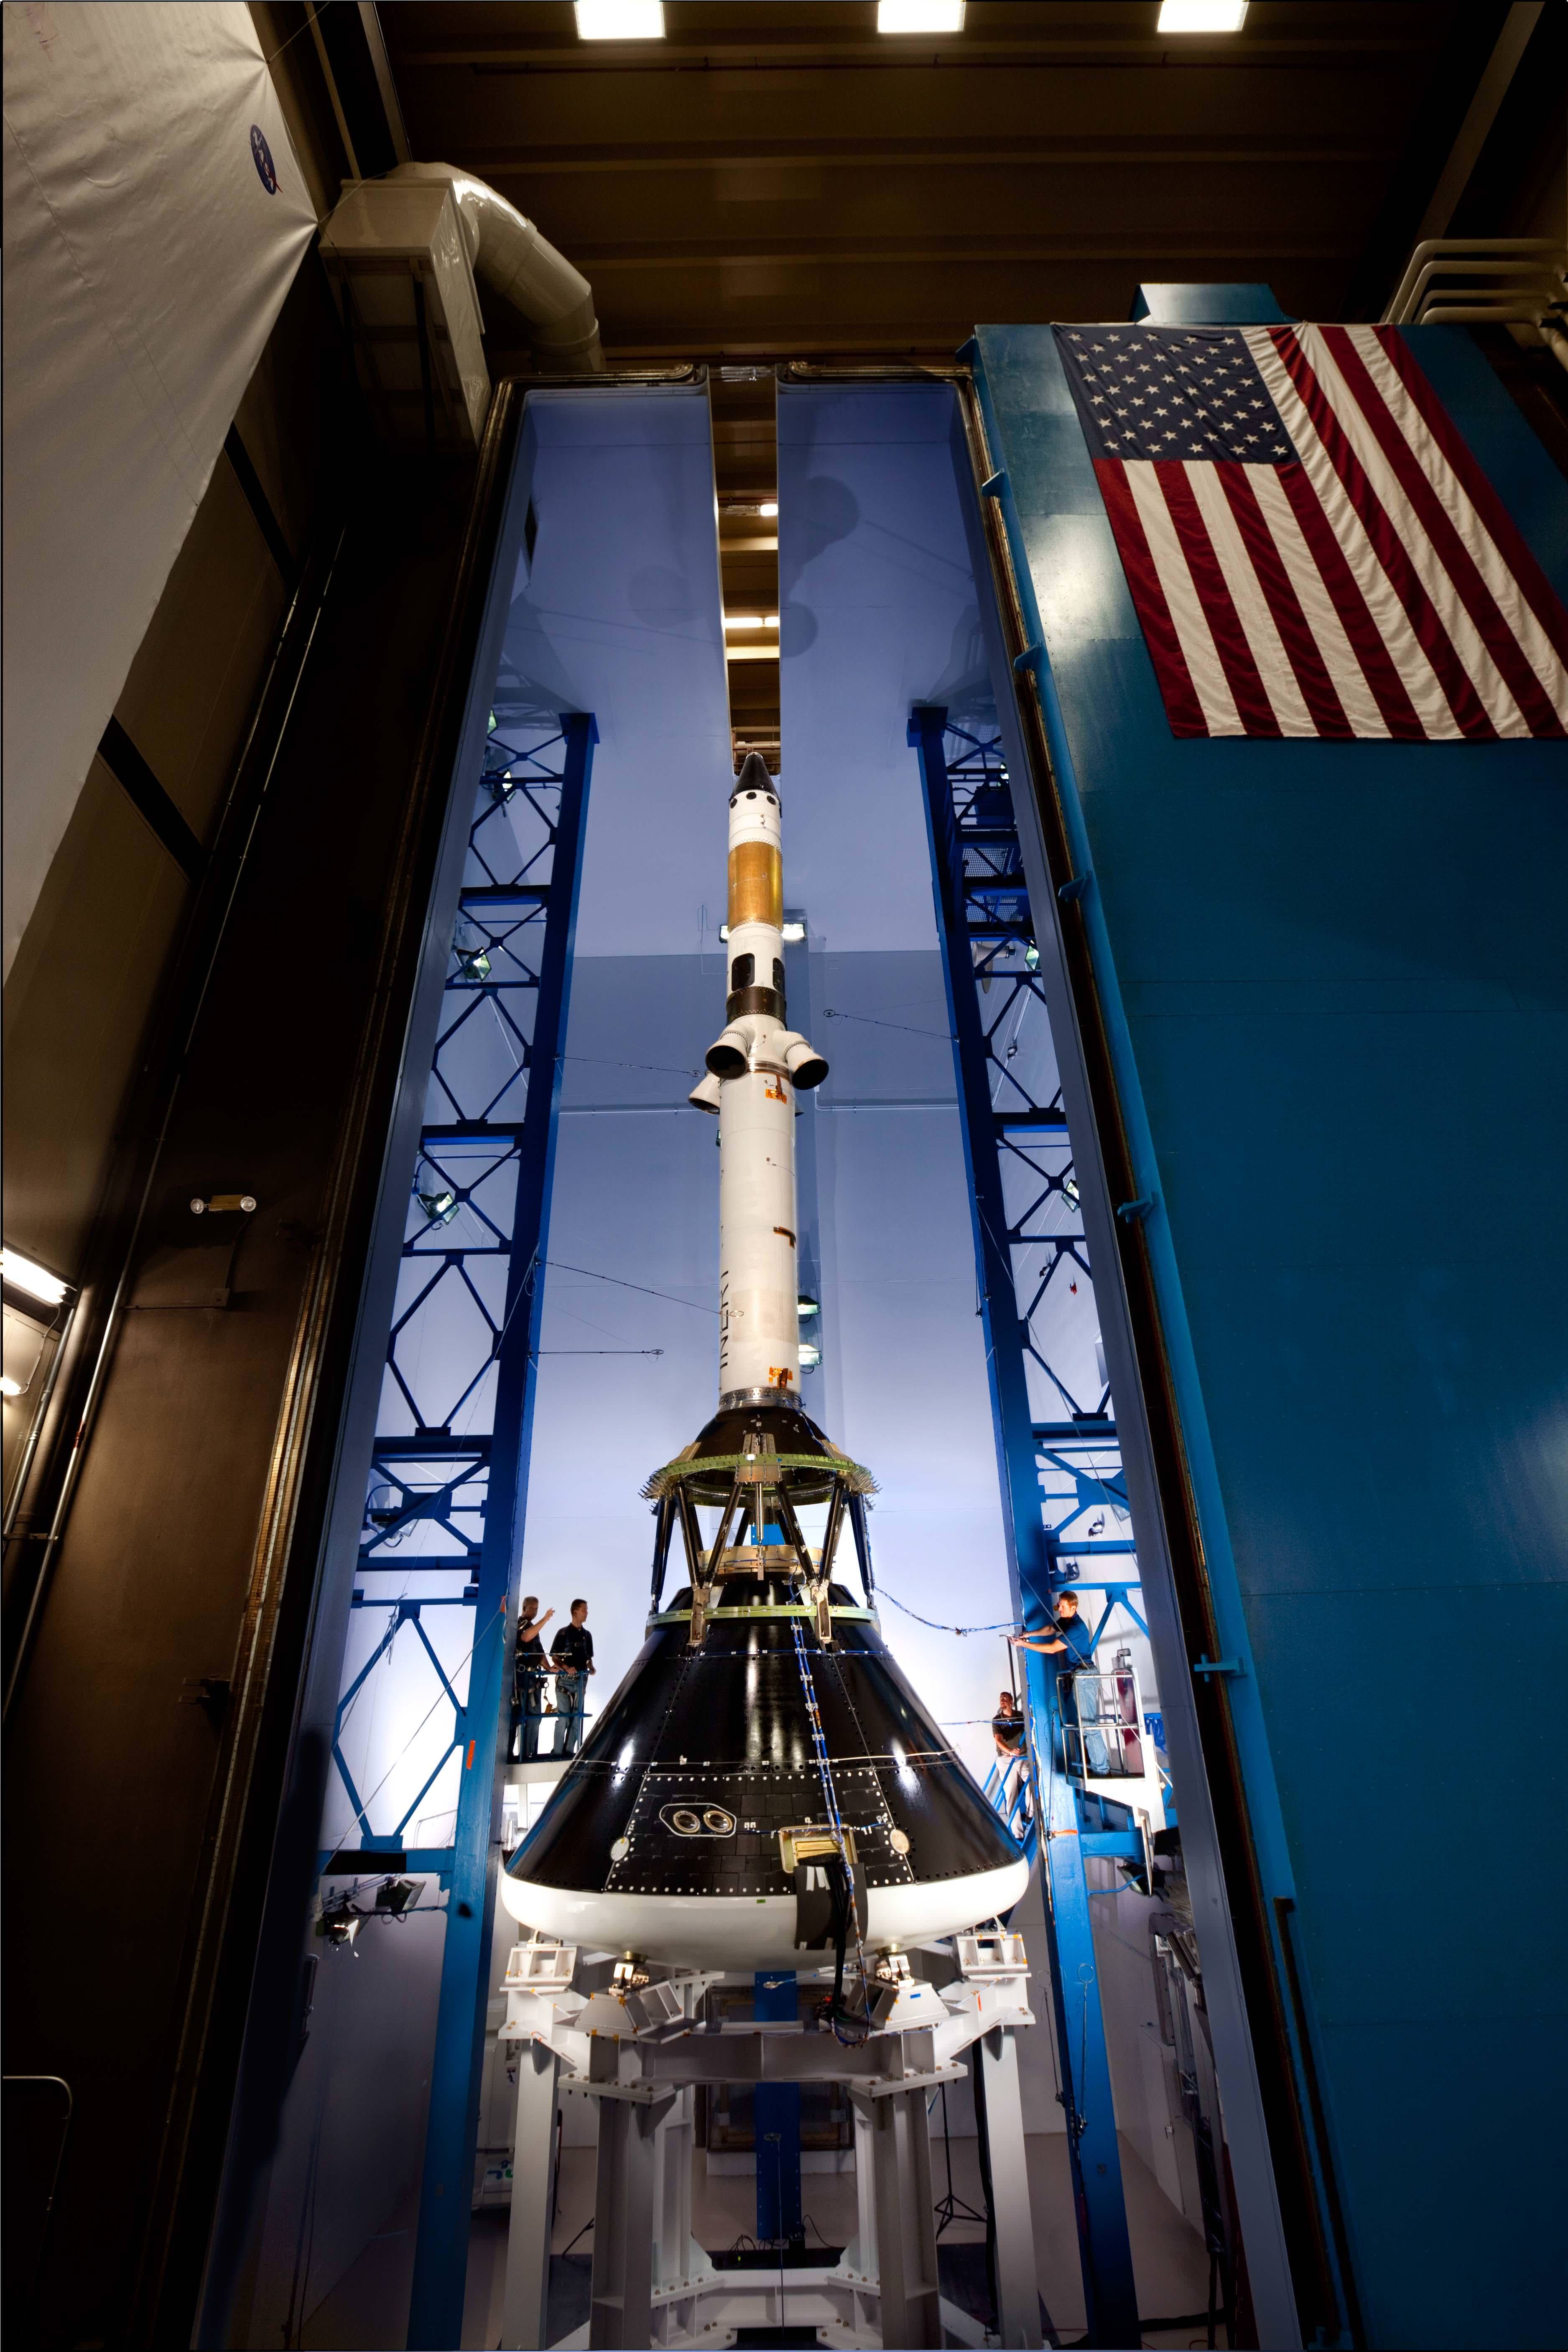
The bill highlights three major items when it comes to NASA’s budget. Of its total funding, $3.8 billion is set aside for Space Exploration. This includes research and development of the the Orion Multi-Purpose Crew Vehicle and Space Launch System, hopefully keeping both programs on schedule.
The Orion Multi-Purpose Crew Vehicle. Credit: NASA.
$4.2 billion has been allocated for Space Operations. This includes funds to tie up the loose ends of the Space Shuttle program, the end of which is expected to save more than $1 billion. The Space Operations budget, however, is $1.3 billion below last year’s level.
Coming to a very popular topic, the bill dedicates $5.1 billion to NASA Science Programs, a division that includes the James Webb Space Telescope. The JWST has garnered much attention this year, usually for being badly behind schedule and cripplingly over budget. Of the funding dedicated to Science Programs, $530 million is directed to the JWST project.
There’s a little problem hidden in this item in the bill. The $5.1 billion is just over the $150 million funding the Science Programs got last year. With $380 million on top of that increased promised to the JWST, where’s the money coming from? Other programs. As the bill says, “the agreement accommodates cost growth in the James Webb Space Telescope (JWST) by making commensurate reductions in other programs.” NASA will get the money for the telescope the only place it can – by cutting other programs.
This means potential major cuts to planetary programs since NASA’s manned program traditionally gets the most money. And understandably so. Aside from the real space enthusiasts who track robotic missions with gusto, an astronaut provides a great human link to space for the everyman. So even without an active manned program, it’s highly unlikely NASA will find the funds for the JWST program in its manned budget.
Planetary missions will likely take the hit. And a funding cut now could seriously affect NASA’s long range plans, such as its planned missions to Mars through 2020. Prospective missions to Europa will face difficulties too, a real shame since liquid water was recently discovered under the icy surface of that Jovian moon.
Unfortunately, NASA’s budget just can’t match its goals. For the near future, NASA will have to do what it can with what it’s got. As NASA Administrator Charles Bolden said in reference to the budget the House of Representatives originally proposed in February, it “requires us to live within our means so we can invest in our future.” Let’s all hope for some wise investing on NASA’s part.