So. Many. Stars…

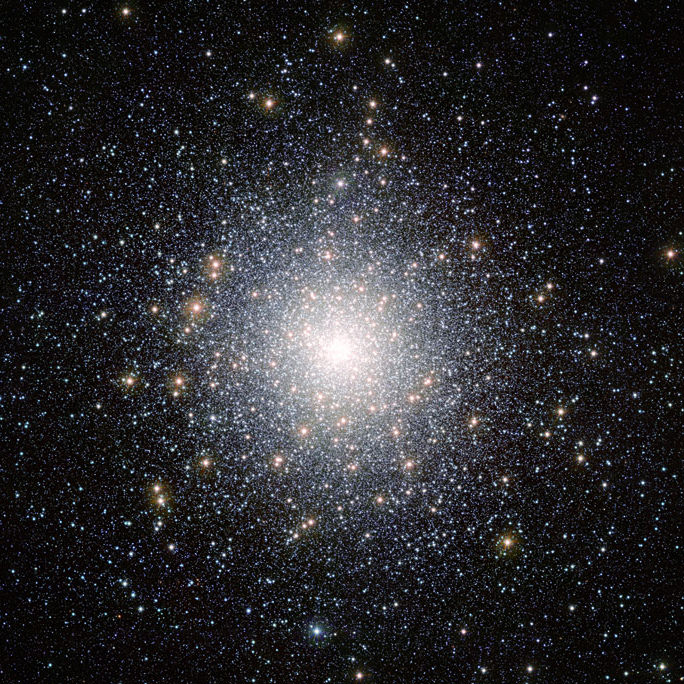
Infrared image of globular cluster 47 Tucanae (NGC 104) captured by ESO’s VISTA telescope.

“My god, it’s full of stars!” said Dave Bowman in the movie 2010 as he entered the monolith, and one could imagine that the breathtaking view before him looked something like this.

Except this isn’t science fiction, it’s reality — this is an image of globular cluster 47 Tucanae taken by the European Southern Observatory’s VISTA telescope at the Paranal Observatory in Chile. It reveals in stunning detail a brilliant collection of literally millions of stars, orbiting our Milky Way galaxy at a distance of 15,000 light-years.

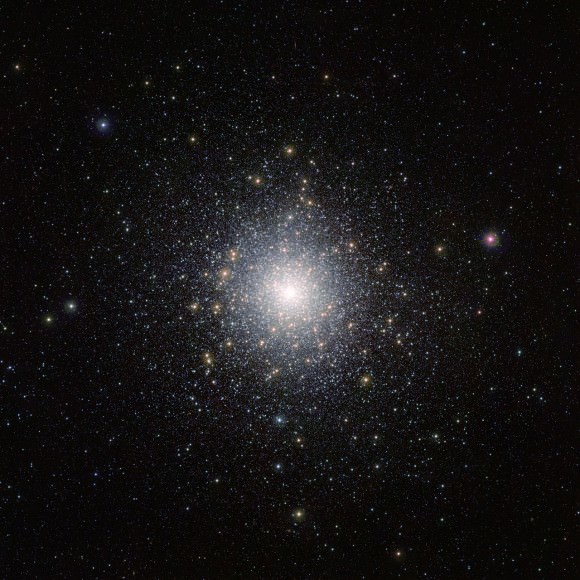
The full image can be seen below.

eso1302a (1)

47 Tucanae (also known as NGC 104) is located in the southern constellation Tucana. It’s bright enough to be seen without a telescope and, even though it’s very far away for a naked-eye object, covers an area about the size of the full Moon.

In reality the cluster is 124 light-years across.

Although globular clusters like 47 Tucanae are chock-full of stars — many of them very old, even as stars go — they are noticeably lacking in clouds of gas and dust. It’s thought that all the gaseous material has long since condensed to form stars, or else has been blown away by radiation and outbursts from the cluster’s exotic inhabitants.

At the heart of 47 Tucanae lie many curious objects like powerful x-ray sources, rapidly-spinning pulsars, “vampire” stars that feed on their neighbors, and strange blue stragglers — old stars that somehow manage to stay looking young. (You could say that a globular cluster is the cosmic version of a trashy reality show set in Beverly Hills.)

Red giants can be seen surrounding the central part of the cluster, old bloated stars that are running out of fuel, their outer layers expanding.

vista-survey-telescopeThe background stars in the image are part of the Small Magellanic Cloud, which was in the distance behind 47 Tucanae when this image was taken.

VISTA is the world’s largest telescope dedicated to mapping the sky in near-infrared wavelengths. Located at ESO’s Paranal Observatory in Chile, VISTA is revealing new views of the southern sky. Read more about the VISTA survey here.

Image credit: ESO/M.-R. Cioni/VISTA Magellanic Cloud survey. Acknowledgment: Cambridge Astronomical Survey Unit

Clouds of Sand and Iron Swirl in a Failed Star’s Extreme Atmosphere

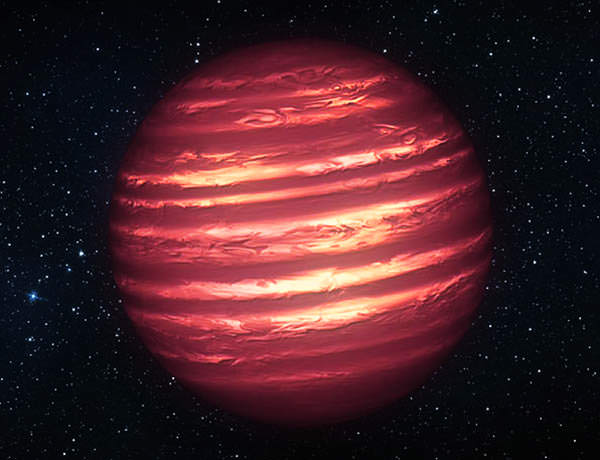
This artist's conception illustrates the brown dwarf named 2MASSJ22282889-431026. NASA's Hubble and Spitzer space telescopes observed the object to learn more about its turbulent atmosphere. Brown dwarfs are more massive and hotter than planets but lack the mass required to become sizzling stars. Their atmospheres can be similar to the giant planet Jupiter's. Spitzer and Hubble simultaneously observed the object as it rotated every 1.4 hours. The results suggest wind-driven, planet-size clouds. Image credit:
This artist's conception illustrates what a "hot jupiter" might look like.

Artist’s concept of brown dwarf  2MASSJ22282889-431026 (NASA/JPL-Caltech)

The complex weather patterns within the atmosphere of a rapidly-rotating brown dwarf have been mapped in the highest detail ever by researchers using the infrared abilities of NASA’s Spitzer and Hubble space telescopes… talk about solar wind!

Sometimes referred to as failed stars, brown dwarfs form from condensing gas and dust like regular stars but never manage to gather enough mass to ignite full-on hydrogen fusion in their cores. As a result they more resemble enormous Jupiter-like planets, radiating low levels of heat while possessing bands of wind-driven eddies in their upper atmospheric layers.

Although brown dwarfs are by their nature very dim, and thus difficult to observe in visible wavelengths of light, their heat can be detected by Hubble and the Spitzer Space Telescope — both of which can “see” just fine in near- and far-infrared, respectively.

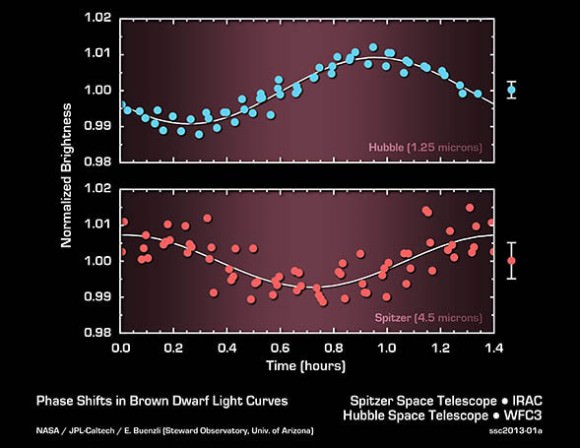
Led by researchers from the University of Arizona, a team of astronomers used these orbiting observatories on July 7, 2011 to measure the light curves from a brown dwarf named 2MASSJ22282889-431026 (2M2228 for short.) What they found was that while 2M2228 exhibited periodic brightening in both near- and far-infrared over the course of its speedy 1.43-hour rotation, the amount and rate of brightening varied between the different wavelengths detected by the two telescopes.

ssc2013-01a_Inline

“With Hubble and Spitzer, we were able to look at different atmospheric layers of a brown dwarf, similar to the way doctors use medical imaging techniques to study the different tissues in your body.”

– Daniel Apai, principal investigator, University of Arizona

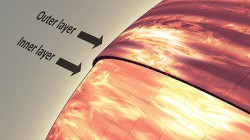
This unexpected variance — or phase shift — most likely indicates different layers of cloud material and wind velocities surrounding 2M2228, swirling around the dwarf star in very much the same way as the stormy cloud bands seen on Jupiter or Saturn.

But while the clouds on Jupiter are made of gases like ammonia and methane, the clouds of 2M2228 are made of much more unusual stuff.

ssc2013-01b_Inline“Unlike the water clouds of Earth or the ammonia clouds of Jupiter, clouds on brown dwarfs are composed of hot grains of sand, liquid drops of iron, and other exotic compounds,” said Mark Marley, a research scientist at NASA’s Ames Research Center and co-author of the paper. “So this large atmospheric disturbance found by Spitzer and Hubble gives a new meaning to the concept of extreme weather.”

While it might seem strange to think about weather on a star, remember that brown dwarfs are much more gas planet-like than “real” stars. Although the temperatures of 1,100–1,600 ºF (600–700 ºC) found on 2M2228 might sound searingly hot, it’s downright chilly compared to even regular stars like our Sun, which has an average temperature of nearly 10,000 ºF (5,600 ºC). Different materials gather at varying layers of its atmosphere, depending on temperature and pressure, and can be penetrated by different wavelengths of infrared light — just like gas giant planets.

“What we see here is evidence for massive, organized cloud systems, perhaps akin to giant versions of the Great Red Spot on Jupiter,” said Adam Showman, a theorist at the University of Arizona involved in the research. “These out-of-sync light variations provide a fingerprint of how the brown dwarf’s weather systems stack up vertically. The data suggest regions on the brown dwarf where the weather is cloudy and rich in silicate vapor deep in the atmosphere coincide with balmier, drier conditions at higher altitudes — and vice versa.”

The team’s results were presented today, January 8, during the 221st meeting of the American Astronomical Society in Long Beach, CA.

Read more on the Spitzer site, and find the team’s paper in PDF form here.

Inset image: the anatomy of a brown dwarf’s atmosphere (NASA/JPL).

What’s Up in the Night Skies for January 2013?

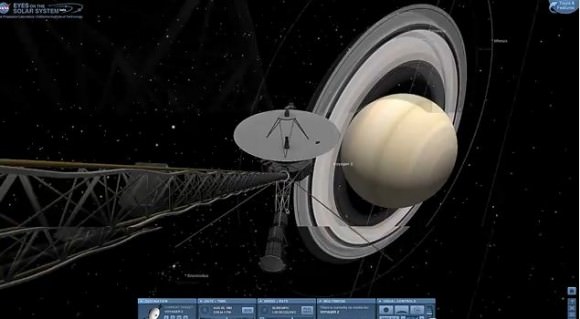
Jane Houston Jones from JPL provides a video preview of the night skies in the first month of the new year. There will be plenty of planetary conjunctions with the Moon: Saturn, Venus, Mars and Jupiter will all be snuggling up with the Moon throughout the month. Jane also suggests using NASA’s Eyes on the Solar System to keep track of where all the different missions are throughout the solar system. If you haven’t yet checked out this amazing site, it is an interactive 3-D “universe” where you can explore the cosmos from your computer. You can fly along with almost any NASA mission, hop on an asteroid, see the entire Solar System moving in real time, or re-live the Mars Curiosity landing. But you have the option of controlling when and where you are. It’s fully addictive!

Astronomer Giovanni Sostero, 1964-2012

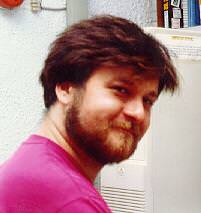
Giovanni Sostero, 1964-2012. Image courtesy of the Remanzacco Observatory

With sadness, we learned of the death of amateur astronomer Giovanni Sostero last Friday. Universe Today readers will remember Giovanni as a member of the team of astronomers from the Remanzacco Observatory in Italy, whose outstanding work we frequently feature, especially for their observations of comets, asteroids and supernovae. Tragically, Giovanni was just 48 years old and passed away due to complications following a heart attack.

Giovanni was credited with the discovery of several supernovae, and Asteroid 9878 Sostero (1994 FQ) was named after him to honor his astronomical observations. His work was published in several professional astronomical journals and he was a leading and active member of the Associazione Friulana di Astronomia e Meteorologia, based in Friuli, Italy, and was an honorary member of the Astronomical Observatory of Visnjan in Croatia.

Not only did he work hard behind the eyepiece, but he was very active in public outreach about astronomy.

Giovanni’s closest colleagues were his co-astronomers at the Remanzacco Observatory, Ernesto Guido and Nick Howes. Both have graciously penned their remembrances of Giovanni for Universe Today, so please read on to get a true sense of not only how much Giovanni contributed to the world of astronomy, but also his unique personality. He will be greatly missed and we at Universe Today send our condolences to his family and friends.

From Ernesto Guido
Italy:

Over the past eight years, I had the privilege to undertake astronomy projects working closely with Giovanni Sostero. In fact our collaboration and friendship started at the beginning of 2005. At that time Giovanni was already an accomplished amateur astronomer known both nationally and internationally for its expertise, his scientific rigor and for his overwhelming passion for the comets. For my part, I was then moving the first steps as a young amateur astronomer. Eager to do my part, I dearly wanted to be a part of any team with the best names in contemporary astronomy and for these past 8 years was lucky enough to meet Giovanni along my own personal road.

Born in Udine in 1964, Giovanni was for many years President of the Italian astronomy association AFAM of Remanzacco. He was coordinator of the comet section of UAI (Unione Astrofili Italiani) and one of the leaders of CARA Team (Comet AfRho Research Group). He began his collaboration with the UAI Comet section in 1983 (the year of perihelion passage of 22P/Kopff), and subsequently participated to the International Halley Watch watching the 21P/Giacobini-Zinner and 1P/Halley.

His passing is a great loss for all those who loved him and for the world of astronomy. It is impossible to list here the many discoveries, articles and all contributions he made to the world of professional and amateur astronomy, not only to the field of comets.

One need only recall the 11 supernovae discovered by him in the years 2005-2009, a nova in the galaxy M31 in 2000 (the first discovery by amateur means) together with dear friends of Remanzacco Observatory, the discovery of dozens of asteroids and the observation and follow-up of hundreds of comets and Near Earth Asteroids (NEOs). In the last two years, we had embarked on a new partnership and friendship with the English amateur astronomer Nick Howes. We both agreed that we could get wonderful results together with Nick, but a cruel fate took Giovanni away too soon.

It will be impossible to fill the void he leaves, but the best way to honour him will be to continue on the road we had taken together to try shed some more light via our research on the objects he loved so much, the comets.

Giovanni was a great person, a great astronomer and the best of friends. I will miss him immensely!

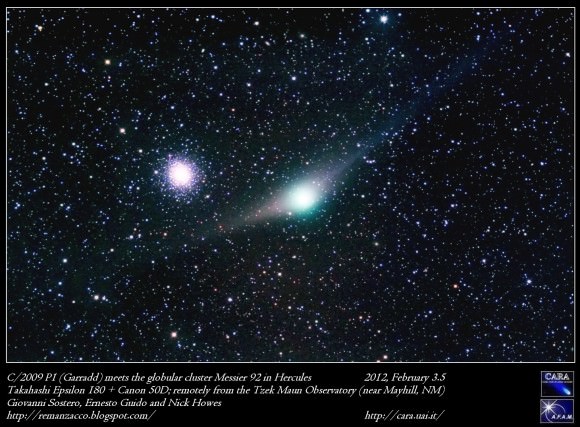
Comet Garradd (C/2009 PI) as it passes by the globular cluster M92 in the constellation Hercules, was taken remotely from the Tzek Maun Observatory in New Mexico by the team of Giovanni Sostero, Ernest Guido and Nick Howes.

From Nick Howes,
UK:

I first encountered the remarkable Giovanni Sostero and his long time friend and collaborator Ernesto Guido in 2010, after the successful imaging of Comet 103P in support of the NASA AOP program. I was using the 2m Faulkes Telescopes a lot for cometary imaging, and after we got chatting, onlline, we decided to collaborate as a team working on both the Faulkes scopes and also their own observatory in Italy for ongoing cometary research projects. His knowledge of the skies was truly staggering, as was his knowledge of comets in general. I learnt so much from working with him, a kind, generous and informative individual with a phenomenal sense of humour.

You only have to look at the over 1880 NASA ADS citations he has for his work, combined with several supernova discoveries and an asteroid named after him, to realise that not only the amateur community, of which we are all proud members, but the professional astronomical community, respected and loved this man.

The reaction on the social media sites and comet mailing lists has been universal, one of shock and deep sadness, that we have lost such a wonderful mind, and such a great person. I valued his friendship greatly, his mentoring, his help and passion for astronomy were invaluable, and words can’t express the deep sadness I think we all feel. The team at Faulkes…well we’re all in deep shock… as we had great plans for this year, with the ESA comet 67P mission project, our plans to track comet ISON and comet Panstarrs L4, but Ernesto and I will continue, and aim to honour his name with many great new discoveries.

You can read more words of condolences for Giovanni here.

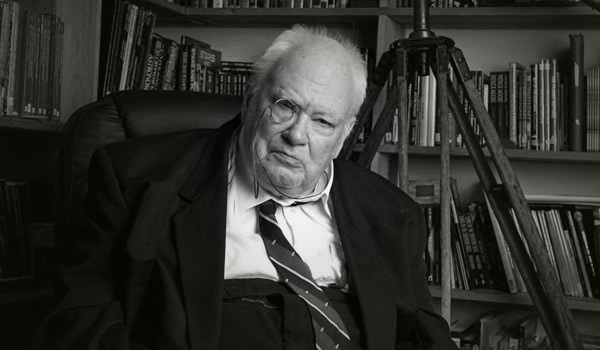
Remembrances and Reflections: Sir Patrick Moore 1923 – 2012

Sir Patrick Moore. Credit: sirpatrickmoore.com

Astronomers, both professional and amateur, throughout the world, were saddened yesterday to hear of the death of Sir Patrick Moore. He was the reason many of them became interested in the stars in the first place. For 55 years, from 26 April 1957 until his final broadcast on 3 December 2012, he was our monthly guide to the stars, earning him a place in the Guinness Book of Records  as the world’s longest-serving TV presenter of the longest-running programme with the same presenter in television history, The Sky at Night.

He was born Patrick Alfred Caldwell-Moore, at Pinner, Middlesex on 4 Mar 1923 and later moved to Sussex. Heart problems during his youth lead to him being educated at home. When he was 6 he was given a copy of The Story of the Solar System by GF Chambers which began his life long passion for astronomy and 5 years later, at age 11, he joined the British Astronomical Association. By age 14 he was asked to run a small local observatory in East Grinstead.

At the age of sixteen he lied about his age in order to join the Royal Air Force and from 1940 until 1945 he served as a navigator in RAF Bomber Command, reaching the rank of flight lieutenant. It was during the war that his fiancée, a nurse called Lorna, was killed by a bomb in London. He never married, saying later: “there was no one else for me … second best is no good for me … I would have liked a wife and family, but it was not to be.” He was elected a Fellow of the Royal Astronomical Society in 1945.

After the war he began teaching and built his own 12½ inch reflector telescope in his garden and began to observe the moon. In 1952 wrote his Guide to the Moon, the first of over 100 books he was to write in his lifetime, all typed on his 1908 Woodstock typewriter. His detailed maps of the moon’s surface were eventually used by Nasa as part of the preparations for the moon landing.

On 26 April 1957, at 10:30 pm, he presented the first episode of The Sky at Night, which was scheduled to run for only three months. During his 55 years as presenter he only missed a single episode and from 2004 the programme was broadcast from his home as arthritis meant he was unable to travel to the studios any longer.

He was Director of the newly constructed Armagh Planetarium in Northern Ireland from 1959 until 1968 when he returned to England to live at Farthings in Selsey. He covered all the Apollo missions for television reported on the Voyager and Pioneer programmes and in 1966 was the only amateur astronomer to be elected a member of the International Astronomical Union. The Caldwell catalogue of astronomical objects was compiled by him and asteroid 2602 Moore was named in his honour.

He was keen pianist and accomplished xylophone player and composer, a chess player, golfer and cricketer. He travelled extensively to all seven continents, including Antarctica and claimed that he was the only person to have met the first man to fly, Orville Wright, the first man in space, Yuri Gagarin, and the first man on the moon, Neil Armstrong. In 2001, he was knighted for “services to the popularisation of science and to broadcasting” and became the only amateur astronomer ever to be appointed an Honorary Fellow of the Royal Society.

In an interview in 2008, he said: “In astronomy, amateurs have always played a major part, and they still do. Amateurs do things professional astronomers don’t want to do, haven’t time to do or can’t do. And the average amateur knows the sky a great deal better than the average professional. So, amateurs discover comets, novae and so on.”

He never had any formal training himself and was keen to support and promote the real contribution that amateur astronomers can make to science. He made a point of responding to all letters delivered to his house and delighted in helping to encourage anyone who showed an interest in the stars. He famously had no time for conspiracy theorists, UFOlogists or astrologers. He gave lectures, tours and public appearances, seemingly to anybody who asked. though he held many views that I will kindly call ‘old fashioned’ and move on, he was happy for people to visit his observatory at his beloved home in FSelsey, which became effectively an open house and science centre. When the news of his death broke tributes poured in from friends and colleagues across the UK and around the world, many feeling they had lost, not just the man responsible for sparking their interest in astronomy, but a mentor and friend, many had stories of his generosity to share.

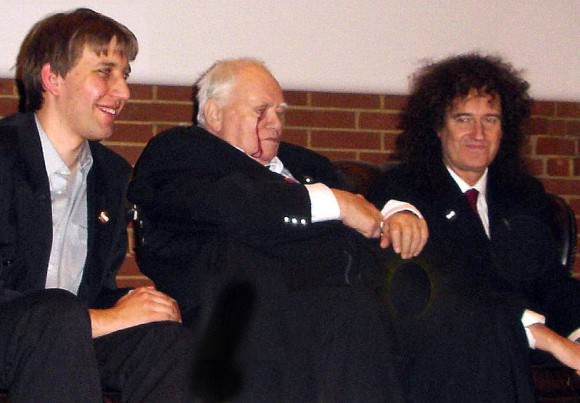
British amateur astronomer Sir Patrick Moore (center), with co-presenter Chris Lintott (left), and the astrophysicist guitarist Brian May (right). Credit: Steve Elliot.

Chris Lintott, Sir Patrick’s co-presenter on the Sky at Night said “Sir Patrick dedicated his life to talking about astronomy at any opportunity – not out of a desire to make a name for himself or to further an agenda, but because he thought the world would be a better place if he did so.”

Linitott told Universe Today that even though Moore was based in the UK, his appeal was international.

“I remember being at the IAU and finding that astronomers from all over the world were queuing up to thank him for sparking their interest,” Lintott said via email. “He also brought amateurs and professionals together, treating everyone as an equal.”

In a statement, musician, astrophysicist and another “Sky at Night” co-presenter Brian May said called Moore a “dear friend and a kind of father figure to me.” adding, “Patrick will be mourned by the many to whom he was a caring uncle, and by all who loved the delightful wit and clarity of his writings, or enjoyed his fearlessly eccentric persona in public life. Patrick is irreplaceable. There will never be another Patrick Moore. But we were lucky enough to get one.”

Another presenter, Paul Abel, gave an interview about Sir Patrick this morning, and you can hear the audio here.

The theme tune for Sky at Night is the first movement from Pelléas et Mélisande,’ At the Castle Gate’ by Sibelius. When I heard of his death I posted the video in tribute to him and many commented that after the first few bars they expected to hear Sir Patrick’s distinctive voice wishing them a ‘Good evening’, I think that is true of a generation of astronomers. Thank you Sir Patrick.

More about Sir Patrick here

Stunning Star Trails Mania

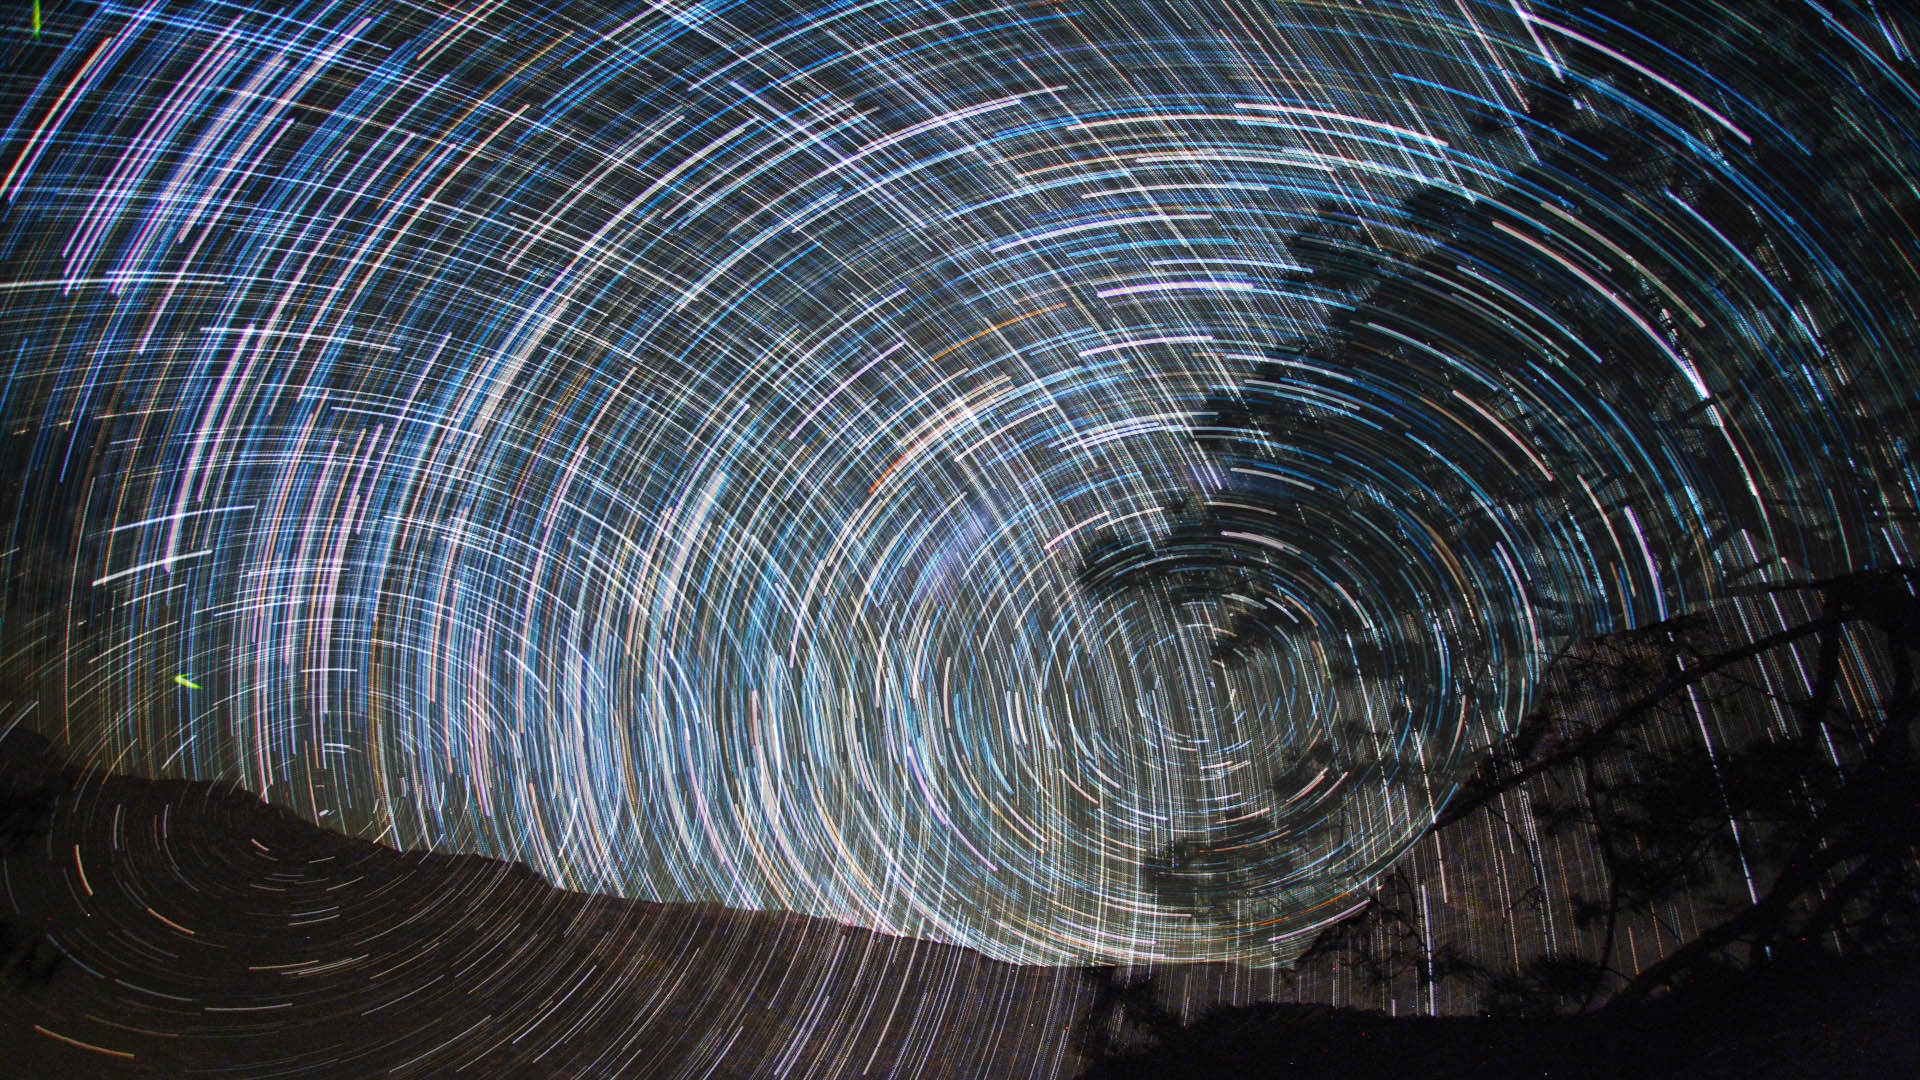
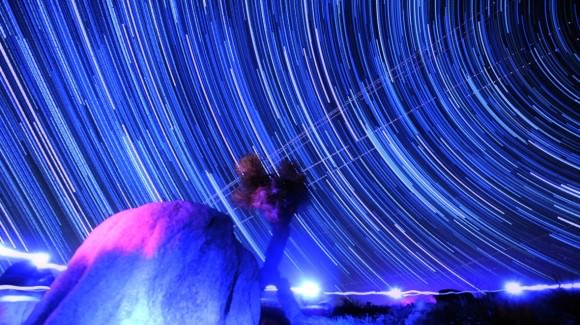
You like star trails? We’ve got star trails! One of our favorite timelapse gurus, Gavin Heffernan from Sunchaser Pictures shot this stunning footage, and as he says, no special effects of any kind are needed to create star trails: just leave your shutter open and the natural rotation of Earth takes care of the rest!

But wait… there’s more!

Have you ever compared how different star trails look in the northern hemisphere compared to the southern hemisphere?

César Cantú has:

From the northern hemisphere, stars appear to move counterclockwise around the north pole of the sky; but if you stand at any point in the earth’s southern hemisphere, the stars appear to move clockwise around the south pole of the sky. César, who mans the Chilidog Observtory, took star trail footage from Mexico and Africa and combined the two to create an incredible “Hemispheric Countersense” video. See more about it here.

Combining star trails from Mexico and Africa. Credit: César Cantú

Scene from Sunchaser Star Trails. Credit: Gavin Heffernan. Footage shot in Big Bear Lake, Joshua Tree, and also Canada. Used Canon 5D & 7D, with a 24mm/1.4 lens and a 28mm/1.8.

SUNCHASER STAR TRAILS from Sunchaser Pictures on Vimeo.

A Virtual Galactic Smash-Up!

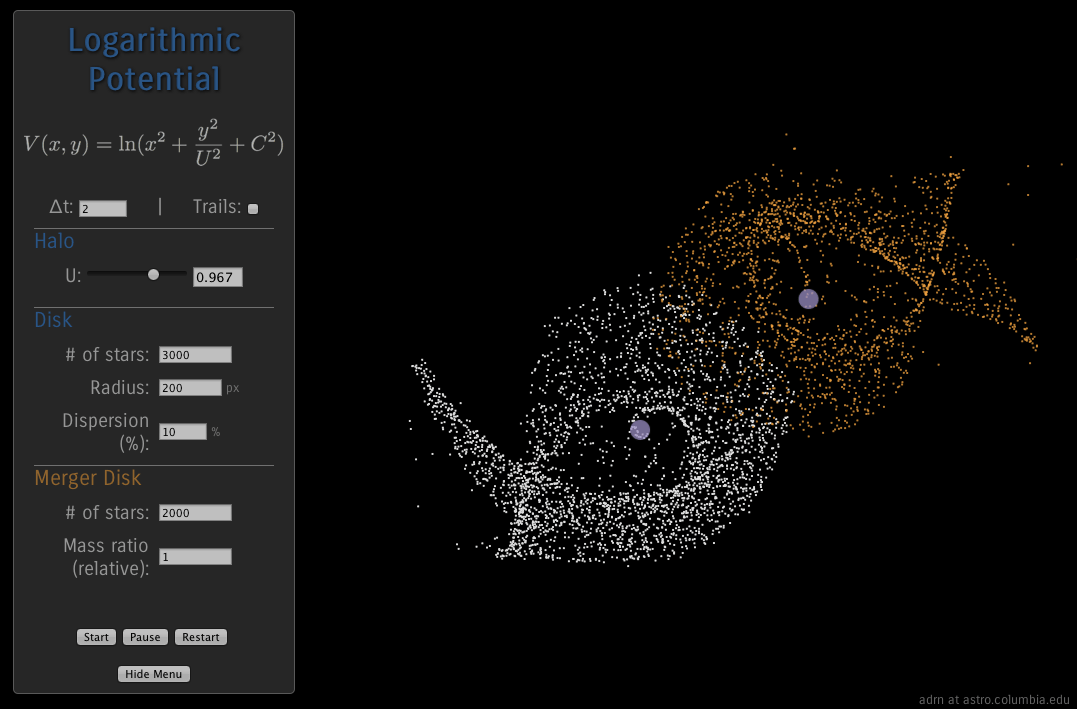
An online simulator for galactic collisions (Adrian Price-Whelan/Columbia University)

Have you ever had the desire to build your own galaxies, setting your own physical parameters and including as many stars as you want, and then smash them together like two toy cars on a track? Well, now you can do just that from the comfort of your own web browser (and no waiting billions of years for the results!)

This interactive online app by Adrian Price-Whelan lets you design a galaxy, including such parameters as star count, radius and dispersion rate, and then create a second galaxy to fling at it. Clicking and dragging on the black area will send the invading galaxy on its course, letting you watch the various results over and over again. (If those SMBH’s hit, look out!)

In reality many galaxies have gone through (or are going through, from our perspective) such collision events, our own Milky Way being no exception. In fact, the Milky Way is on course to collide with the Andromeda Galaxy… in about 4 billion years.

So while we wait patiently for that, this is just a bit of addictive fun to distract you from your Cyber Monday shopping spree. Enjoy!

(Source: Columbia University Astronomy & Physics)

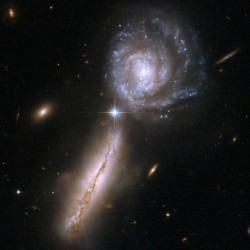
Inset image: Hubble interacting galaxies UGC 9618, 450 million light-years away. Credit: NASA, ESA, the Hubble Heritage (STScI/AURA)-ESA/Hubble Collaboration, and A. Evans (University of Virginia, Charlottesville/NRAO/Stony Brook University)

New Online Astronomy Course from CosmoQuest

For those of you who’d like to brush up on your Astronomy knowledge, or never took Astronomy 102, CosmoQuest has a new online course offering for you!

Following the success of the initial 101-level course (CQX 001: Solar System Science), the newest course offering is “CQX 003: Galaxies and Galaxy Clusters”. Just like the previous course offering, CQX003 is an 8-session, 4-week course, which will explore galaxies, galaxy clusters, and brief introduction to cosmology.

“Planets are cool and all, but I’m an extragalactic girl at heart. There is just NO comparison for studying the way that billions of stars interact in some of the largest gravitationally bound structures in the universe.” said Nicole Gugliucci (CosmoQuest) via the CosmoQuest Blog. “This class will cover all of that as well as what active galaxies are all about, another one of my favorite subjects. Then it will round up with a brief introduction to cosmology which is truly the study of EVERYTHING.”

Once again, the course will be a hybrid online course with lectures taking place via Google+ hangouts, with course assignments and homework assigned via Moodle. The instructor will once again be yours truly, Ray Sanders. For those not familiar with me, I’m a research assistant at Arizona State University, and have written for Universe Today in the past. I also blog when I have time over at “Dear Astronomer”.

In addition to my lectures, there may also be “guest” appearances from astronomers Dr. Pamela Gay, and Dr. Nicole Gugliucci.

“I love my solar system and its amazing planets and moons, but this class will give you a chance to expand your understanding beyond the solar system and explore the limits of what we know about the universe.” adds Georgia Bracey (CosmoQuest). “Beginning back when the idea of other galaxies was still a matter of debate, you’ll journey forward to examine our present-day understanding of how galaxies are formed and evolve, including a look at some of the hot topics in astronomy like dark matter, dark energy, active galactic nuclei, and the geometry of the universe.”

CosmoQuest has additional courses in the works for students interested in Cosmology, Data Reduction, Geology/Planetary Science, and more.

The cost for the class is $240, and the class is limited to 8 participants, with the possibility for an additional 5 participants. CQX003: Galaxies and Galaxy Clusters begins on November 26th 2012. More information, and a sign up link is at: http://cosmoquest.org/Classes

Don’t miss this opportunity to combine the convenience of an online class with the lively interaction of a small group of astronomers and astronomy enthusiasts!

Notes from an Amateur Telescope Maker’s Journal, Part 2

First of all, I’d like to say thank you for all the feedback on the first entry from the Amateur Telescope Maker’s Journal and say “Hello! Kia ora! Namaste! Greetings and Salutations!” to all the amateur, professional and armchair astronomers who wrote from the USA, Guatemala, New Zealand, Finland, India and elsewhere. What a kick it’s been to hear from everyone, and I like to think that astronomy and watching the stars is a shared language between people from around the world.

If I have succeeded in whetting your appetite for such things and you are still interested in, or even thinking about trying to build your own telescope, you might want to read on.

Two tips to remember: “Any job worth doing is worth doing right!” No excuses! and “The longest journey begins with the first step!” Here we go!

My first step was collecting as many fasteners as I could gather. I like to repair and build things and have found that fasteners always come in handy for this or that project. Eventually the fasteners I collected became crucial in the building of my telescope! If you do decide to, or are thinking about building your own telescope, you might do some serious fastener scavenging first, or if you can afford it, go out and buy a complete set of precision stainless steel nuts and bolts. I can’t over emphasize how important this step is. Believe me, you will need them.

My favorite scavenger hunt was the result of looking in a trash bin (dumpster diving anyone?) next to a computer test equipment manufacturing company where I worked the 1980’s. During inventory the ‘powers that be’, found it actually cheaper to throw away – if you can believe it — the used and/or unsorted fasteners left over from one project or another. This was cheaper than re-sorting and re-stocking I was asked by one of the techs, if I’d be interested in collecting some of them. Of course I was! Some of those ‘slightly used’ fasteners still live in mayonnaise, peanut butter and pickle jars in my garage!

A word about scavenging, in fact, a caution: Remember to be extremely careful when handling old electronic components. For example: TV or stereo capacitors when not fully discharged present a serious shock hazard! Also, collecting components from any leaky or cracked open transformers or other components should be suspect and left alone. Got contamination? Burnt components or signs of burning are also a not good prospect. Leave it alone! Old machinery and tools found at swap meets, garage sales and recycle centers are the best resource.

Many of us amateur astronomers are on a very limited budget. We have to do the best we can to find, adapt or modify that which allows us to follow our astronomy bliss. I am not above scavenging and getting my hands dirty to do the deed!

The main mirror in a Newtonian telescope is obviously the most important single component? That is to say, aside from the eyepieces, the secondary and main mirror mount! I’ve always wanted a larger scope and was hugely excited when I heard about a 12 ½-inch mirror for sale through a friend. Buying that mirror made the rest of my project possible and the other pieces fall into place. Here, I’d like to applaud the synchronicity and blind luck!

Originally I opted to build the easiest and quickest to build mount for this telescope. That would be a ‘Dobson’ style or alt-azimuth style turntable mount. A 14 inch diameter ‘sono’ tube (a concrete pier mold) came with the mirror I bought. I experimented with this tube for a while as part of the OTA (Optical Train Assembly) but found it too heavy and clumsy to handle easily. So instead, I decided to build some sort of N/S E/W polar aligned mount. A yoke mount? A German Equatorial? or a fork mount? I had to think on that for awhile.

After buying the mirror, I found myself at a ‘point of no return’. Now was the time to consider the final design and move forward! At first, I was tempted to build a simple Dobson style mount. (John Dobson is a hero of mine!) The heavy duty ‘sono tube’ concrete pier form was originally intended as the main body of the scope. Man-O-Man, was that thing ever heavy! And kind of ugly too. The more I thought about it the more I realized it would be too heavy and probably too hard to transport. That’s when I decided to try something a little bit lighter… and maybe a little different.

I received several requests for more construction details which follow, after this progress report…

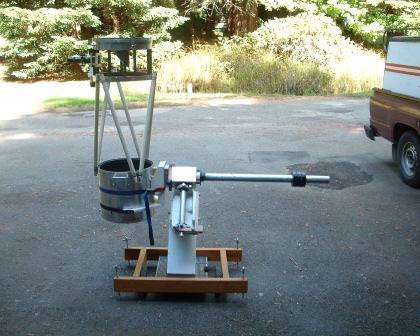
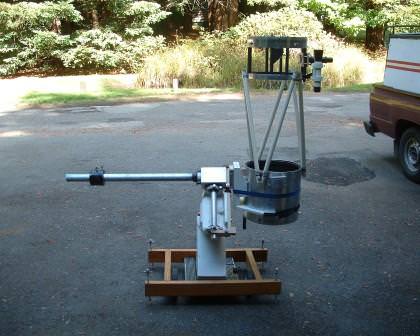
I painted the counter balance arm and counter weights with acrylic paint(s). For transporting the telescope the OTA is removed and the lead weights and steel counter balance bar removed. Handling uncoated lead or galvanized steel pipe regularly is known to be a source of heavy metal contamination. Use precautionary measures including gloves and or masks when handling or working these materials!

The most recent addition to my home-built telescope is the bright orange tennis ball at the end of the counter balance bar. I traced the end of the pipe onto the tennis ball with a pencil, then cut out the circle with an exacto knife. (CAREFULLY!) After trimming, it fit snugly in place. Next up: I will find a small battery powered red LED and mount it on the end of the tennis ball. The batteries will ‘live’ inside the removable ball. I made the plywood box to hold counter balance weights, tools, supplies and battery(s). It is also a handy ‘step up’ to the eyepiece, for shorter viewers. The top of the box I covered with a new car floor mat I found lying on the side of the road… Is that road kill?

Now, how about some more construction details:

The plant saucer I used to cover the main mirror housing has a dual function.
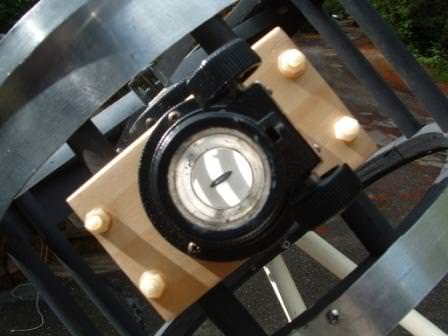
The circularly embossed rings in the top help align the focuser and secondary!
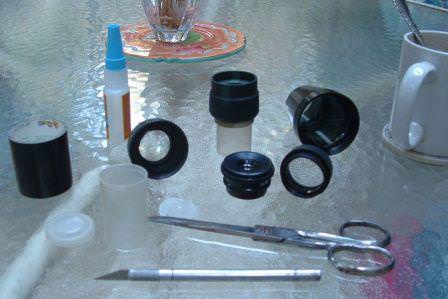
Now, let’s talk about some inexpensive eyepieces. Have you ever made your own? Why not?

I collected optical components from old cameras, dark room projectors, binoculars and video cameras I found along the way. Some of the optics had quite reasonable focal lengths and diameters, which made them easier to modify and turn into useful eyepieces! Inexpensive and readily available materials can be used with quite satisfactory results… that is if you aren’t a perfectionist.

Above, I show how I used old 35 mm film canisters to make eyepieces. Use an Exacto knife to cut out the bottom of plastic film containers. These containers come in several colors. I prefer the black one’s but transparent work well too! The canisters have a 1 1/4 inch outside diameter and will fit into the 1 1/4 inch eyepiece holder later.
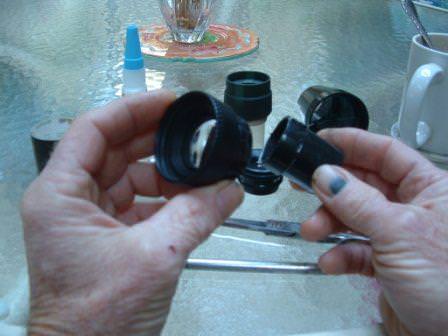
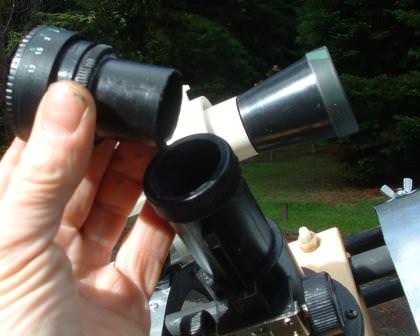
In these views I am shown attaching a modified film canister to a ‘recycled’ 24mm video camera lens.

I wrapped the end of the film canister with black tape to make up for the difference in diameters. The modified canister then fit snugly into the end of the lens body. This handmade eyepiece has a VERY wide field yet performs fairly well! There is no color shift in the crisp, wide angle view… Yes! I like!
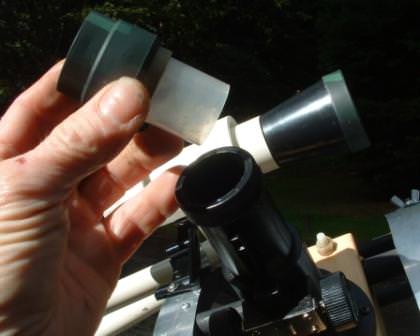
I did the same thing with one of the eyepieces from the Chinese binoculars I had. The 20 mm eyepiece has great eye relief! In this case, the modified film canister is super glued into place. Note: BE VERY CAREFUL when applying super glue near any optical surface! The fumes released during curing can severely damage any lens! Not that this has ever happened to me…. no……

Construction details: Continued

The leveling screws use drilled out faucet handles. I found that needed to rub some graphite onto the threads to stop them from squeaking loudly. The lag bolts pass thru clear holes in the 2 X 4’s. There are threaded inserts installed on the bottoms of the four hole locations. The faucet handles are locked in place with cap screws and nuts. The wheel axle is a solid steel rod, 3/8 inches diameter and has holes drilled thru either end for cotter pins, washers and keepers. The gap between the wheel and the modified aluminum router table is maintained with a cut piece of clear, thick walled nylon tubing.
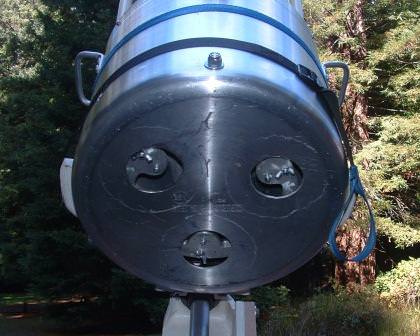
The main mirror adjustment or collimating screws are accessed through these holes in the base of the main mirror mount.

Eventually, I will mount a cooling fan here.

Here’s how I made the secondary spider legs…
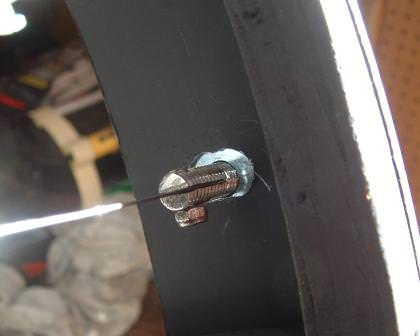

I used 2 inch long 1/4-20 bolts and cut off the heads. Then I cut a slot 1/2 way down the bolt shafts with a hand held hacksaw. I cut thin stainless steel packing straps to fit – rounded the ends – then drilled a thru hole for #00 lock nuts and screws to fasten the assembly. On the far side, there’s a SS washer and thumbscrew.
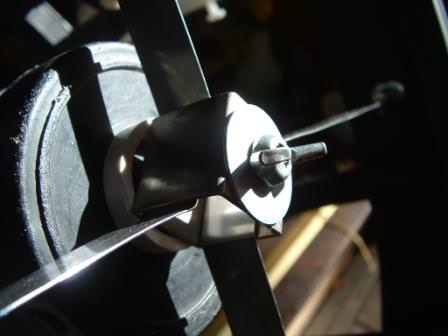
The secondary mirror housing mount was made from a 1 inch long section of 1 inch square stainless steel tubing. The stainless steel packing straps were then inserted and bent 45 degrees to fit.

How’s that for details? Of course, some ideas are not mine. I copied good ideas from elsewhere, created my own and am passing them forward to you. Does that work for you? I hope you’ve found some of this stuff useful or at least interesting? Please write and let me know? I’d appreciate it and promise to reply. I’m just a ‘lonely’ astronomer and would love to hear from you!

By the way… got any old telescope parts laying around? I’m always looking for more!
Notes from an Amateur Telescope Maker’s Journal, Part 1

A home-made equatorial wedge used with an off-the-shelf telescope, just one of the ways you can improve your telescope experiences. Credit: Dale Jacobs

Editor’s note: Interested in DIY telescopes? Amateur astronomer Dale Jacobs will be sharing his experiences in using everyday items to build or enhance telescopes.

I am an amateur astronomer and have been since the late 1970’s. I’ll be sharing some of my adventures in building and modifying telescopes for my personal use. Hopefully I can help instill the ‘bug’ in those of you who have been thinking of building your own scope but have yet to do it, or help others avoid some of my pitfalls. I’ll also be sharing my successes, which has inspired me to continue and enhance my stargazing endeavors. As you’ll see, it doesn’t always require expensive equipment, and I’ll show you how to be creative in using some things that you may have right in your kitchen cupboard or garage.

But first: how did I get started in this great hobby? Back in the 70’s I lived in a beachside studio apartment in overly crowded southern California. One chilly mid-November night (on my birthday!) I decided to go for a walk on the mostly deserted beach in front of my apartment complex to meditate and take in whatever stars I could see through the bright city lights. When I got down to the water and looked up, I was surprised to see a swarm of meteors overhead! Wow! Unknown to me at the time, this was the annual Leonid Meteor shower. I felt blessed and lucky to see those Leonids, which fell in near ‘storm’ proportions that year. I was truly amazed and watched for hours. Soon after, I began reading Sky and Telescope and Astronomy magazines to find out more about what I’d seen and then I signed up for an astronomy class at the local junior college.

One of my upstairs neighbors in the apartment building I lived in, heard about my new fascination and offered to lend me an unused and quite dusty 80mm ‘dime store’ refractor. The telescope was mounted on a poorly built alt-azimuth style tripod and came with three overpowered and very small eyepieces. Only one of them was any good and even so the eye relief was just terrible. No matter, I was young and had good eyes back then. So I took that telescope out every chance I could get and was amazed to see Jupiter’s bands and its brighter moons, Saturn’s rings with Titan, and the great Orion Nebula! The Moon soon became a constant companion as my fascination grew.

In 1984 after breaking up with my fiancée, I decided I needed a change of pace to keep from going crazy. So I quit my aerospace job and moved to Northern California. My new ‘digs’ were on a 1,000 acre cattle ranch half way up Sonoma Mountain. The ranch was only a few miles from the town of Petaluma, yet still had that ‘country’ feel – for a ‘city boy.’ The skies were usually pretty good there, especially when the fog rolled in and covered the lights of the S.F. Bay Area. At times, the brilliant stars above literally ‘took my breath away.’ We didn’t have skies like that down in Southern California! At least not within 100 miles of the greater metropolitan area…

I opted to buy a Meade model 2040, 4-inch Schmidt Cassegrain, fork mounted telescope for about $800 rather than the T.V. I was tempted to buy. This telescope turned out to be a MUCH better ‘deal’ and has been a great night time companion over the years! Since I wasn’t dating or even interested in the opposite sex for a quite awhile, it suited and served me well. A small scope is easy to set up and transport, which is key for casual observing. I even put it on the back of my motorcycle one time and drove up to Lake Tahoe with it! (Minus the tripod – it has screw-in legs for setting up on any suitable flat surface – such as a picnic table.)

The top image is of that telescope mounted on an equatorial wedge I made for my latitude. The wedge is constructed of a hard wood core, marine grade plywood. It is very stable! The cost for this endeavor was about $10, which included the wood, glue and fasteners. It was well worth the price, and I’m still using it! The tripod is an old surveyor’s backsight that my brother, a land surveyor, found one day working way back ‘in the woods’, up on a mountaintop. It had obviously been forgotten and had been there for who knows how many years. It was probably made in the 1940’s. It sure soaked up/took a lot rejuvenating oil and rubbing to make it useful again, but I like reusing old tools.

Building this equatorial wedge was a great confidence builder and inspired me to continue my star gazing. A 4-inch scope may be considered ‘small’, but a scope this size is a GREAT beginner’s scope and is a handy adjunct for any serious star gazer. Not shown in this image is the tar paper/roofing felt tube I rubber band around the end of the scope for dew protection. Yeah… this is ‘my baby’. It has served me quite well throughout the years! I saw Comet Austin, Comet Halley, Comet Hyakutaki, and Comet Hale Bopp with this scope, along with 41 other comets! I may have been taunted by other astronomers at star parties for having such a ‘small’ scope… but I’ll tell you what… smaller scopes can sometimes ‘see’ through upper atmospheric disturbance cells and are actually better than larger scopes at doing so. I have seen where they will sometimes outperform 8-, 10- or 12-inch scopes! Many times at ‘star parties’ I was the one to found that obscure comet… long before the larger scopes did.

One thing I discovered is that while adequate for casual viewing, this scope doesn’t do all that well with faint galaxies. As a result, I’ve always dreamed of having a larger ‘light bucket’ for those clear nights, when the seeing excels. Then one day, a scientist friend of mine, who was leaving the area to work at the new Virgin Galactic space port in New Mexico, offered to sell me a 12 1/2 inch mirror he’d ground and polished back in the 1970’s. He’d never completed the project due in no small part to the arrival of babies and pressing career responsibilities. Along with the 12 1/2″ mirror he also sold me several components he’d collected to build his ‘dream’ scope, but never did. What you see below is what I ended up doing with some of those components and my own additions.

Here ‘she’ is, warts and all…. my new baby!

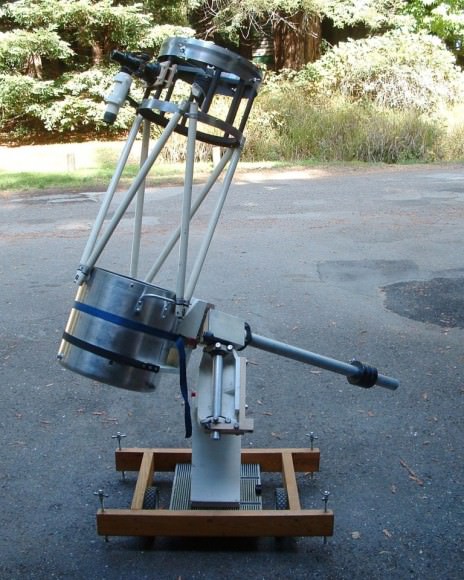
Dale’s 12 1/2 inch lightbucket…. or light pot. Image: Dale Jacobs.

The base of the mount I made from a modified aluminum router table. Attached to that is a Doug Fir 2X4 leveling and support base. The leveling screws I made from 8-inch long lag bolts with their rounded heads pointing downwards. The handles of the leveling screws I made from drilled out garden faucet handles. They are captured by stainless steel cap nuts and threaded inserts. The wheels on this side of the base I purchased at a local hardware store, the axle too. The two front wheels on the side opposite, are from a baby carriage! The equatorial wedge I cut from a piece of 1 inch thick plywood. The cast aluminum equatorial mount was made from an old Navy gun alignment bore sight. The R.A. axis is mounted where the spotting or alignment scope once lived. The clamps that held that bore scope now hold the R.A. shaft bearings in place.

Here’s what I did with the old refractor/bore sight.

I mounted it on a German Equatorial from an old Tasco 4 inch reflector a friend gave me. The aluminum pie pan makes the shadow for the projected solar image. To connect the imager to the eyepiece I used black PVC tubing with straightened clothes hanger metal spokes in drilled through holes. The spokes are held in place with a stainless steel tube clamp. Rubber bands behind the white projection plate hold it firmly in place. I use this scope to observe Sun spots. Not only can I see the spots but also sometimes can see the whitish faculae which frequently accompany and surround them!

I finally got the balancing just right for the 12 1/2″ scope. That was tricky! This mount allows me to move the whole assembly with a finger light touch. I made brakes to stop motion A/R in either axis from hard wood cutouts.

Here’s a view of the secondary mirror housing:

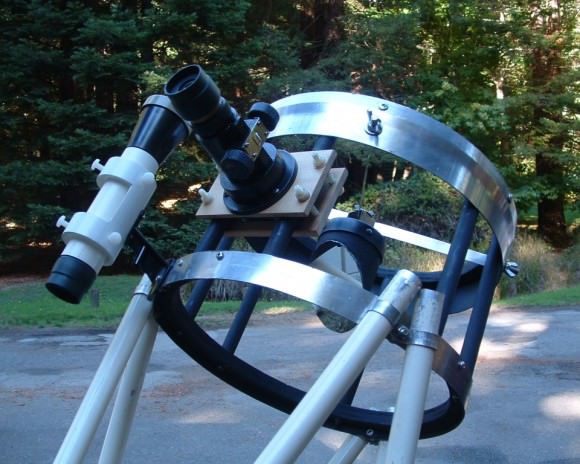
The aluminum struts I purchased at a scrap and hardware store. I made the finder scope from a pair of ‘funky’ plastic Chinese binoculars that never focused properly anyway. The finder’s body and mount are constructed from white PVC tubing and held in place with nylon screws. The base of the finder mount was made from a broken finder scope that I modified to fit with a Dremel tool. The eyepiece focuser can be moved left/right, up/down on any of the four paired dowels by loosening the attached nylon screws. Next up, I will make a ‘clocking mechanism’ so I can easily turn the secondary 90-180 or 270 degrees.

I can add other focusers, cameras or instruments on any of the 4X ‘dowel flat’ pairs. I made the secondary mirror from a precision optical flat another scientist friend gave me back in 1984 when I worked at a semiconductor equipment manufacturing company. Ever cut glass before? Triple trick! Those flats were coated with aluminum during a vacuum/deposition chamber test. The secondary housing I cut from an old fishing rod transport tube. Later, I plan to purchase a 1/10 wave or better secondary and new mirror mount. The spider legs are modified stainless steel packing straps. Both the secondary housing and main mirror housing were made from 34 qt. alum. cook pots! What’s cooking Daddy-O or Momma Mia?!

Here’s a view of the mirror cover I made from a ‘spare’ plant pot saucer. (Don’t tell the wife!) I sewed the ‘grip handles’ into the nylon mounting straps to aid in tightening the straps. Part of the two wooden brake assemblies are also shown in this view:

In this view you can see the ‘yet to be coated’ primary mirror and the ‘at that time’ mostly unpainted secondary mirror housing:

I’ll have the mirror tested and coated soon and plan on using a web cam or DSLR for imaging after I install some sort of clock drive mechanism. I hope to eventually participate in the Universe Today’s weekly online Virtual Star Parties with this ‘puppy’ (as David Letterman would say) when completed. I hope so anyway… only time will tell!

In the next episode… I hope to ‘show off’ some images! There’s that ‘only time will tell’ thing again!

Have any questions or comments for Dale about his amateur DIY astronomy? Leave comments below, or you can send him an email

All images are courtesy Dale Jacobs