Image credit: Astro.Geekjoy Like many hobbies, an interest in amateur astronomy can suddenly flare up or be the natural out-working of many years of quiet contemplation. Developing that interest further can occur through sheer whim and fancy - or follow a carefully thought-through process of selective reasoning. Like the proverbial race between the hare ("Lepus") and the tortoise ("Al Shilyak"), the hobby of amateur astronomy can move in fits and starts - or maintain a constant momentum. Following either approach can lead to the finish line. But in amateur astronomy the "finish line" is but the beginning of a longer journey - one that starts with the acquisition of that very first astronomical instrument of long-seeing (the telescope).
Are you the kind of person who plots and plans? Or the kind that pots and pans? Most of us lie somewhere between. We peek and poke around a thing until critical mass is achieved. Then we overcome rolling resistence, toss down some hard-earned cash, and walk away with our shiny new scope in excited anticipation of that first night out amongst the stars. But before first light comes the first rite.
Will the ritual of putting that scope together lead to "buyer's remorse" or "great of course!"? Somehow we must successfully assemble that new scope, align it for practical use, and overcome the initial bump in the learning curve that could block us from achieving our astronomical potential and fulfilling our aspirations.
A telescope typically starts out in a variety of pieces. These pieces come in boxes. The first order of the day - not the night - is to pull all these parts together to make a working scope. To help in this an instruction manual should have arrived with your scope. Ideally that manual should provide all the clues needed - in word and picture - to make scope assembly possible.
Before you start make sure that all the parts needed came in those boxes and that each part appears to be in good working order. Anything missing? Contact the vendor. Anything damaged? Contact the vendor. Anything you don't understand? Contact...
"And thus great things have smaller things, smaller things that bind them, and these small things have smaller things, hopefully not ad infintem."
But right here is your first "gotcha" - you need to have a basic understanding of how that telescope works - along with a practical grasp of the purpose of each conmponent and the practical relationships between them.
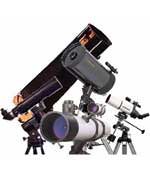
Thankfully - compared to particle accelerators for instance - telescopes are relatively simple devices. One part of the telescope gathers the light to form an image, another reveals that image to the eye. A third helps you find what you're looking for, and a forth holds things together enough so you can enjoy looking at it. If you already know the names for these four basic assemblies you are already on your way to making sense out of the instructions coming with your new scope. If not, you may want to spend some quality-time with the person who sold it to you...
So now we assume you've installed the finder on the optical tube assembly, placed an eyepiece in the focuser, and mated the telescope to its fully assembled mount. The next step is to get all these parts working together as a team.
Presumably your first scope is small enough that mount and scope, finder and eyepiece can all be hand carried out onto the front drive where you can point it at a distant tower or building. If the scope uses a non-tracking altazimuth or dobsonian mount you should have no trouble figuring out how to get the telescope tube to swing toward any chosen target. If you are one of the brave souls who chooses to master the complexities of the equatorial mount, you may be in for a shock - the thing just doesn't make sense!
Equatorial mounts are enigmatic for one very good reason: they are meant for astronomical - not terrestrial use. The key to the equatorial mount is to think astronomically! And to think astronomically you need but ask one simple question: "What part of the sky does not move as the Earth turns?"
If you came up with "the north or south pole" you have the IQ for the EQ. That "T"-shaped part of your german equatorial mount must be aimed precisely as possible at a celestial pole (depending on your earthly latitude). So look at it this way, if you live among walruses and polar bears you would simply adjust that "T" as though it were a "T". Everything celestial would appear to move in a great circle and your scope would follow that apparent motion in the sky. (Did you say: "I get it just like a dobsonian or altazimuth mount!"?) But if you live on the equator that T would be a "lazy-T" (-|) pointing off toward some distant point on the horizon. Those great arcs would sweep up, over, and down.
But where on the horizon precisely? Toward the same pole where the T pointed earlier - only now its harder to find. Since most folks don't live on the equator, and none live at the poles, you simply adjust the angle of the "T" to the same angle as your geographic latitude and point it due north or south (not magnetic north - but physical). In fact many equatorial mounts include an angular scale to assist in this. Do you live at 42 degrees north latitude? Well then, swing that declination axis upward until the little arrow on the side of the mount settles on 42 degrees. Follow this by leveling the mount (using the leg extensions) whenever you set up outside for a night of astro-navigation. Don't know where due north is? Point that same axis in the direction of Polaris! Live south of the equator? Things get more complicated (since there is no Polaris-star-south to guide her by) - but the equatorial can still be used - polar alignment just gets a bit more complicated.
1
.
But right now you have everything setup outside. If the optical tube is on an equatorial mount, the base of the "T" points toward the pole. (If an altazimuth, the single pivoting shaft points straight up. If a dobsonian, the "rocker box" holding the newtonian telescope is level.) Your next challenge is to align the finderscope with the main tube using the most distant target possible. (This overcomes parallaxial shift between the two instruments).
Amateur astronomers vary in type finderscope favored. The traditional finder takes the form of a small refractor telescope of 2 (or fewer) inches in aperture and less than 10 power magnification. It typically includes crosshairs to simplify precise sighting. Such a finder shows less than 10 degrees of the sky in a single view. (10 degrees is roughly the apparent width of your fist arm extended.) Other amateurs favor "unit finders" of one type or another. Unit finders are simple sighting devices. More sophisticated models include an illuminated reticle to center specific stars or regions of the sky while less sophisticated ones simply display a red dot to "hide" the star intended. Irrespective of finder type, the task at hand is to align it to center on whatever is seen in the main telescope.
Most telescopes come with at least two eyepieces. Of the two, the physically larger one is likely to give the lowest power (and largest field of view). You can confirm this by inspecting each eyepiece for a stamped or silk-screened number (typically designated in mm's refering to the eyepiece's focal length). Contrary to what you might expect, the larger the focal length the lower the power of that particular eyepiece. (To actually determine the power selected, you must also know the focal length of the telescope itself - something that will matter more once you have more experience.)
After installing the low power eyepiece, sight along the tube at the most distant target possible. Now for the moment of clarity: Place your observing eye about one inch above the eyepiece. Shift your head slightly until you see a bright region right in its midst. Slowly lower your head allowing this region (the exit pupil) to expand until you can look inside the eyepiece and take in the entire dark perimeter of the field stop in one glance. Holding still, carefully reach for the focusing knob and turn it first one way then the other to get a sense of what direction the focuser needs to move in order to sharpen the image. Then go for it! Sharpen that image as much as possible - overshoot, undershoot, and settle in on the very best position of the eyepiece - relative to the objective lens or mirror - that gives the very best view
2
.
Make a mental note of whatever it is that you are looking at then shift over to the finder. Make the mechanical adjustments needed to center the very same target in the finder without moving the main tube. (It doesn't matter at this point if the target you originally selected is the one you end up with in this first rough pass at finderscope alignment.) Once the same target is centered in both the finder and the main scope then drop in the higher power eyepiece and attempt to lock on the original (most distant) target and repeat the alignment procedure.
With the finder scope aligned you can now begin practicing with your scope. Pick out distant targets from all around you. Make sure that each target is at least several hundred meters away. Get accustomed to shifting the scope to all angles - but DON'T turn your scope anywhere near the sun!!! (Danger Will Robinson, Danger!) Practice centering your eye over the eyepiece alot. (It'll be tougher in the dark and you won't have a bright circle to guide your eye position.)
Now you're ready for first (astronomical) light. Right after sunset, set up your telescope outside in an open area. (The best spot will have a north-south view.) Give it a chance to cool down to air temperature. It's best to leave dust caps on the scope but if temperatures are dropping quickly remove the one on the main tube to speed up cool down - but there's no reason to expose the eyepieces or finder to dust. If the Moon isn't up, grab yourself a cup of tea while you do some homework on the web or in books to see "What's up" in the early evening sky. Some forty-five minutes after sunset the very first bright stars (Vega, Deneb, Fomalhaut, Rigil, Capella, Sirius, Procylon, Rigil Kentaurus, Canopus etc.) or planets (Venus, Mars, Jupiter, and Saturn) will peek out. Start practicing with your telescope at low power. Get used to slewing your scope around and finding things. Work on your focusing and eye centering technique. Try different eyepieces - but always come back to the lowest power before searching for the next celestial study. Don't be surprised at how fast things move across the field of view - especially at higher powers! Get "the drift" of this and learn how to anticipate the motion by slewing your mount slowly. Don't use any tracking drive until after you've mastered manual slewing. And yes, take some time to really appreciate what you are looking at! This is the time to develop some positive observing habits.
Within an hour and a half of sunset skydark will arrive. Conditions should be ripe for your first deepsky study. What's going to be first? How about that Whirlpool Galaxy - ain't she a beaut?
Like "Dirty Harry" said: "Know your limitations." First you'll need to find your way around the night sky. Start with the circumpolar constellations. Think of them as "jumping off points" - based on the time of night and the seasons of the sky. If the Big Dipper (Ursa Major) is high overhead - look further south and you'll see bright Regulus and well-formed Leo the Lion. Want more of a challenge? Find Leo Minor between them. If the circumpolar constellations are not visible to you, start with the zodiac. Some - Taurus, Gemini, Leo, Scorpio, and Sagittarius - include bright stars or are easily grasped by the imagination. Others (Aries, Virgo, and Libra) are bright enough but less easily traced out against the sky. Capricorn, Aquarius, Pisces, and Cancer are relatively obscure and take some real concentration. Once you know your way around the circumpolars and zodiacals try your eye on those constellations bathed in the light of the Milky Way. From then on out just let whim or necessity drive your wanderings - they'll always be plenty of opportunity to go a wandering and a wondering!
Be sure to get a good set of star charts - nothing too sophisticated at first. You won't be tracking down IC (Index Catalog) galaxies right away. Practical charts include stars visible to magnitude 5.5 at least. It should also include all 109 Messier deep sky studies plus a half-dozen or so findable double stars in each of the major constellations. Software programs are also available on the open market or can be downloaded off the web. You may even have received a free software CD with your telescope. Such programs are very useful in determining the location of the Moon, planets, and certain periodic comets. They also include logs for archiving your observing notes. (These are often transcribed from a tape recorder or brief notes taken during observing sessions. Your observing notes are your future gift to self - and possibly others. They are the legacy of your love for the Night Sky.)
Your immediate goal is to learn how to use your scope and really enjoy whatever you see. As you learn the constellations set goals like finding anything in the night sky brighter than the 6th magnitude - including studies like magnitude 5.9 M13, the Great Cluster in Hercules; magnitude 3.5, the Great Galaxy in Andromeda and magnitude 4.0, the Great Nebula in Orion. Keep in mind that just because a study doesn't include the appellation "Great" doesn't mean that it won't be "great" to find and observe. Also keep in mind that you will not get views like those seen through the telescopes in the "Great" Observatories either. But you will get views that are very unique and personal to you, your scope, and the sky through which you observe.
Ultimately you may discover that amateur astronomy is one of the "greatest" of all hobbies - one that knows no limits in terms of experience - personal and social. There is also no limit to what can be learned. After all, astronomy covers the whole universe - and there's no reason to think the it only comes out at night or ends with the horizon...
1
Once your equatorial mount is set up for your latitude (using the vertical compass and index mark), the first step in locating the south celestial pole is to find the southern cross (Crux). Once this bright tight constellation is found, extend your fist an arms length away from you and follow the cross south three fists (or five cross) lengths. Orient your declination axis toward that point. Then sight the scope itself on any bright star well away from the pole (most are!) Install your highest power eyepiece. Center the star in your eyepiece field and allow it to drift across the field. Bring the star back to its original position by adjusting only the azimuth position of the mount until the star always returns to the center of the field. To simplfy future polar alignment, rotate the finderscope crosshairs until that same star skims across one of them perfectly. Then during future setup simply reposition the tripod legs until you can reproduce the skimming effect by moving the telescope slow motion along that same axis. (This last works fine north of the equator too.)
2
Telescopes can only focus on studies at a limited range of distances. If you select an target too nearby, the focuser will fully extend away from the light-gathering objective lens or mirror without achieving focus. If however the focuser travels all the way in without focus, contact your vendor. Also note, some telescopes (SCT's & MCTs) use primary mirror shift rather than eyepiece travel to set focus. If for some reason the mirror-shift mechanism is loose you will have trouble settling in at precise focus due to "image hop" as you turn the knob.
Acknowledgement:
My Thanks to Anthony Jifkins of Melbourne, Australia who suggested that I write this article for publication at Universe Today.
About The Author:
Inspired by the early 1900's masterpiece: "The Sky Through Three, Four, and Five Inch Telescopes", Jeff Barbour got a start in astronomy and space science at the age of seven. Currently Jeff devotes much of his time observing the heavens and maintaining the website Astro.Geekjoy.