Notes from an Amateur Telescope Maker’s Journal, Part 1

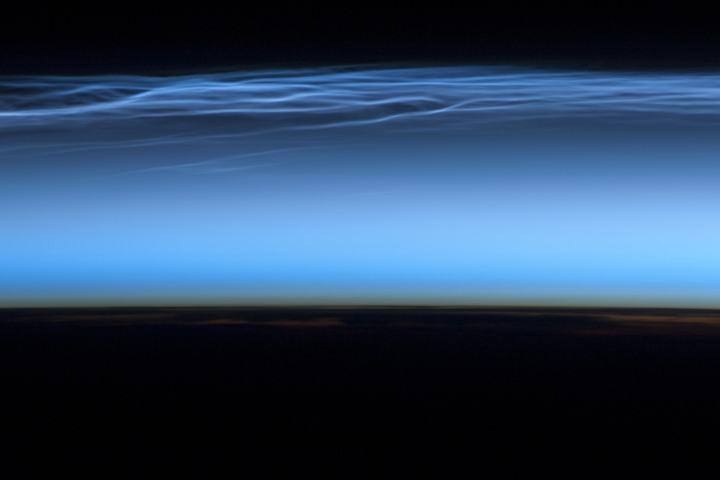
A home-made equatorial wedge used with an off-the-shelf telescope, just one of the ways you can improve your telescope experiences. Credit: Dale Jacobs

Editor’s note: Interested in DIY telescopes? Amateur astronomer Dale Jacobs will be sharing his experiences in using everyday items to build or enhance telescopes.

I am an amateur astronomer and have been since the late 1970’s. I’ll be sharing some of my adventures in building and modifying telescopes for my personal use. Hopefully I can help instill the ‘bug’ in those of you who have been thinking of building your own scope but have yet to do it, or help others avoid some of my pitfalls. I’ll also be sharing my successes, which has inspired me to continue and enhance my stargazing endeavors. As you’ll see, it doesn’t always require expensive equipment, and I’ll show you how to be creative in using some things that you may have right in your kitchen cupboard or garage.

But first: how did I get started in this great hobby? Back in the 70’s I lived in a beachside studio apartment in overly crowded southern California. One chilly mid-November night (on my birthday!) I decided to go for a walk on the mostly deserted beach in front of my apartment complex to meditate and take in whatever stars I could see through the bright city lights. When I got down to the water and looked up, I was surprised to see a swarm of meteors overhead! Wow! Unknown to me at the time, this was the annual Leonid Meteor shower. I felt blessed and lucky to see those Leonids, which fell in near ‘storm’ proportions that year. I was truly amazed and watched for hours. Soon after, I began reading Sky and Telescope and Astronomy magazines to find out more about what I’d seen and then I signed up for an astronomy class at the local junior college.

One of my upstairs neighbors in the apartment building I lived in, heard about my new fascination and offered to lend me an unused and quite dusty 80mm ‘dime store’ refractor. The telescope was mounted on a poorly built alt-azimuth style tripod and came with three overpowered and very small eyepieces. Only one of them was any good and even so the eye relief was just terrible. No matter, I was young and had good eyes back then. So I took that telescope out every chance I could get and was amazed to see Jupiter’s bands and its brighter moons, Saturn’s rings with Titan, and the great Orion Nebula! The Moon soon became a constant companion as my fascination grew.

In 1984 after breaking up with my fiancée, I decided I needed a change of pace to keep from going crazy. So I quit my aerospace job and moved to Northern California. My new ‘digs’ were on a 1,000 acre cattle ranch half way up Sonoma Mountain. The ranch was only a few miles from the town of Petaluma, yet still had that ‘country’ feel – for a ‘city boy.’ The skies were usually pretty good there, especially when the fog rolled in and covered the lights of the S.F. Bay Area. At times, the brilliant stars above literally ‘took my breath away.’ We didn’t have skies like that down in Southern California! At least not within 100 miles of the greater metropolitan area…

I opted to buy a Meade model 2040, 4-inch Schmidt Cassegrain, fork mounted telescope for about $800 rather than the T.V. I was tempted to buy. This telescope turned out to be a MUCH better ‘deal’ and has been a great night time companion over the years! Since I wasn’t dating or even interested in the opposite sex for a quite awhile, it suited and served me well. A small scope is easy to set up and transport, which is key for casual observing. I even put it on the back of my motorcycle one time and drove up to Lake Tahoe with it! (Minus the tripod – it has screw-in legs for setting up on any suitable flat surface – such as a picnic table.)

The top image is of that telescope mounted on an equatorial wedge I made for my latitude. The wedge is constructed of a hard wood core, marine grade plywood. It is very stable! The cost for this endeavor was about $10, which included the wood, glue and fasteners. It was well worth the price, and I’m still using it! The tripod is an old surveyor’s backsight that my brother, a land surveyor, found one day working way back ‘in the woods’, up on a mountaintop. It had obviously been forgotten and had been there for who knows how many years. It was probably made in the 1940’s. It sure soaked up/took a lot rejuvenating oil and rubbing to make it useful again, but I like reusing old tools.

Building this equatorial wedge was a great confidence builder and inspired me to continue my star gazing. A 4-inch scope may be considered ‘small’, but a scope this size is a GREAT beginner’s scope and is a handy adjunct for any serious star gazer. Not shown in this image is the tar paper/roofing felt tube I rubber band around the end of the scope for dew protection. Yeah… this is ‘my baby’. It has served me quite well throughout the years! I saw Comet Austin, Comet Halley, Comet Hyakutaki, and Comet Hale Bopp with this scope, along with 41 other comets! I may have been taunted by other astronomers at star parties for having such a ‘small’ scope… but I’ll tell you what… smaller scopes can sometimes ‘see’ through upper atmospheric disturbance cells and are actually better than larger scopes at doing so. I have seen where they will sometimes outperform 8-, 10- or 12-inch scopes! Many times at ‘star parties’ I was the one to found that obscure comet… long before the larger scopes did.

One thing I discovered is that while adequate for casual viewing, this scope doesn’t do all that well with faint galaxies. As a result, I’ve always dreamed of having a larger ‘light bucket’ for those clear nights, when the seeing excels. Then one day, a scientist friend of mine, who was leaving the area to work at the new Virgin Galactic space port in New Mexico, offered to sell me a 12 1/2 inch mirror he’d ground and polished back in the 1970’s. He’d never completed the project due in no small part to the arrival of babies and pressing career responsibilities. Along with the 12 1/2″ mirror he also sold me several components he’d collected to build his ‘dream’ scope, but never did. What you see below is what I ended up doing with some of those components and my own additions.

Here ‘she’ is, warts and all…. my new baby!

Dale’s 12 1/2 inch lightbucket…. or light pot. Image: Dale Jacobs.

The base of the mount I made from a modified aluminum router table. Attached to that is a Doug Fir 2X4 leveling and support base. The leveling screws I made from 8-inch long lag bolts with their rounded heads pointing downwards. The handles of the leveling screws I made from drilled out garden faucet handles. They are captured by stainless steel cap nuts and threaded inserts. The wheels on this side of the base I purchased at a local hardware store, the axle too. The two front wheels on the side opposite, are from a baby carriage! The equatorial wedge I cut from a piece of 1 inch thick plywood. The cast aluminum equatorial mount was made from an old Navy gun alignment bore sight. The R.A. axis is mounted where the spotting or alignment scope once lived. The clamps that held that bore scope now hold the R.A. shaft bearings in place.

Here’s what I did with the old refractor/bore sight.

I mounted it on a German Equatorial from an old Tasco 4 inch reflector a friend gave me. The aluminum pie pan makes the shadow for the projected solar image. To connect the imager to the eyepiece I used black PVC tubing with straightened clothes hanger metal spokes in drilled through holes. The spokes are held in place with a stainless steel tube clamp. Rubber bands behind the white projection plate hold it firmly in place. I use this scope to observe Sun spots. Not only can I see the spots but also sometimes can see the whitish faculae which frequently accompany and surround them!

I finally got the balancing just right for the 12 1/2″ scope. That was tricky! This mount allows me to move the whole assembly with a finger light touch. I made brakes to stop motion A/R in either axis from hard wood cutouts.

Here’s a view of the secondary mirror housing:

The aluminum struts I purchased at a scrap and hardware store. I made the finder scope from a pair of ‘funky’ plastic Chinese binoculars that never focused properly anyway. The finder’s body and mount are constructed from white PVC tubing and held in place with nylon screws. The base of the finder mount was made from a broken finder scope that I modified to fit with a Dremel tool. The eyepiece focuser can be moved left/right, up/down on any of the four paired dowels by loosening the attached nylon screws. Next up, I will make a ‘clocking mechanism’ so I can easily turn the secondary 90-180 or 270 degrees.

I can add other focusers, cameras or instruments on any of the 4X ‘dowel flat’ pairs. I made the secondary mirror from a precision optical flat another scientist friend gave me back in 1984 when I worked at a semiconductor equipment manufacturing company. Ever cut glass before? Triple trick! Those flats were coated with aluminum during a vacuum/deposition chamber test. The secondary housing I cut from an old fishing rod transport tube. Later, I plan to purchase a 1/10 wave or better secondary and new mirror mount. The spider legs are modified stainless steel packing straps. Both the secondary housing and main mirror housing were made from 34 qt. alum. cook pots! What’s cooking Daddy-O or Momma Mia?!

Here’s a view of the mirror cover I made from a ‘spare’ plant pot saucer. (Don’t tell the wife!) I sewed the ‘grip handles’ into the nylon mounting straps to aid in tightening the straps. Part of the two wooden brake assemblies are also shown in this view:

In this view you can see the ‘yet to be coated’ primary mirror and the ‘at that time’ mostly unpainted secondary mirror housing:

I’ll have the mirror tested and coated soon and plan on using a web cam or DSLR for imaging after I install some sort of clock drive mechanism. I hope to eventually participate in the Universe Today’s weekly online Virtual Star Parties with this ‘puppy’ (as David Letterman would say) when completed. I hope so anyway… only time will tell!

In the next episode… I hope to ‘show off’ some images! There’s that ‘only time will tell’ thing again!

Have any questions or comments for Dale about his amateur DIY astronomy? Leave comments below, or you can send him an email

All images are courtesy Dale Jacobs

Mysterious Noctilucent Clouds as Seen from the International Space Station

Mysterious “night shining” or noctilucent clouds are beautiful to behold, and this stunning image offers an unusual view of these clouds as seen by astronauts on board the International Space Station. Also called polar mesospheric clouds, these clouds are puzzling scientists with their recent dramatic changes. They used to be considered rare, but now the clouds are growing brighter, are seen more frequently, are visible at lower and lower latitudes than ever before, and sometimes they are even appearing during the day.

The astronauts were also able to take a time-lapse sequence of these clouds on June 5, 2012, as seen below. According to NASA, it is first such sequence of images of the phenomena taken from orbit.

The sequence in this video was taken while the ISS was passing over western Asia. By focusing on the limb of the Earth at night with the Sun illuminating it, the crew was able to capture some movement to these mysterious clouds.

There is quite a bit of debate for the cause of noctilucent clouds. Dust from meteors, global warming, and rocket exhaust have all been tagged as contributors, but the latest research suggests that changes in atmospheric gas composition or temperature has caused the clouds to become brighter over time.

Noctilucent clouds are usually seen during the summertime, appearing at sunset. They are thin, wavy ice clouds that form at very high altitudes (between 76 to 85 kilometers (47 to 53 miles) above Earth’s surface and reflect sunlight long after the Sun has dropped below the horizon. They appear in both the Northern and Southern Hemisphere and appear as delicate, shining wispy clouds against the dark sky.

The top image from the ISS was taken on June 13, 2012, as the space station passed over the Tibetan Plateau. At the same time, polar mesospheric clouds were also visible to aircraft flying over Canada. In addition to the noctilucent/polar mesospheric clouds trending across the center of the image, lower layers of the atmosphere are also illuminated. The lowest layer of the atmosphere visible in this image—the stratosphere—is indicated by dim orange and red tones near the horizon.

Lead image caption: Noctilucent or Polar Mesospheric clouds captured by the crew of the ISS on June 13, 2012. Credit: NASA

Source: NASA Earth Observatory

Astronomers View Asteroid 2012 LZ1’s Bright Flyby

As reported, asteroid 2012 LZ1 came about 5.3 million km (3.3 million miles) from planet Earth on its closest approach on June 14th, 2012. The fairly big and unusually bright space rock is about 502 meters (1,650 feet) wide. The Remanzacco Observatory crew of Nick Howes, Ernesto Guido & Giovanni Sostero captured this imagery of the pass.

Ian Musgrave in Australia also took some imagery of the pass:

Asteroid 2012 LZ1 imaged by Ian Musgrave with the iTelescope T16. Click for larger view of the image.

According to a little research by David Dickinson (@Astroguyz on Twitter) by looking at ESA’s NEODYS-2 website, this rock won’t be back in Earth’s vicinity again until June 12th, 2053, and will be about 3 times as distant.

There was no danger this asteroid would impact Earth at the distance it passed, and it appears it won’t be a problem in the future. But it has been classified as a Potentially Hazardous Asteroid. PHAs are asteroids larger than approximately 100 meters that can come closer to our planet than 0.05 AU (7.4 million km, 4.65 million miles). None of the known PHAs is on a collision course with our planet, although, as the Remanzacco team pointed out, astronomers are finding new ones all the time.

See the Minor Planet Center for more details on this object.

Ring of Fire! Annular Solar Eclipse on May 20

As the solar eclipse on May 20th progresses, its partial and annular phases will look very similar to this eclipse on May 10, 1994. Photo by Fred Espenak/SkyandTelescope.com.

[/caption]

There’s a great reason to look up this weekend and hope for clear skies! On May 20-21 an annular eclipse of the Sun will be visible from a 300 kilometer-wide track that crosses eastern Asia, the northern Pacific Ocean and the western United States. An annular eclipse means the Moon will not cover the Sun completely, and so when the Moon is directly in front of the Sun, there will be a bright ring of visible light on the surrounding edges, creating a so-called ‘ring of fire.’ The eclipse begins at 20:56 UTC (16:56 EDT US time) on May 20, and ends at 02:49 UTC May 21 (22:49 on May 20 EDT).

Not in that swath? See the map below, but you may be able to see a partial eclipse if you are in Asia, the Pacific and the western two-thirds of North America.

A map of the area where the annular eclipse can be seen. The dark strip in the center indicates the best locations for viewing the eclipse. The eclipse is also visible in the areas that are shaded red, but less of the Sun's disk is obscured. The fainter the red shading the less of the Sun's disk is covered during the eclipse. Click on this image for an interactive map from TimeandDate.com

Still not in the path of the Sun during that time? There will be several webcasts, including one from SLOOH, and more from Hong Kong, the summit of Mt. Fuji in Japan, and Area 51 in Nevada USA (no alien spaceships will be seen in this webcast, guaranteed.)

An important note if you ARE in an area where you can see the eclipse. DO NOT look directly at the Sun, and especially do not look through a telescope or binoculars at the Sun with your eyes directly. That ‘ring of fire’ will indeed burn, burn, burn your retinas, and could cause serious and permanent eye damage. There are special eclipse glasses, or you can make your own eclipse viewers. Mr. Eclipse has a whole list with instructions for pinhole cameras, and other safe viewing methods. If you have a telescope, the folks from Galileoscope have instructions for how to build a Sun-funnel for safe viewing

We posted an article last week about special eclipse glasses you can purchase, but you might be running out of time to buy them.

If you take any images of the eclipse (again, know what you are doing and be careful!) please share them with us via our Flickr page, or send them in via email. We’ll have a grand eclipse gallery of images from around the world!

Some of the spacecraft will also be observing the eclipse and will provide images and movies, such as the JAXA/NASA Hinode mission. You will be able to see the images and videos here, and as an added bonus Hinode’s X-ray Telescope will be able to provide images of the peaks and valleys of the lunar surface.

Unfortunately, the orbits the Solar Dynamics Observatory (SDO), the Solar Terrestrial Relations Observatory (STEREO), and the Solar Heliospheric Observatory (SOHO) will not provide them with a view of the eclipse.

You can see more eclipse information from Sky and Telescope, NASA and TimeandDate.com

The next solar eclipse will be the total solar eclipse on November 13, 2012.

Here’s a video from NASA:

Crowdsourcing the Hunt for Potentially Dangerous Asteroids

Faulkes Telescope, Hawaii. Credit: ESA

[/caption]

What’s the best way to look for potentially hazardous asteroids? Get as many eyes on the sky as you can. That’s the impetus behind a new partnership between the European Space Agency and the Faulkes Telescope Project, which will encourage amateur astronomers to look for asteroids, as well as providing educational opportunities that will allow students to discover potentially dangerous space rocks, too.

ESA’s Space Situational Awareness (SSA) program is part of an international effort to be on the lookout for space hazards – not only asteroids but disruptive space weather and space debris objects in Earth orbit.

But asteroids pose a problem. Often, they are hard to see because they can be very dark, they can approach rather too close before anyone sees them, and they’re often spotted only once and then disappear before the discovery can be confirmed.

That’s where crowdsourcing comes in, to get more eyes on the skies. ESA is turning to schools and amateur astronomers to help as part of Europe’s contribution to the global asteroid hunt.

This month, the UK’s Faulkes Telescope Project will become the latest team to formally support the SSA program. Spain’s La Sagra Sky Survey, operated by the Observatorio Astronomico de Mallorca, began helping SSA earlier this year.

“The wider astronomy community offers a wealth of expertise and enthusiasm, and they have the time and patience to verify new sightings; this helps tremendously,” says Detlef Koschny, Head of NEO activity at ESA’s SSA program office. “In return, we share observing time at ESA’s own Optical Ground Station in Tenerife and provide advice, support and professional validation. We’ll assist them in any way we can.”

The Faulkes Telescope Project runs both educational and research programs, based at the University of Glamorgan in the UK. The project has been active in public education and science outreach, and is a partner of the US-based Las Cumbres Observatory Global Telescope network, which owns and operates two telescopes. Faulkes supports hundreds of schools across Europe, offering free access to their online observing program to schools.

The Faulkes project has two telescopes where you can sign up for observing online: Haleakala, Hawaii (Latitude: N 20 42′ 27.35″ Longitude: W 156 15′ 21.72″) and Siding Spring, Australia (Latitude: S 31 16′ 23.5″ Longitude: E 149 04′ 13.0″)

“Our new cooperation with ESA is a great opportunity. Use of the 2 m-diameter telescopes in Hawaii and Siding Spring, Australia, will greatly enhance asteroid-spotting for the SSA programme, enabling fainter object detection and tracking from a global telescope network,” says Nick Howes, Pro-Am Program Manager at the Faulkes Telescope. “For European students, collaborating on exciting ESA activities and possibly detecting new NEOs is very appealing, as its engagement with one of the world’s great space agencies doing critical scientific work.”

While the Faulkes project focuses on schools, amateurs will be able to freely access the data archives. ESA’s archives are also open to all, and they work with amateur astronomers with the Teide Observatory Tenerife Asteroid Survey (TOTAS) team, who use a 1-meter telescope at the ESA’s Optical Ground Station on Tenerife in the Canary Islands. Since starting their SSA-sponsored survey work in January 2010, the TOTAS amateur astronomers have identified hundreds of asteroid candidates, over 20 of which have been confirmed and named.

Find out more about how where students in schools across the UK/EIRE and some European locations can sign up.

ESA’s Space Situational Awareness program

Source: ESA

M55 — Or a Swarm of Angry Bees?

M55. Image credit: ESO

[/caption]

Globular clusters are my absolute favorite telescope targets. Okay, Saturn, and then globular clusters. And that’s why I’ve absolutely fallen in love with this amazing picture from the European Southern Observatory of the globular cluster M55, located in the constellation Sagittarius. In fact, it’s my new desktop wallpaper (it should be yours too, click here and download the screensize that fits your monitor)

Globular clusters contain vast numbers of stars clumped together in a tight area. In the case of M55, there are about 100,000 stars grouped up within a sphere only 100 light-years across. Astronomers know that globular clusters are old, almost as old as the Universe itself. In fact, for the longest time, astronomers calculated the age of globular clusters to be older than the estimated age of the Universe. Of course, there was an incorrect measurement there, and astronomers eventually aligned the age of globular clusters and the Universe.

M55 is thought to have formed 12.3 billion years ago, when the Universe was less than 3 billion years old. The most ancient stars in the cluster burned out a long time ago, detonating as supernovae. We’re now left with the cooler, lower mass stars, which slowly wink out one-by-one becoming white dwarfs as they proceed through the full stellar life cycle. Our own Sun is only halfway through its own lifespan, before it runs out of hydrogen fuel and becomes a white dwarf.

There are at least 160 globular clusters scattered across the Milky Way, grouped up more towards our galaxy’s core. We can only see some of the clusters because the bright core of the Milky Way obscures our view to objects on the other side. But other galaxies, with their own globular clusters show us what our own galaxy probably looks like from afar.

M55 is part of the Messier catalog; a collection of objects that looked comet-like to the eyes of Charles Messier, a French astronomer working in the 18th century. Messier recorded a list of more than 100 objects which could be confused as comets: galaxies, clusters, and nebulae.

Want to see M55 on your own? You’ll need at least a pair of 50 mm binoculars or a small telescope, some nice dark skies, and a clear view to the constellation Sagittarius. Sagittarius looks exactly like a teapot in the sky, hovering above the southern horizon in summer. The further south you go, the higher Sagittarius will be in the sky.

But you’ll never see a view or take an image as detailed as this photo. That’s because it was captured with the ESO’s 4.1-metre (13.4 foot) Visible and Infrared Survey Telescope for Astronomy (VISTA) at ESO’s Paranal Observatory in northern Chile.

Original Source: ESO News Release

See Big and Bright Saturn at Opposition This Weekend

Saturn on April 3, 2012 with the moons Dione (Top-Left) and Tethys (Bot.-Right) as the ringed planet approaches opposition.Credit: Efrain Morales.

[/caption]

Now is the time to take a look at the planet Saturn, as the ringed planet will be at opposition this weekend, making its closest approach to Earth on April 15, 2012. Its face will be fully illuminated by the Sun, so get out those telescopes, binoculars and your imaging equipment! We want to see your photos! Efrain Morales from the Jaicoa Observatory took this image of Saturn and some of its moons on April 3.

The giant planet’s rings are now optimally angled at over 13 degrees, revealing them better than they have appeared in the past five years. To see the rings of Saturn during opposition, in the northern hemisphere point your telescopes east to southeast at nightfall and south around midnight. For reference, Saturn will be near the bright star Spica, in the constellation Virgo. In the southern hemisphere, Saturn will be above the eastern horizon at 10pm local time, still near Spica.

If the skies aren’t clear in your area, the Slooh Space Observatory will broadcast a free, real-time feed of Saturn at opposition. Their coverage will begin on Sunday, April 15th, starting at 6:30 p.m. PDT/9:30 p.m. EDT/01:30 UTC (April 16th). Slooh will provide two distinct observatory feeds — one from a remote location in South Africa and the second from their world-class observatory site in Canary Islands off the coast of Africa. The broadcast can be accessed at Slooh’s homepage or by visiting Slooh’s Google+ page, where you will be able to see a panel of experts interact live via G+ Hangouts On Air.

The experts include Duncan Copp, producer of many astronomical documentaries, including “In the Shadow of the Moon”; Amanda Hendrix, Cassini’s deputy project scientist from NASA’s Jet Propulsion Laboratory; and Bob Berman, author of numerous astronomy books and contributing editor and monthly columnist for Astronomy Magazine.

“In 40 years of observing the heavens and watching people’s reactions to celestial glories, I’ve found that no object elicits more amazement and sheer wonder than Saturn. I am thrilled to be part of Slooh’s live close-up visit to that magnificent planet,” said Bob Berman.

Send us your images of Saturn by joining our Flickr group, or send us your images by email (this means you’re giving us permission to post them). Please explain when and where you took it, the equipment you used, etc.

Thierry Legault: Astrophotography is an ‘Adrenaline Rush’

Thierry Legault with the equipment he uses for satellite images. Images courtesy of Thierry Legault.

[/caption]

During one of the final space shuttle missions, photographer Thierry Legault traveled nearly 4,000 km across various locations in Europe to try and capture the shuttle docked to the International Space Station as the two spacecraft transited across the surface of the Sun.

“Essentially, I was trying to catch the clear sky so I could take images of an event that would last less than a second,” Legault said from his home in France.

This type of dedication to his craft, along with his attention to detail and quality has earned Legault the reputation as one of the top amateur astrophotographers in the world.

Amazingly, he started his astrophotography hobby — and his specialty of imaging objects in front of the Sun — just by chance. And now Legault has been shooting breathtaking images of spacecraft in orbit and astronomical objects and events for nearly 20 years.

“I began in 1993 with one of the first CCD cameras, the first year that CCD cameras were available for amateurs,” Legault said. “It was a wonderful time, because it was a time of pioneers, and it was a revolution after film.”

An Airplane in Front of the Sun Credit & Copyright: Thierry Legault

Intrigued by what could be done with digital equipment, he experimented by taking planetary and deep sky pictures and has now amassed a prolific portfolio of stunning images. In 2001 he took the first of the type of images he has become renown for.

“I took a picture of a plane in front of the Sun,” Legault recalled, “and it was published on APOD (Astronomy Picture of the Day), and so now I have taken many images of things in front of the Sun.”

Image of the solar transit of the International Space Station (ISS) and Space Shuttle Atlantis, 50 minutes after undocking from the ISS, before return to Earth, taken from the area of Mamers, Normandie, France on September 17, 2006. Credit and copyright, Thierry Legault

In 2006 he took pictures of the space station and space shuttle side by side just as the shuttle undocked. It was published by newspapers around the world, including a double page in the Guardian, was shown on CNN and other news shows, and was everywhere on the internet.

“It was an incredible success, which was very surprising. This type of imaging is very fun for me, as I like the challenge,” Legault said. “But it is interesting how taking a picture of a spaceship in front of the Sun is really something for non-astronomers, but yet I never received so much interest for all the other astronomy images I have taken.”

Legault said he has received emails and letters from people around the world expressing how much they enjoy his transit images.

One of the setups Legault uses for solar imaging. Image courtesy Thierry Legault

Living in the suburbs of Paris means there are plenty of lights to interfere with his astrophotography.

“Where I live is not a problem for taking pictures of some satellites, the Sun, the Moon and planets,” he said. “For deep space imaging and for the space station, I have to put everything in the van and drive 20-30 kilometers and go to the country; also for solar or lunar transits I have to go to the place where the transit is visible.”

This is the first image ever taken from the ground, of an astronaut in extravehicular activity (EVA1). Steve Bowen, attached to the end of the ISS robotic arm (MSS), was working on a defective ammonia pump. The pump was hooked to the ISS mobile base system (MBS). All major elements of the robotic arm are visible, including the structures of the motorized joints and some elements along the arms (smaller than the astronaut). Credit and copyright, Thierry Legault.

For the STS-131 mission in May of 2010, Legault traveled to Spain, Switzerland, various parts of France, and for the STS-133 mission in February 2011, where he took the first-ever ground-based image of astronaut in spacewalk he drove to Germany, and to both the south and north of France, and between 3,000 and 4,000 kilometers.

All this driving and weeks of preparation is for an event that he never sees live with his own eyes, and usually lasts about a half a second. He uses CalSky.com to calculate the exact moment and exact location he will need to be to capture an event.

“For transits I have to calculate the place, and considering the width of the visibility path is usually between 5-10 kilometers, but I have to be close to the center of this path,” Legault explained, “because if I am at the edge, it is just like a solar eclipse where the transit is shorter and shorter. And the edge of visibility line of the transit lasts very short. So the precision of where I have to be is within one kilometer.”

Legault studies maps, and has a radio synchronized watch to know very accurately when the transit event will happen.

“My camera has a continuous shuttering for 4 seconds, so I begin the sequence 2 seconds before the calculated time,” he said. “I don’t look through the camera – I never see the space station when it appears, I am just looking at my watch!”

Atlantis during the STS-135 mission docked to the International Space Station, July 15, 2011. Credit: Thierry Legault.

For a transit event, he gets get a total of 16 images – 4 images every second, and only after he enlarges the images will he know if he succeeded or not.

“There is a kind of feeling that is short and intense — an adrenaline rush!” Legault said. “I suppose it is much like participating in a sport, but the feeling is addictive. I did it with a friend two years ago and now he is addicted too.”

Legault added that when he succeeds, it is a very satisfying feeling.

But Legault is not keeping the adrenaline rushes all to himself; he willingly shares his knowhow and techniques.

His website provides a wealth of knowledge about his techniques and equipment

In 2005 he wrote a book (in French) called Astrophotographie, that has sold over 6,000 copies, and he is working on getting it published in English. The book provides information on how to image constellations, stars, comets, eclipses, the Moon, planets, sun, and deep-sky objects, in accessible, nontechnical language. Legault also gives practical advice on equipment and technique, with answers to problems faced by every beginner. He also co-authored another book, “New Atlas of the Moon” with Serge Brunier, and in the March 2012 issue of Sky and Telescope, Legault wrote a detailed article on how to take detailed, ground-based images of the ISS.

Tomorrow on Universe Today, Legault will share his advice for avoiding “bad” astrophotography.

See Venus in Daylight This Weekend

Photo of Venus and the Moon taken on Jan 26, 2012. The new moon is at the top right and Venus is at the bottom left. Credit: Gadi Eidelheit.

[/caption]

The planet Venus is so bright that when conditions are right, it can be visible in full daylight. This weekend, and especially on Saturday, February 25, 2012, conditions should be just right for seeing Venus in the daytime. Our friend Gadi Eidelheit sent us his tips for seeing Venus, and says it is easier to see Venus when it is far from the Sun and less affected by its glare, so make sure that the Sun is blocked by a building or a tree. If you have a clear blue sky in your location early Saturday afternoon, try first locating the crescent Moon at about 1 pm local time. At this time, the Moon will be in the southeastern sky, about 60 degrees above the horizon.

When you find the Moon, look a short distance directly below it to find Venus. The planet will appear as a tiny white dot in the sky. You can also use sky maps or internet sites (such as Heavens-Above) to find out where Venus is relative to the Moon.

If you don’t see Venus during the day, try to see Venus immediately at sunset; and right now, the Moon, Venus and Jupiter are lining up for triple conjunction at dusk, and with clear skies, it will be a great view that is almost impossible to miss!

But for seeing Venus on subsequent days, try to stand in the same position where you saw it before, but 20 minutes before sunset. Try to locate Venus a little higher up and to the East from where it was a day before. Do so for several days, each time a little earlier.

You can also try to use binoculars to locate Venus. Safety first, make sure that the Sun is completely blocked and that you can not accidentally look directly at it through the binoculars! Although Venus is bright, it will not appear through binoculars if they are not focused properly. In order to use binoculars, focus it beforehand (such as the evening before) on Venus and make sure that the focus does not change. Now the binoculars are focused and you can use them to see Venus in the day. After you find Venus through the binoculars, try to see it without them.

If you get images of Venus in the daytime or of the triple conjunction, you can submit them to our Flickr page.

If your location does not have clear skies for the triple conjunction, The online Slooh Space Camera will webcast views from various observatories around the world, beginning at 0230 GMT (9:30 pm EST, 6:30 pm PST) both nights this weekend (Feb. 26 and 27). Access the webcast here.

Slooh will provide footage from multiple observatories around the world, including Arizona and the Canary Islands off the coast of Africa. The broadcast can be accessed at Slooh’s homepage, found here: http://events.slooh.com/

Frederick Quintao on Google+ has provided instructions for seeing Venus in the daytime in Portuguese!