New Comet Discovered by Amateur Astronomer

Image of Comet C/2012 C2 (Bruenjes) made from ten 60 sec. exposures on Feb. 11, 2012. (Fred Bruenjes)

[/caption]

“Friday, February 10th 2012 just felt like the perfect night for a comet to be discovered by an amateur astronomer,” writes Fred Bruenjes on his astronomy blog. And, this past Friday night, that’s exactly what Fred did.

Here’s how he did it:

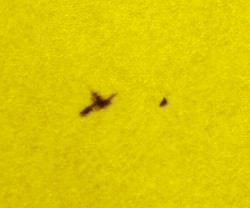
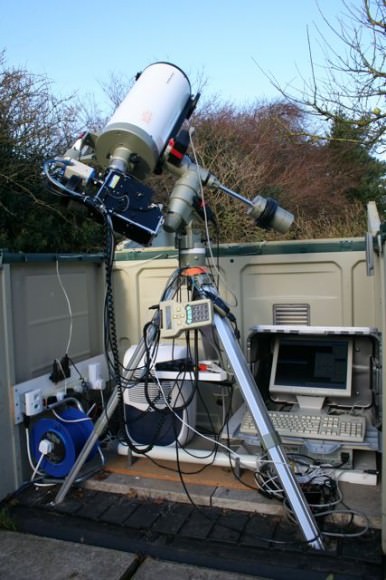
Using custom-written software to operate a 14″ Meade LX200GPS telescope in his self-built observatory in Warrensburg, Missouri, Fred set his system up to capture images of the sky on that cold evening, not allowing himself to be chased inside by the low temperatures or the bright, rising moon. After some technical difficulties with his dSLR, Fred managed to acquire some quality images. While making a cursory look through the blink data, Fred was surprised to spot a faint burry object visible moving across three frames. A check of online databases of known objects brought up no positive hits — this was something that hadn’t been seen before.

Raw-color discovery image. (Fred Bruenjes)

Fred describes the “eureka” moment on his blog:

A check of known objects in the region had a lot of results in the area, but all were moving eastward while my fuzzy was moving westward. Rocks don’t make U-turns. This was really getting exciting. I had Jen, my better half, an accomplished astro imager, take a look at the images and before I could point out the faint smudge she exclaimed “That’s a comet!”

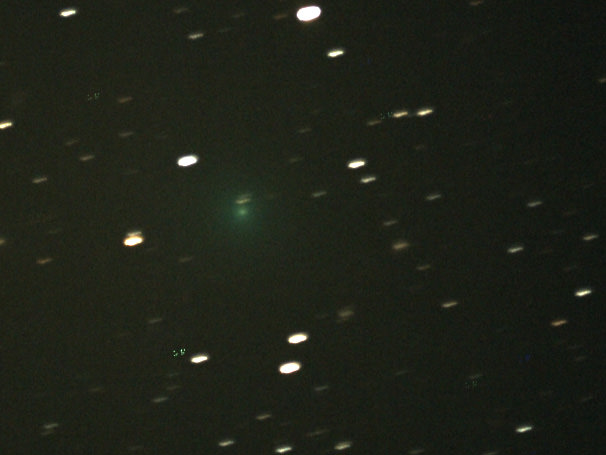
Still, Fred notes, “it wasn’t a slam-dunk.” The images were faint and there could have been other causes of blurry spots in digital images. But a check of the raw color data revealed a greenish coloration to the object’s glow, which is indicative of cyanogen and carbon emission — typical hallmarks of comets. “Very encouraging,” Fred added.

Another night’s observation was needed. If it was a comet, it would appear again along its expected trajectory. Of course, with an unidentified comet there would be no known orbit, so Fred had to manually extrapolate its position. When he trained his telescope onto his calculated coordinates the following evening and began taking images, there it was… the same faint, fuzzy green blur from the previous night, slowly appearing in the darkening sky right where it should be.

“Oh. Wow. It was dead nuts at where it was supposed to be,” Fred writes. “Wow. This thing is for real! It’s at about this time that it begins to sink in that a lifelong quest has just been fulfilled. I just crossed another thing off the bucket list!”

Fred spent the next hour gathering images to send in to the IAU’s Minor Planet Center, in the hopes of having the object cataloged so that others could locate and observe it. He didn’t have to wait long; within five minutes the object was listed on the Near-Earth Object Confirmation Page, and dubbed C/2012 C2 (Bruenjes), in honor of its discoverer.

Now that’s just got to feel good.

Comet Bruenjes is an NEO currently about 0.555 AU away from Earth. Its exact size and orbital period isn’t known, and it may even be a returning comet or piece from a larger one… the official report isn’t out yet. It appears to have a fairly inclined orbit relative to the ecliptic, based on the current diagram created by JPL’s Small-Body Database.

Currently plotted orbit of C/2012 C2 (Bruenjes) (NASA/JPL)

The comet’s total magnitude is 16.6, so it is dim and not visible to the naked eye. Fred told Universe Today in an email: “it’s in the constellation Aries, about six degrees north of Jupiter. Just after sunset in the Northern hemisphere it’s high in the southwest, nearly overhead.”

Stay tuned for more updated information on this newly-discovered member of our solar system. And congratulations to Fred Bruenjes, comet-hunter extraordinaire!

Read Fred’s full story on his astronomy site here.

Images © 2012 Manfred Bruenjes. All rights reserved. Used with permission.


First Amateur Image of Another Solar System

Amateur astronomer Rolf Wahl Olsen from New Zealand shared an image with Universe Today, and it is perhaps the first image of another solar system taken by an amateur. The image above is Olsen’s image of the protoplanetary disc around Beta Pictoris.

“For the last couple of years I have been wondering if it was possible for amateurs to capture this special target but have never come across any such images,” Olsen wrote in an email. “I must say it feels really special to have actually captured this.”


Olsen said he has been fascinated by professional images of Beta Pictoris since seeing the first one in taken in 1984.

Beta Pictoris and the protoplanetary disc of debris and dust that is orbiting the star is 63.4 light years away from Earth. This is a very young system thought to be only around 12 million years old and astronomers think this is essentially how our own Solar System must have formed some 4.5 billion years ago. The disc is seen edge-on from our perspective and appears in professional images as thin wedges or lines protruding radially from the central star in opposite directions.

“The main difficulty in imaging this system is the overwhelming glare from Beta Pictoris itself which completely drowns out the dust disc that is circling very close to the star,” Olsen said.

Images of the disc taken by the Hubble Space Telescope, and from big observatories, are usually made by physically blocking out the glare of Beta Pictoris itself within the optical path.

Olsen found inspiration from a paper he found recently, the 1993 paper ‘Observation of the central part of the beta Pictoris disk with an anti-blooming CCD’ (Lecavelier des etangs, A., Perrin, G., Ferlet, R., Vidal-Madjar, A., Colas, F., et al., 1993, A&A, 274, 877)

“I then realised that it might not be entirely impossible to also record this object with my own equipment,” Olsen said. “So now that Beta Pictoris has risen to a favorable position in this year’s evening sky I decided to have a go at it the other day.”

He followed the technique described in the paper, which basically consists of imaging Beta and then taking another image of a similar reference star under the same conditions. The two images are subtracted from each other to eliminate the stellar glare, and the dust disc should then hopefully reveal itself.

“First I collected 55 images of Beta Pictoris at 30 seconds each,” Olsen said. “The dust disc is most prominent in IR so ideally a better result would be expected with the use of an IR pass filter. Since I only have a traditional IR/UV block filter I just imaged without any filter, to at least get as much IR light through as possible.”

The next step was to capture a similar image of a reference star under the same conditions. Olsen did as the paper suggested and used Alpha Pictoris, a star that is of nearly the same spectral type (A7IV compared to Beta’s A6V) and is also close enough to Beta in the sky so that the change in telescope orientation should not affect the diffraction pattern. However, since the two stars have different magnitudes he needed to calculate how long to expose Alpha for in order to get a similar image which he could subtract from the Beta image.

Some quick math:

The magnitude difference between the stars is 3.86(Beta) – 3.30(Alpha) = 0.56

Due to the logarithmic nature of the magnitude scale we know that a difference of 1 magnitude equals a brightness ratio of 2.512. Therefore 2.512 to the power of the numerical magnitude difference then equals the variation in brightness.

2.512^0.56 = 1.67, so it appears Alpha is 1.67 times brighter than Beta. This means that exposure for Alpha should be 1/1.67 = 0.597x that of Beta. I took the liberty of using 0.6x for simplicity’s sake…

“So I collected 55 images of 18 seconds (30 x 0.6) for Alpha,” Olsen said. “Both sets of images were stacked separately in Registax and I then imported these into Photoshop, layered Alpha in ‘Difference’ mode on top of Beta and flattened the result. This produces a very dark image (which it should!) apart from the different background stars. But after some curves adjustment I was able to see clear signs of the actual dust disc protruding on both sides from the glare of the star. I was very happy to conclude that the position angle with regards to the background stars matched the official images exactly.”

Olsen said he was disappointed with the raw “Difference” image so to produce a more natural looking result, he took the original stacked Beta image and then blended in the central parts from the Difference image that showed the dust disc.

“I decided to also keep the black spot of the central glare from the Difference image since the contrast with the protruding disc seems better this way,” Olsen said.

What resulted is what is thought to be the first amateur image of another solar system.

Olsen is encouraging others amateur astrophotographers to try this, and see if they can do even better.

“I’m sure this can be done much better with a higher quality camera, but at least here it is,” he said. And I’m personally extremely happy and proud of having achieved this. I hope you enjoy the view as much as I did!”

If any other amateur astronomers have attempted to image a disk around another star, we’d love to hear about it and see the results.

Check out the original image on Olsen’s website: http://www.pbase.com/rolfolsen/image/139722640/original

Backyard Science: How You Can Make a Difference

Three people enjoy the summer sky over the Delaware river, NJ, USA in August 2006. Image Credit: Wikimedia

[/caption]

It’s a great time to be an amateur astronomer!  Nowadays, “backyard” astronomers armed with affordable CCD imagers, high-quality tracking mounts, inexpensive PC’s and the internet at their fingertips are making real contributions to Astronomy science.

How are people in their backyards contributing to real science these days?

Consider that in 1991, the Hubble Space Telescope launched with a main camera of less than 1 megapixel.  (HST’s array was 800×800 pixels – just over half a megapixel).   Currently, “off-the-shelf” imaging equipment available for a few hundred dollars or less easily provides 1 megapixel or more.  Even with a “modest” investment, amateurs can easily reach the ten megapixel mark. Basically, the more pixels you have in your imaging array, the better resolution your image will have and the more detail you’ll capture (sky conditions notwithstanding).

With access to fairly high resolution cameras and equipment, many amateurs have taken breathtaking images of the night sky. Using similar equipment other hobbyists have imaged comets, supernovae, and sunspots. With easy access to super-precise tracking mounts and high-quality optics, it’s no wonder that amateur astronomers are making greater contributions to science these days.

One spectacular example of amateur discoveries was covered by Universe Today earlier this year. Kathryn Aurora Gray, a ten year old girl from Canada, discovered a supernova with the assistance of her father and another amateur astronomer, David Lane. The discovery of Supernova 2010lt (located in galaxy UGC 3378 in the constellation of Camelopardalis) was Kathryn’s first, her father’s seventh and Lane’s fourth supernova discovery. You can read the announcement regarding Ms. Gray’s discovery courtesy of The Royal Astronomical Society of Canada at: http://www.rasc.ca/artman/uploads/sn2010lt-pressrelease.pdf

Often times when a supernova is detected, scientists must act quickly to gather data before the supernova fades. In the image below, look for the blinking “dot. The image is a before and after image of the area surrounding Supernova 2010lt.

A before and after animation of Supernova 2010lt. Credit: Dave Lane

Before Kathyrn Gray, astronomer David Levy made headlines with his discovery of comet Shoemaker-Levy 9. In 1994, comet Shoemaker-Levy 9 broke apart and collided with Jupiter’s atmosphere. Levy has gone on to discover over twenty comets and dozens of asteroids. Levy has also published several books and regularly contributes articles to various astronomy publications. If you’d like to learn more about David Levy, check out his internet radio show at http://www.letstalkstars.com/, or visit his site at http://www.jarnac.org/

Hubble image of comet P/Shoemaker-Levy 9, taken on May 17, 1994. Image Credit: H.A. Weaver, T. E. Smith (Space Telescope Science Institute), and NASA
The International Space Station and Space Shuttle Atlantis transiting the sun. Image Credit: Thierry Legault

Rounding out news-worthy astronomers, astrophotographer Thierry Legault has produced many breathtaking images that have been featured here on Universe Today on numerous occasions. Over the past year, Thierry has taken many incredible photos of the International Space Station and numerous images of the last few shuttle flights. Thierry’s astrophotography isn’t limited to just the sun, or objects orbiting Earth. You can read more about the objects Thierry captures images of at: http://www.astrophoto.fr/ You can also read more about Thierry and the equipment he uses at: http://legault.perso.sfr.fr/info.html

Performing science as an amateur isn’t limited to those with telescopes. There are many other research projects that ask for public assistance. Consider the Planet Hunters site at: http://www.planethunters.org/. What Planet Hunters aims to achieve is a more “hands-on” approach to interpreting the light curves from the publicly available data from the Kepler planet finding mission. Planet Hunters is part of the Zooniverse, which is a collection of citizen science projects. You can learn more about the complete collection of Zooniverse projects at: http://www.zooniverse.org

Sample light curve data. Image Credit: Zooniverse/PlanetHunters.org

Another citizen science effort recently announced is the Pro-Am White Dwarf Monitoring (PAWM) project. Led by Bruce Gary, the goal of the project is to explore the possibility of using amateur and professional observers to estimate the percentage of white dwarfs exhibiting transits by Earth-size planets in the habitable zone. The results from such a survey are thought to be useful in planning a comprehensive professional search for white dwarf transits. You can read more about the PAWM project at: http://www.brucegary.net/WDE/

Transit simulation. Image Credit: Manuel Mendez/PAWM

One very long standing citizen project is the American Association of Variable Star Observers (AAVSO). Founded in 1911, the AAVSO coordinates, evaluates, compiles, processes, publishes, and disseminates variable star observations to the astronomical community throughout the world. Currently celebrating their 100th year, the AAVSO not only provides raw data, but also publishes The Journal of the AAVSO, a peer-reviewed collection of scientific papers focused on variable stars. In addition to data and peer reviewed journals, the AAVSO is active in education and outreach, with many programs, including their mentor program designed to assist with disseminating information to educators and the public.

If you’d like to learn more about the AAVSO, including membership information, visit their site at: http://www.aavso.org/

Sample AAVSO light curve plot. Image Credit: AAVSO

For over a decade, space enthusiasts across the internet have been taking part in SETI@Home. The official description of SETI@home is “a scientific experiment that uses Internet-connected computers in the Search for Extraterrestrial Intelligence (SETI)”. By downloading special client software from the SETI@Home website at http://setiathome.berkeley.edu/, volunteers from around the world can help analyze radio signals and assist with SETI’s efforts to find “candidate” radio signals. You can learn more about SETI@Home by visiting http://setiathome.berkeley.edu/sah_about.php

The projects and efforts featured above are just a small sample of the many projects that non-scientists can participate in. There are many other projects involving radio astronomy, galaxy classification, exoplanets, and even projects involving our own solar system. Volunteers of all ages and educational backgrounds can easily find a project to help support.

Ray Sanders is a Sci-Fi geek, astronomer and space/science blogger. Visit his website Dear Astronomer and follow on Twitter (@DearAstronomer) or Google+ for more space musings.

New Hubble Images Zoom In on Asteroid Impact on Jupiter

These NASA Hubble Space Telescope snapshots reveal an impact scar on Jupiter fading from view over several months between July 2009 and November 2009. Credit: NASA, ESA, M. H. Wong (University of California, Berkeley), H. B. Hammel (Space Science Institute, Boulder, Colo.), I. de Pater (University of California, Berkeley), and the Jupiter Impact Team

[/caption]

When amateur astronomer Anthony Wesley from Australia saw a dark spot the size of the Pacific Ocean appear on Jupiter through his telescope on July 19, 2009, this started a flurry of astronomic activity, with other telescopes quickly slewing to take a look. It didn’t take long for other astronomers to confirm Jupiter had been hit by an object, either an asteroid or a comet. Of course, the world’s most famous telescope, Hubble, zeroed in on this unexpected activity on Jupiter, and luckily, the telescope had been recently updated with a new Wide Field Camera 3 and newly repaired Advanced Camera for Surveys. Astronomers have now released a series of images from Hubble which may show for the first time the immediate aftermath of an asteroid striking another planet.

Astronomers have witnessed this kind of cosmic event before, but from a comet. Similar scars had been left behind during the course of a week in July 1994, when more than 20 pieces of Comet P/Shoemaker-Levy 9 (SL9) plunged into Jupiter’s atmosphere. The 2009 impact occurred during the same week, 15 years later.

But comparing Hubble images of both collisions, astronomers say the culprit was likely an asteroid about 1,600 feet (500 meters) wide.

Jupiter, Hubble WFC3: July 23, 2009
Source: Hubblesite.org

“This solitary event caught us by surprise, and we can only see the aftermath of the impact, but fortunately we do have the 1994 Hubble observations that captured the full range of impact phenomena, including the nature of the objects from pre-impact observations” says astronomer Heidi Hammel of the Space Science Institute in Boulder, Colo., leader of the Jupiter impact study.

The analysis revealed key differences between the two collisions (in 1994 and 2009), providing clues to the 2009 event. Astronomers saw a distinct halo around the 1994 impact sites in Hubble ultraviolet (UV) images, evidence of fine dust arising from a comet-fragment strike. The UV images also showed a strong contrast between impact-generated debris and Jupiter’s clouds.

Hubble ultraviolet images of the 2009 impact showed no halo and also revealed that the site’s contrast faded rapidly. Both clues suggest a lack of lightweight particles, providing circumstantial evidence for an impact by a solid asteroid rather than a dusty comet.

The elongated shape of the recent asteroid impact site also differs from the 1994 strike, indicating that the 2009 object descended from a shallower angle than the SL9 fragments. The 2009 body also came from a different direction than the SL9 pieces.

HST WFC3 Image of Jupiter: July 23, 2009
Source: Hubblesite.org

Team member Agustin Sanchez-Lavega of the University of the Basque Country in Bilbao, Spain, and colleagues performed an analysis of possible orbits that the 2009 impacting body could have taken to collide with Jupiter. Their work indicates the object probably came from the Hilda family of bodies, a secondary asteroid belt consisting of more than 1,100 asteroids orbiting near Jupiter.

The 2009 strike was equal to a few thousand standard nuclear bombs exploding, comparable to the blasts from the medium-sized fragments of SL9. The largest of those fragments created explosions that were many times more powerful than the world’s entire nuclear arsenal blowing up at once.

The recent impact underscores the important work performed by amateur astronomers. “This event beautifully illustrates how amateur and professional astronomers can work together,” said Hammel.

The Jupiter bombardments reveal that the solar system is a rambunctious place, where unpredictable events may occur more frequently than first thought. Jupiter impacts were expected to occur every few hundred to few thousand years. Although there are surveys to catalogue asteroids, many small bodies may still go unnoticed and show up anytime to wreak havoc.

The study by Hammel’s team appeared in the June 1 issue of The Astrophysical Journal Letters.

Science Paper by: Hammel et al. (PDF document)

Source: HubbleSite

Amateur Spectroscopy

Credit: Robert Kaufman's image of Tarantula and Orion spectra (used with permission)

[/caption]

Amateur astronomers are a unique species worthy of their own reality TV show. Their craftsmanship, resourcefulness, dedication, and passion is simply amazing. Many professional astronomers rely heavily on amateurs for quick spot checks, discovery followups, collaboration on research projects, the diverse locations of their telescopes and their ability/willingness to put in long hours of observation. So what is spectroscopy, and what do the amateur astronomers get up to?

Absorption spectroscopy is the study of the color and light spectrum of stars and galaxies. We all love our Hubble photos and pretty astro-photographs, however most of the real research and science comes from observing the light spectrum.

Robin Leadbeater’s LHIRESIII Spectrograph

Robin Leadbeater's telescope with LHRESIII spectrograph

Astronomers look at emission lines and absorption lines in the spectra to determine the make up of stars, nebulas and galaxies. Dopler effects, orbital behavior, elements of stars, even atmospheres can be determined by observing these absorption and emission lines. Scientists believe that a carbon dioxide absorption spectrum line signature in the spectrum of a star with a transiting exo-planet could eventually be the most exciting discovery – a possible indicator of extra-terrestrial life.

Why are amateurs interested?

I asked Ken Harrison the moderator of the Yahoo group – Astronomical Spectroscopy, why amateurs would be interested in absorption spectra?

“I see it as the “last frontier” for amateur astronomers. When you’ve taken the 100th image of the Orion nebulae – what do you do next?? It’s challenging, interesting and can give some scientific value to your work. Amateurs have successfully recorded the spectra of nova before the professionals and complimented other variable star work with observations of the changing spectral emissions of stars showing their Doppler shifts and atmospheric changes.”

Ken specializes in the spectra of Wolf-Rayet stars and is currently writing a book on amateur spectroscopy. Ken has been building his own spectrographs since 1992 and has used a variety of devices ranging from a simple star analyzer on a digital SLR camera to a sophisticated guided spectrograph.

A spectrograph allows light to pass through a narrow slit where it is then split into it’s spectra by passing through some sort of diffraction grating, before being captured on a CCD. The plate scale of the CCD then comes into play as angstroms per pixel instead of the usual (astrometric measure) arc/secs per pixel.

Rob Kaufman recently captured a Nova outburst Nova Scuti 2009 (V496 SCT) between the trees and clouds from his back yard.

Rob Kaufman spectrograph of Nova Scuti 2009 (V496 SCT) outburst
Credit: Rob Kaufman's spectrogram of Nova Scuti 2009 (V496 SCT) outburst

Italian amateur Fulvio Mete has achieved a spectrographic separation of tight binary Beta Aurigea. The double Ha absorption line is easily identifiable in his image taken with a 14inch Celestron. Some of the world’s best telescopes are unable to separate Beta Aurigea optically, so being able to do a spectrographic separation with a back yard telescope is a significant achievement.

Fulvio Metes spectrograph of Beta Aurigae
Fulvio Mete's spectrogram of Beta Aurigae

Perhaps there is no finer example of the quality of the spectroscopy done by amateurs than the current citizen science project on the eclipse of binary Epsilon Aurigae. Robin Leadbeater from Three Hills Observatory, a team member/contributor to the Citizen Sky project and avid amateur astronomer, has documented the changing spectra of Epsilon Aurigae, in particular monitoring the changing KI (neutral potassium) 7699 absorption line during the early stages of the ingress.

Robin Leadbeater's Spectrogram of KI 7699 absorption line in Epsilon Aurigae eclipse.

The eclipse happens every 27 years and this eclipse will be the first to be fully documented with advanced spectroscopy – clearly alot of that will be performed by skillful amateurs.

So what equipment do I need?

Ken Harrison comments that the equipment required is not necessarily expensive and it is a lot of fun.

“Luckily with the filter gratings available at reasonable prices (Star Analyser, Rainbow Optics etc) interested amateurs can start using their current equipment with minimal cost and outlay. Freeware programs like IRIS (C Buil) and VSpec (V Desnoux) allow the detailed analysis of spectra to be done without all the mathematics or detailed physics. As experience grows so do the questions. What do those absorption features mean? Why does this spectrum look completely different from that spectrum? How can I get benn resolution? Yes, it has its learning curve like any new adventure, but there are many others who have trodden the road before and only too willing to assist  – To boldly go where few amateurs have gone before – Spectroscopy!!!”

Dale Mais another dedicated amateur from Orange Grove, San Diego County has an excellent paper on qualitative and quantitative analysis that can be achieved by amateur astronomers.

The contribution of amateurs across all forms of astronomy is significant, and spectroscopy is no exception. If you want more information join one of the Yahoo groups or major amateur astronomy forums as they all have discussion groups with experienced people who are keen to help you get started.

Special thanks to Ken Harrison, Robin Leadbeater, Rob Kaufman, Fulvio Mete and Dale Mais for your photos and insight!

Amateur Astronomer is “Chasing Galileo”

A collage of 21-day old Moons, sketched by Galileo, (left), an image from Jane Houston Jones' telescope, center, and Jane's sketch, right.

[/caption]
A collage of 21-day old Moons, sketched by Galileo, (left), an image from Jane Houston Jones’ telescope, center, and Jane’s sketch, right.

Amateur astronomers have different ways of documenting their observing sessions, such as taking astrophotos or keeping a logbook. Others, like Jane Houston Jones, employ an age-old method used by Galileo Galilei himself: they take pen in hand and sketch what they see through the lens of their telescope. During this International Year of Astronomy, Jones – an amateur astronomer who also happens to work at the Jet Propulsion Laboratory — wanted to do something special to honor the legacy of Galileo, and decided to follow through with something she has been considering for quite a while. Jones is recreating all of Galileo’s astronomical sketches as she looks through a telescope similar in size to the one used by the father of modern observational astronomy. “Every time I look through a small telescope at these same objects that Galileo did, it just gives me chills,” Jones said. “It fills me with wonder every time I think that I’m seeing the same view Galileo saw 400 years ago, and I wonder what was going through his mind as he made his observations.”

Sketching isn’t new for Jones, a Senior Outreach Specialist for the Cassini mission to Saturn. “When I made my very first telescope in 1989, the first thing I did was draw pictures of what I observed,” she said, “and I’ve just continued it. It makes a wonderful journal or diary of everything you do with a telescope.”

Jane Houston Jones' telescope alongside a replica of Galileo's telescope.  Credit: Jane Houston Jones
Jane Houston Jones' telescope alongside a replica of Galileo's telescope. Credit: Jane Houston Jones

Galileo’s first telescope had an objective diameter of 37 mm, a focal length of 980 mm, and the instrument’s magnification was 21.

Jones is using a small refractor, a Televue Ranger, which has an objective diameter of 70mm, a focal length of 480mm, and using a 25mm Zeiss Abbe Orthoscopic eyepiece, yields a comparable magnification of 19.
“My field of view is bigger than what Galileo had, but I have little less magnification, so in the end I’m getting about the same view that Galileo did. But 400 years later, with better optics, mine is easier to see,” she said. “For effect, I’m also using just a manual mount where I have to move the telescope myself up and down and side to side.”

But using a small telescope to make sketches is a challenging task, Jones is finding, and she has gained new appreciation for Galileo’s original astronomical drawings. “I’ve never observed and sketched through a small telescope before, so it’s a challenge,” she said. “I’ve always loved sketching the Moon, but I’ve usually used a much larger telescope and sketched one crater or a small feature on the terminator. I’ve never tried to sketch the whole Moon at once before, but I wanted to make the same sketches as Galileo. With his telescope, Galileo could only see a tiny portion of the Moon, maybe about 1/8 of the surface at once. And when he looked at a star cluster he couldn’t see, for example, all of the Pleiades in one view. So, I now wonder what kind of worksheet he prepared to try and connect the different views together into the larger view, because he certainly had to sweep through several views to make one sketch.”

Galileo's sketch of Jupiter and its moons, and also Neptune.

Jones said her most memorable views during this Galilean exercise are some of the most basic things Galileo saw. “To me, the very coolest things I saw are the Galilean moons. Everybody who looks at Jupiter through a telescope sees the three or four little dots as the moons are orbiting around the planet. We take that for granted, seeing the moons lined up along the equator of Jupiter. But when Galileo looked at them, it was just amazing that he saw their movement and made the discovery.”

One of her most significant views included an object that Galileo didn’t realize was another, yet undiscovered planet. “Galileo also did a sketch showing the Galilean moons and one additional fixed star, which using modern astronomy software, we can go back to the same day of his observations, and now we know that fixed star was Neptune. To me, that was just so amazing to see all in one eyeview Jupiter, the four moons and another planet that at Galileo’s time, hadn’t been discovered yet, and wouldn’t be discovered for several hundred years.”

Jane Houston Jones' sketch of Saturn from 2002. Courtesy Jane Houston Jones

Now, she is working sketching Saturn, which is interesting given Saturn just went through equinox, meaning the rings have “disappeared” from our vantage point on Earth. “When Galileo first looked at Saturn, he thought he saw three objects – the planet and the rings on both sides of Saturn, And of course he looked at Saturn again a few years later and the rings had disappeared. I’m working on getting my sketches of Saturn over the years to try and match up what Galileo sketched.”

After Saturn, Venus is her next target for sketching.

Since Jones has been sketching for 20 years, she said she won’t quit after the IYA. “To me it makes a diary that follows a tradition that goes back centuries. I like to do that, because I can then take my sketches and look at Galileo’s or other centuries-old views of the same objects and I have a connection with those observers because we held a pen or pencil in our hand while looking through an eyepiece and made notes of what we see. I like that. Plus it’s such a fun project and I’m learning so much about Galileo’s observations, as well as some of the current scholars who are documenting his observations and researching his sketches. It’s a great learning experience, besides the artistic and personal satisfaction of drawing something. It’s a great history lesson.”

Jones and her husband Morris are members of the Old Town Astronomy group, which does “Urban Guerrilla Astronomy,” where they set up their telescopes on city sidewalks providing the public a chance to look through telescopes. Click here for a video about what they do.

In her day job at JPL, Jones does educational outreach for the Cassini mission, working with the public, museums, planetariums, astronomy clubs, and an international network of volunteers called the Saturn Observation Campaign. Additionally she is the Twitter voice of Cassini. But she also creates a monthly podcast for JPL called “What’s Up” about what is visible in the night sky each month. “It’s really neat to have astronomy part of my day job as well as my passion in life,” she said.

For more of Jones’ observations and sketches, check out her website, and this specific page about observing with a small refractor.

What’s Up podcast

High School Students Discover Asteroid

250px-astronomy_amateur_3_v2.thumbnail.jpg

Here’s another wonderful example of how amateur astronomers can make important discoveries. Three high school students from Wisconsin discovered an asteroid while doing an astronomical observation project for a class in school. Connor Leipold, Tim Patika, and Kyle Simpson of The Prairie School near Racine were notified this week by the Minor Planet Center in Cambridge, Massachusetts that the object they discovered has been verified as an asteroid.

The students will have the opportunity to name the asteroid, temporarily designated as 2008 AZ28. They spotted the asteroid through telescopes located in New Mexico that operate remotely via the internet. The technology was provided through a project sponsored by Calvin College in Grand Rapids, Michigan.

As Fraser and Pamela commented on their Astronomy Cast episode about amateur astronomy, “Astronomy is one of the few sciences where amateurs make can meaningful contributions and discoveries.” And here’s proof. So the rest of you, go out there and start looking!

Original New Source: NewsDaily