First of all, I’d like to say thank you for all the feedback on the first entry from the Amateur Telescope Maker’s Journal and say “Hello! Kia ora! Namaste! Greetings and Salutations!” to all the amateur, professional and armchair astronomers who wrote from the USA, Guatemala, New Zealand, Finland, India and elsewhere. What a kick it’s been to hear from everyone, and I like to think that astronomy and watching the stars is a shared language between people from around the world.
If I have succeeded in whetting your appetite for such things and you are still interested in, or even thinking about trying to build your own telescope, you might want to read on.
Two tips to remember: “Any job worth doing is worth doing right!” No excuses! and “The longest journey begins with the first step!” Here we go!
My first step was collecting as many fasteners as I could gather. I like to repair and build things and have found that fasteners always come in handy for this or that project. Eventually the fasteners I collected became crucial in the building of my telescope! If you do decide to, or are thinking about building your own telescope, you might do some serious fastener scavenging first, or if you can afford it, go out and buy a complete set of precision stainless steel nuts and bolts. I can’t over emphasize how important this step is. Believe me, you will need them.
My favorite scavenger hunt was the result of looking in a trash bin (dumpster diving anyone?) next to a computer test equipment manufacturing company where I worked the 1980’s. During inventory the ‘powers that be’, found it actually cheaper to throw away – if you can believe it — the used and/or unsorted fasteners left over from one project or another. This was cheaper than re-sorting and re-stocking I was asked by one of the techs, if I’d be interested in collecting some of them. Of course I was! Some of those ‘slightly used’ fasteners still live in mayonnaise, peanut butter and pickle jars in my garage!
A word about scavenging, in fact, a caution: Remember to be extremely careful when handling old electronic components. For example: TV or stereo capacitors when not fully discharged present a serious shock hazard! Also, collecting components from any leaky or cracked open transformers or other components should be suspect and left alone. Got contamination? Burnt components or signs of burning are also a not good prospect. Leave it alone! Old machinery and tools found at swap meets, garage sales and recycle centers are the best resource.
Many of us amateur astronomers are on a very limited budget. We have to do the best we can to find, adapt or modify that which allows us to follow our astronomy bliss. I am not above scavenging and getting my hands dirty to do the deed!
The main mirror in a Newtonian telescope is obviously the most important single component? That is to say, aside from the eyepieces, the secondary and main mirror mount! I’ve always wanted a larger scope and was hugely excited when I heard about a 12 ½-inch mirror for sale through a friend. Buying that mirror made the rest of my project possible and the other pieces fall into place. Here, I’d like to applaud the synchronicity and blind luck!
Originally I opted to build the easiest and quickest to build mount for this telescope. That would be a ‘Dobson’ style or alt-azimuth style turntable mount. A 14 inch diameter ‘sono’ tube (a concrete pier mold) came with the mirror I bought. I experimented with this tube for a while as part of the OTA (Optical Train Assembly) but found it too heavy and clumsy to handle easily. So instead, I decided to build some sort of N/S E/W polar aligned mount. A yoke mount? A German Equatorial? or a fork mount? I had to think on that for awhile.
After buying the mirror, I found myself at a ‘point of no return’. Now was the time to consider the final design and move forward! At first, I was tempted to build a simple Dobson style mount. (John Dobson is a hero of mine!) The heavy duty ‘sono tube’ concrete pier form was originally intended as the main body of the scope. Man-O-Man, was that thing ever heavy! And kind of ugly too. The more I thought about it the more I realized it would be too heavy and probably too hard to transport. That’s when I decided to try something a little bit lighter… and maybe a little different.
I received several requests for more construction details which follow, after this progress report…
I painted the counter balance arm and counter weights with acrylic paint(s). For transporting the telescope the OTA is removed and the lead weights and steel counter balance bar removed. Handling uncoated lead or galvanized steel pipe regularly is known to be a source of heavy metal contamination. Use precautionary measures including gloves and or masks when handling or working these materials!
The most recent addition to my home-built telescope is the bright orange tennis ball at the end of the counter balance bar. I traced the end of the pipe onto the tennis ball with a pencil, then cut out the circle with an exacto knife. (CAREFULLY!) After trimming, it fit snugly in place. Next up: I will find a small battery powered red LED and mount it on the end of the tennis ball. The batteries will ‘live’ inside the removable ball. I made the plywood box to hold counter balance weights, tools, supplies and battery(s). It is also a handy ‘step up’ to the eyepiece, for shorter viewers. The top of the box I covered with a new car floor mat I found lying on the side of the road… Is that road kill?
Now, how about some more construction details:
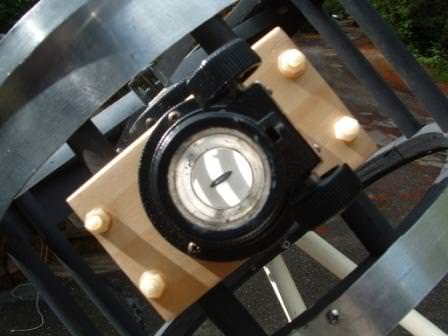
The plant saucer I used to cover the main mirror housing has a dual function.
The circularly embossed rings in the top help align the focuser and secondary!
Now, let’s talk about some inexpensive eyepieces. Have you ever made your own? Why not?
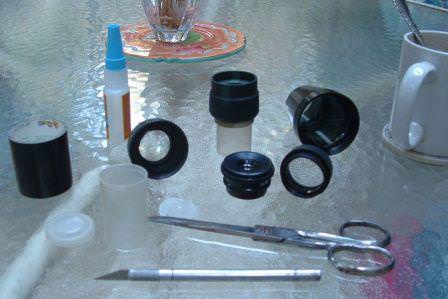
I collected optical components from old cameras, dark room projectors, binoculars and video cameras I found along the way. Some of the optics had quite reasonable focal lengths and diameters, which made them easier to modify and turn into useful eyepieces! Inexpensive and readily available materials can be used with quite satisfactory results… that is if you aren’t a perfectionist.
Above, I show how I used old 35 mm film canisters to make eyepieces. Use an Exacto knife to cut out the bottom of plastic film containers. These containers come in several colors. I prefer the black one’s but transparent work well too! The canisters have a 1 1/4 inch outside diameter and will fit into the 1 1/4 inch eyepiece holder later.
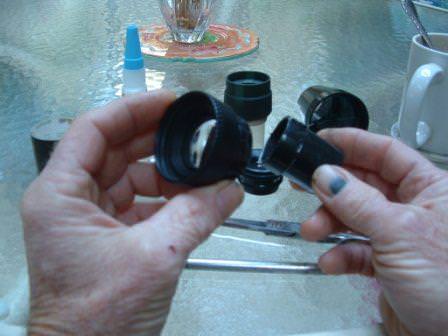
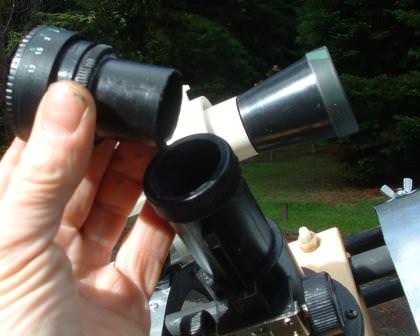
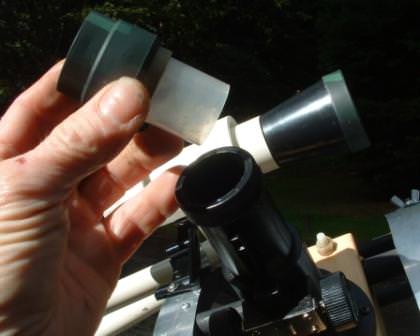
In these views I am shown attaching a modified film canister to a ‘recycled’ 24mm video camera lens.
I wrapped the end of the film canister with black tape to make up for the difference in diameters. The modified canister then fit snugly into the end of the lens body. This handmade eyepiece has a VERY wide field yet performs fairly well! There is no color shift in the crisp, wide angle view… Yes! I like!
I did the same thing with one of the eyepieces from the Chinese binoculars I had. The 20 mm eyepiece has great eye relief! In this case, the modified film canister is super glued into place. Note: BE VERY CAREFUL when applying super glue near any optical surface! The fumes released during curing can severely damage any lens! Not that this has ever happened to me…. no……
Construction details: Continued
The leveling screws use drilled out faucet handles. I found that needed to rub some graphite onto the threads to stop them from squeaking loudly. The lag bolts pass thru clear holes in the 2 X 4’s. There are threaded inserts installed on the bottoms of the four hole locations. The faucet handles are locked in place with cap screws and nuts. The wheel axle is a solid steel rod, 3/8 inches diameter and has holes drilled thru either end for cotter pins, washers and keepers. The gap between the wheel and the modified aluminum router table is maintained with a cut piece of clear, thick walled nylon tubing.
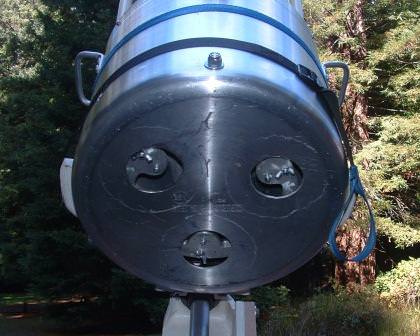
The main mirror adjustment or collimating screws are accessed through these holes in the base of the main mirror mount.
Eventually, I will mount a cooling fan here.
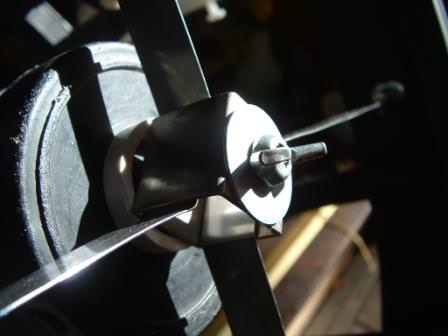
Here’s how I made the secondary spider legs…
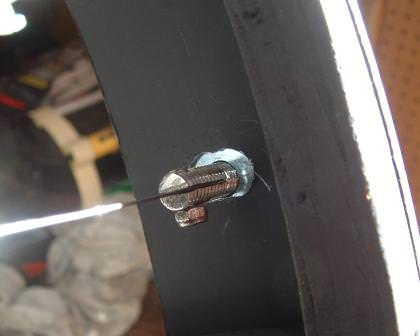
I used 2 inch long 1/4-20 bolts and cut off the heads. Then I cut a slot 1/2 way down the bolt shafts with a hand held hacksaw. I cut thin stainless steel packing straps to fit – rounded the ends – then drilled a thru hole for #00 lock nuts and screws to fasten the assembly. On the far side, there’s a SS washer and thumbscrew.
The secondary mirror housing mount was made from a 1 inch long section of 1 inch square stainless steel tubing. The stainless steel packing straps were then inserted and bent 45 degrees to fit.
How’s that for details? Of course, some ideas are not mine. I copied good ideas from elsewhere, created my own and am passing them forward to you. Does that work for you? I hope you’ve found some of this stuff useful or at least interesting? Please write and let me know? I’d appreciate it and promise to reply. I’m just a ‘lonely’ astronomer and would love to hear from you!
By the way… got any old telescope parts laying around? I’m always looking for more!



Congratulations!! Your telescope looks Great, strong easy to use… BEAUTIFUL !!
Thanks… I needed that! Hopefully I will soon get the main mirror coated, finish up the ‘final-final’ details and submit some images! Eventually, I’d like to join Frasier’s weekly star party(?) and submit views of the glories above!