
To celebrate the 45th anniversary of the Apollo 13 mission, Universe Today is featuring “13 MORE Things That Saved Apollo 13,” discussing different turning points of the mission with NASA engineer Jerry Woodfill.
The air to ground transcript from the time of the explosion on Apollo 13 demonstrates the confusion of what was happening:
Jim Lovell: Houston, we’ve had a problem. We’ve had a MAIN B BUS undervolt.
Capcom: Roger. MAIN B undervolt. Okay, stand by, 13. We’re looking at it.
Fred Haise: Okay. Right now, Houston, the voltage is – is looking good. And we had a pretty large bang associated with the Caution and Warning there.
Lovell then started to name all the Caution and Warning lights that were illuminating, including the Guidance and Navigation light, a computer restart, and indicators that there might be a problem with the oxygen and helium tanks.
The Apollo spacecraft Caution and Warning System had one intended function: alert the astronauts and Mission Control to a potential system failure. Plainly put, the Caution and Warning System allowed the spacecraft to tell the story of what was going wrong.

In all our discussions so far with NASA engineer Jerry Woodfill, we’re finally letting him talk about the system he was responsible for: the Caution and Warning System (C&WS).

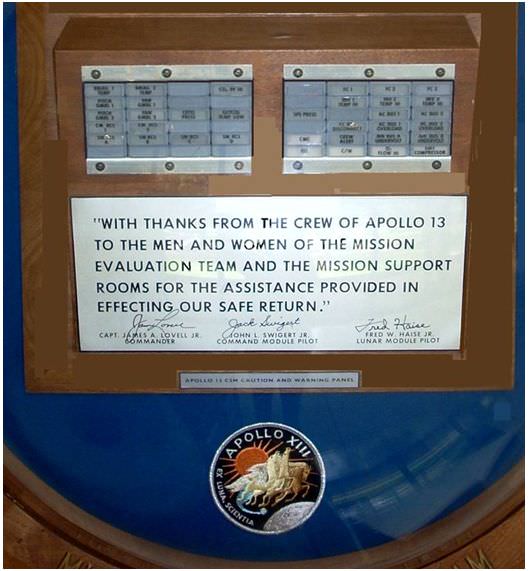
Of the image above of the plaque from the Apollo 13 astronauts thanking the mission support teams, Woodfill said, “That was my system. The alarm system personified what the team’s role was providing caution, warning, and assistance for the crew’s safety.”
From an official NASA report on the Apollo spacecraft systems:
“Critical conditions of most spacecraft systems are monitored by a caution and warning system. A malfunction or out-of-tolerance condition results in illumination of a status light that identifies the abnormality. It also activates the master alarm circuit, which illuminates two master alarm lights on the MDS and one in the lower equipment bay and sends an alarm tone to the astronauts’ headsets. The master alarm light and tone continue until a crewman resets the master alarm circuit. This can be done before the crewmen deal with the problem indicated. The caution and warning system also contains equipment to sense its own malfunctions.”
One of Woodfill’s responsibilities was to enter into the Apollo 13 Crew’s Operational Checklist when ”nuisance alarms” might be expected as a result of momentary switching modes. But mainly, he was responsible for setting the thresholds for when the alarms would be activated. The myriad of alarms sounding for Apollo 13 made it obvious that something serious was happening.
“The first alert that Apollo 13 was direly threatened came from the Caution and Warning system’s Master Alarm issued as a result of a Main Bus B under-voltage,” explained Woodfill. “It was because the warning system’s threshold for low voltage was established that the crew and mission control had an instant awareness of the dire situation. This saved valuable time in analyzing the source of Apollo 13’s malfunction.”
Likewise, as we discussed in Part 5 of this series, it was the setting of the threshold of the CO2 caution light ringing a Master Alarm which alerted the crew to the need for changing out the lithium hydroxide canisters to filter out the danger carbon dioxide that was accumulating in the Lunar Module.
“The component caution CO2 light’s illumination, while backed-up by a gauge, nevertheless, made the need for a solution all the more apparent,” said Woodfill.
And, of course, when the Oxygen Tank 2 Quantity sensor failed, a Master Alarm sounded from the Caution and Warning System as an alert, along with the quantity gauge reading, that trouble shooting should be undertaken.
Woodfill noted that because multiple inputs from the tanks were “OR-gated” (electronic logic system disjunction) into the alarm system, the actual explosion of Oxygen Tank 2 did not set off the Master Alarm, via the oxygen tank inputs to the C&WS, but rather the resulting secondary sensing by the C&WS of the Main Bus B undervolt input which did. But he does believe the failure of the Tank 2 sensor did earlier set off the Master Alarm to initiate the trouble shooting, not being masked by “OR-gating” of other items.

In our original series of “13 Things That Saved Apollo 13” Woodfill explained how the Apollo 1 fire – as tragic as it was – contributed to the success of future Apollo flights and the saving of Apollo 13 by the design improvements in spacecraft components and systems.
“This resulted in the much improved, safer, more reliable Apollo Command Module,” said Woodfill.
Woodfill said the C&WS additionally helped — both before and after the fire — to reveal what in the manufacture of the poorly made initial Block One ill-fated Spacecraft 012 that contributed to the fire which cost the lives of the Apollo 1 crew in January of 1967.
“The Caution and Warning System revealed a myriad of glitches, flaws, discrepancy reports, squawks, oversights and shortcomings,” Woodfill said. “Yet, the warning system, in doing its job, led to design improvements in the next series of Apollo craft which included Apollo 13. Though compromised by a damaged O2 tank, Apollo 13 had numerous features added as a result of the terrible Spacecraft 012 fire.”
Woodfill’s part in improving the system was key. Both the Command and Lunar Module’s C&WS were improved following the fire, and were thoroughly reviewed to assure all systems were safely upgraded to avoid the kind of failure which killed the Apollo 1 crew. These improvements in the Lunar Module’s C&WS are listed in the Apollo Experience Report Woodfill co-authored as the Warning System Engineer, which can be read here.
“Had not the Caution and Warning System helped alert NASA and the contractor team to how badly the original command ships were made, likely Apollo 13 would have not survived the oxygen tank explosion,” said Woodfill.

Previous articles in this series:
Part 1: The Failed Oxygen Quantity Sensor
Part 2: Simultaneous Presence of Kranz and Lunney at the Onset of the Rescue
Part 3: Detuning the Saturn V’s 3rd Stage Radio
Part 4: Early Entry into the Lander
Part 5: The CO2 Partial Pressure Sensor
Part 6: The Mysterious Longer-Than-Expected Communications Blackout
Part 7: Isolating the Surge Tank
Part 8: The Indestructible S-Band/Hi-Gain Antenna
Part 10: ‘MacGyvering’ with Everyday Items
Find all the original “13 Things That Saved Apollo 13″ (published in 2010) at this link.